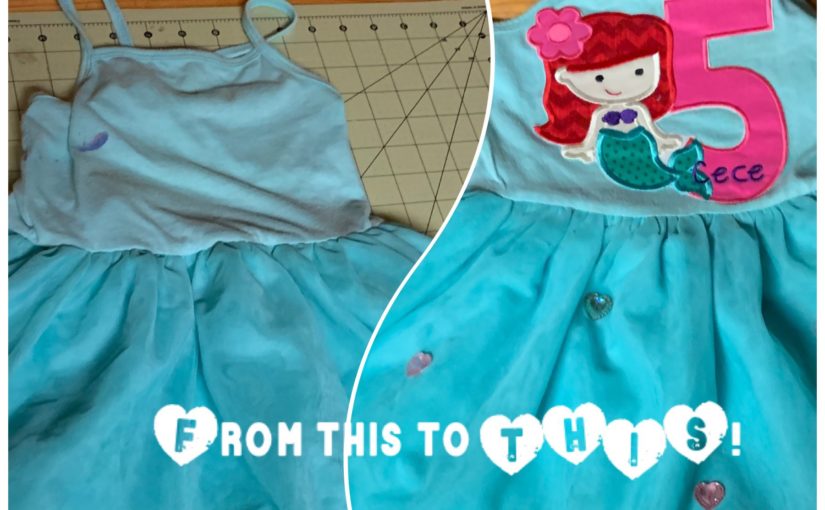
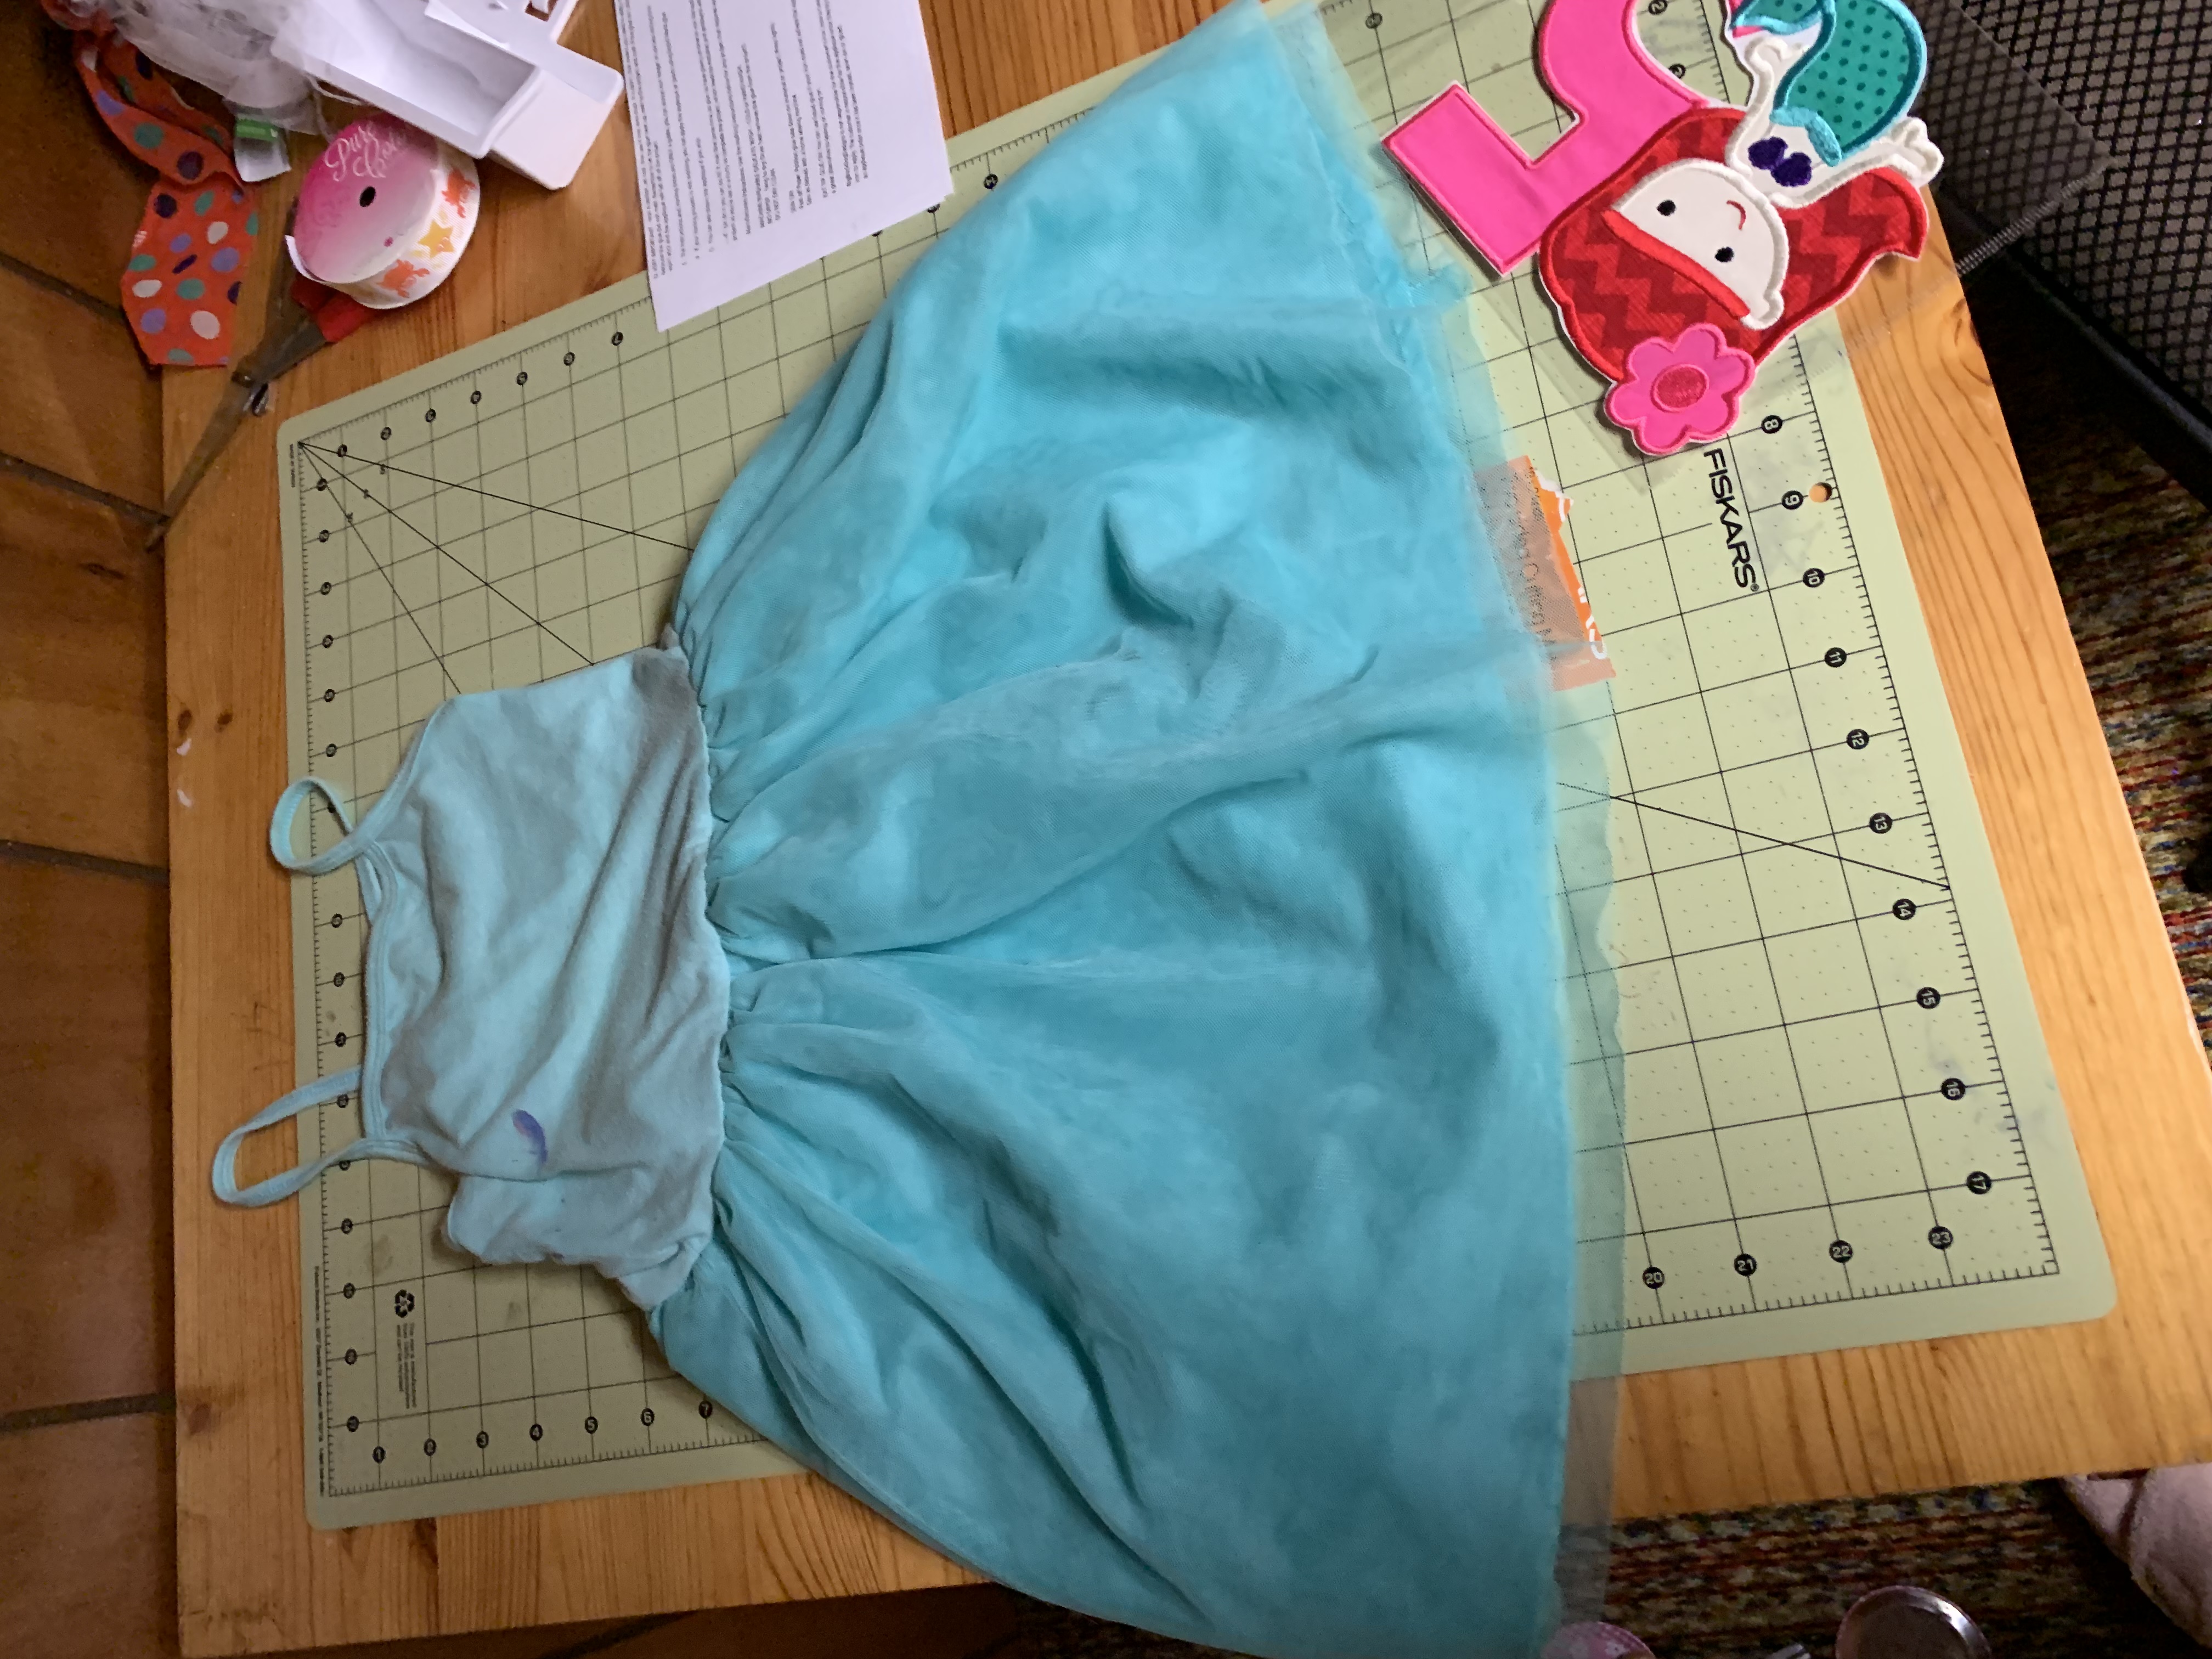
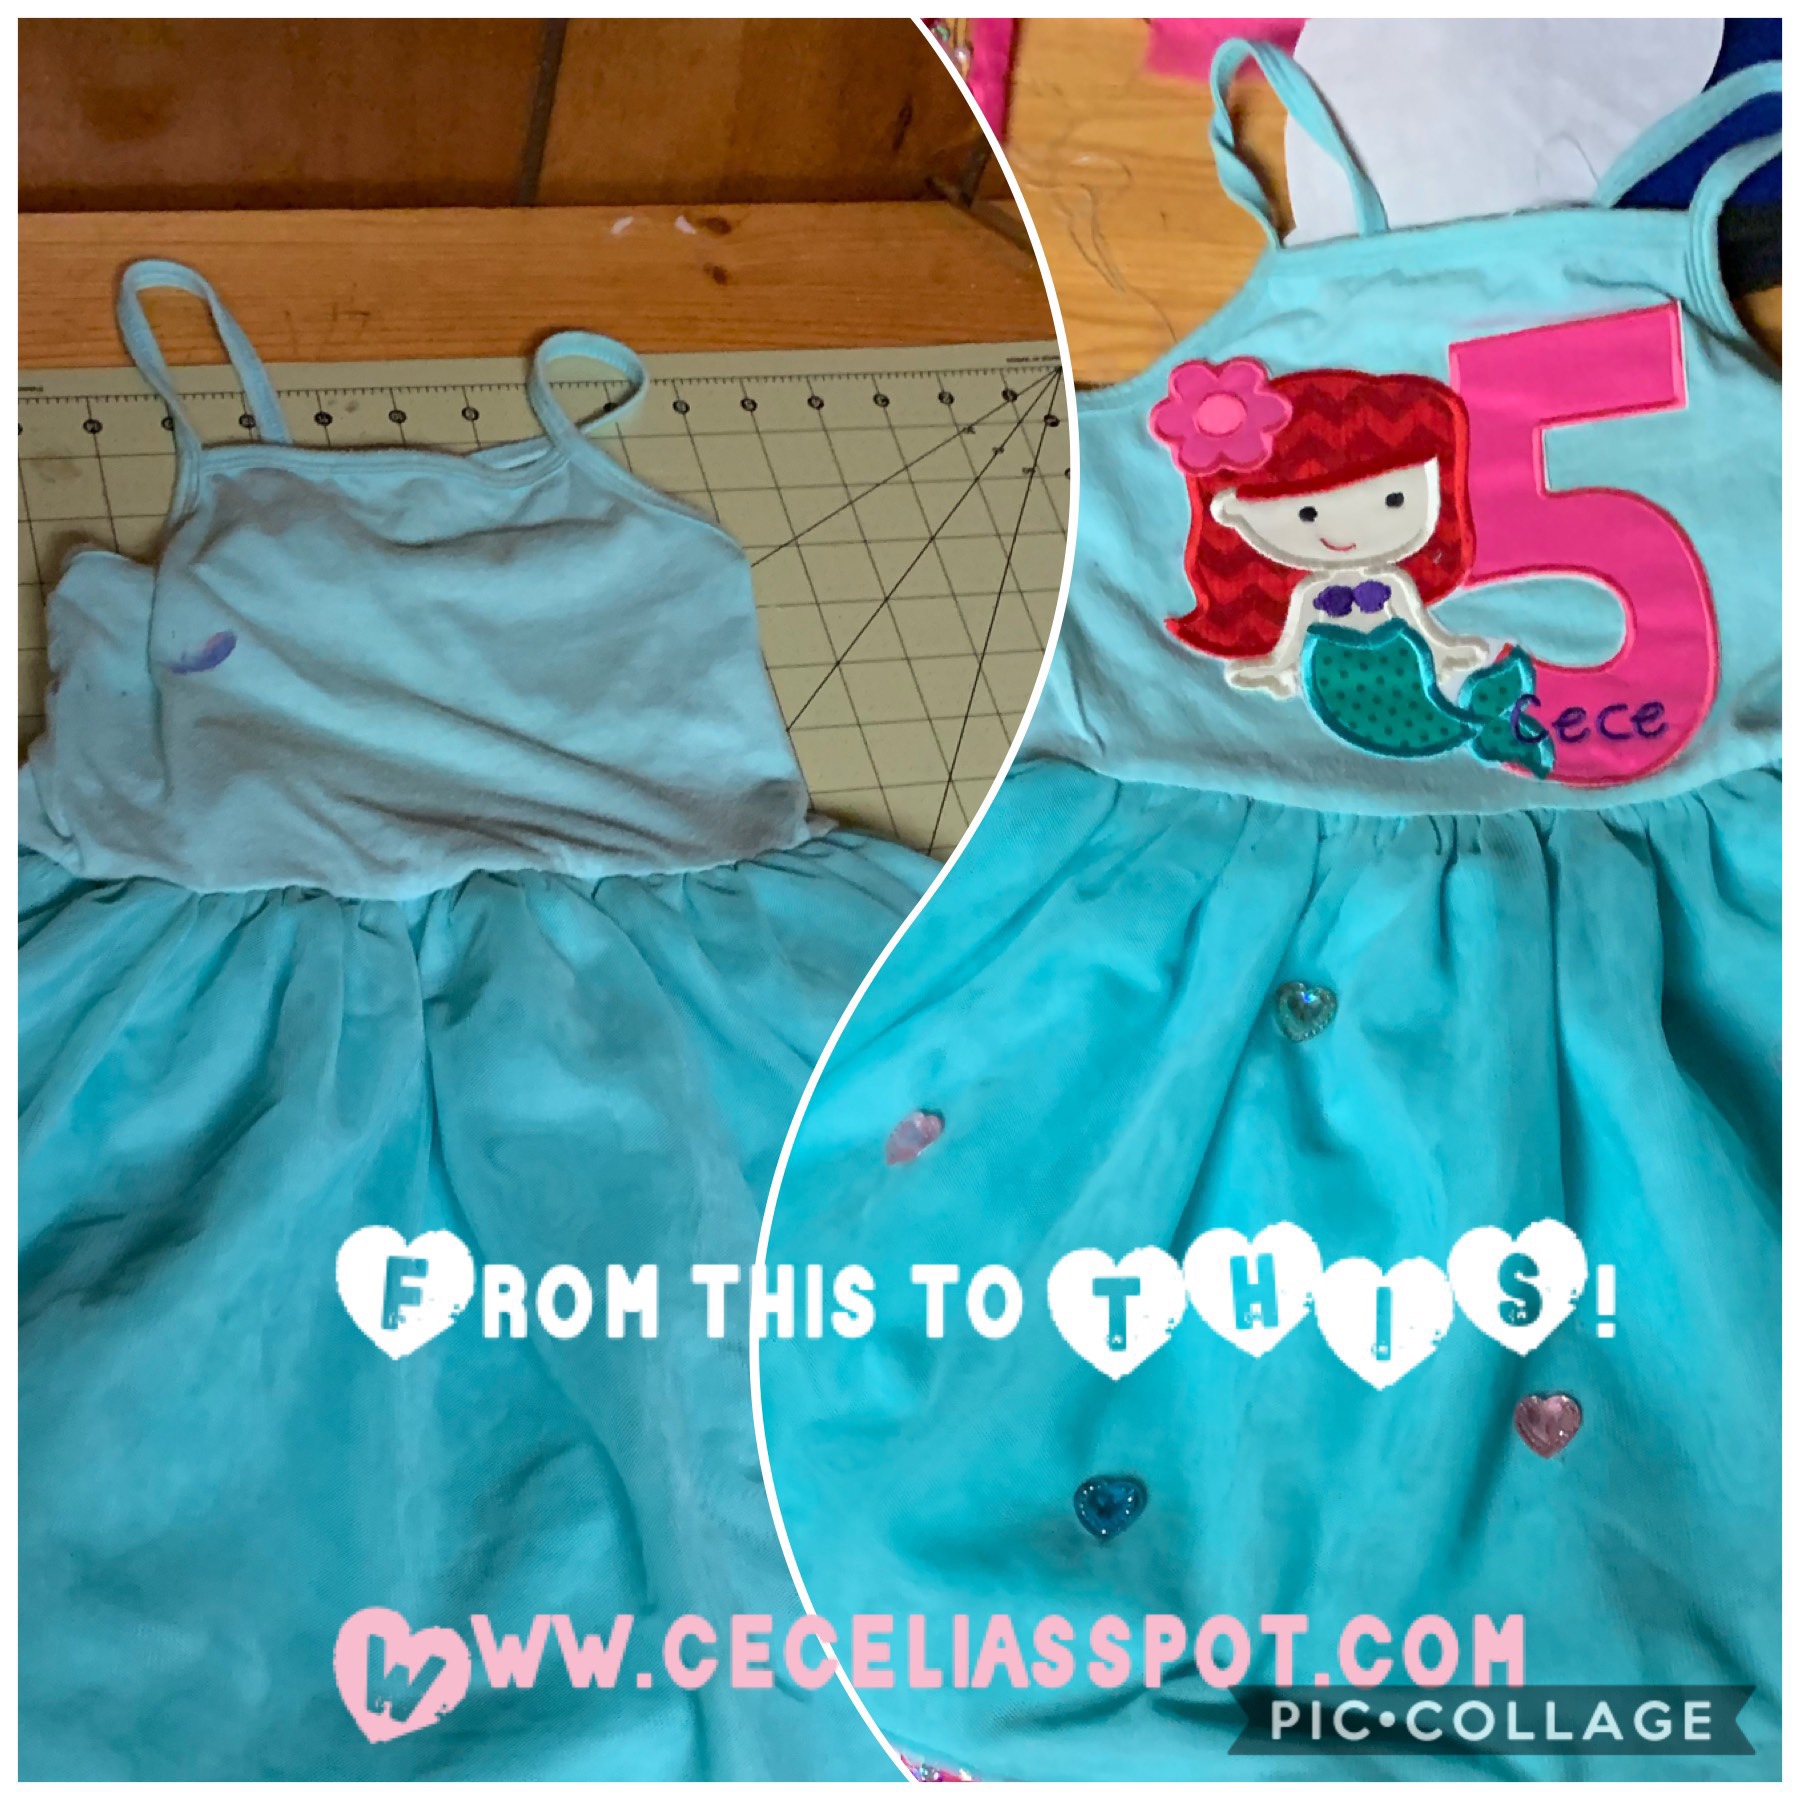
This time I just didn’t have time to make a full princess dress, who does when the kids are little? So last minute I used a plain tutu dress that actually has paint stains I couldn’t get out on it! Don’t worry, they get covered up!
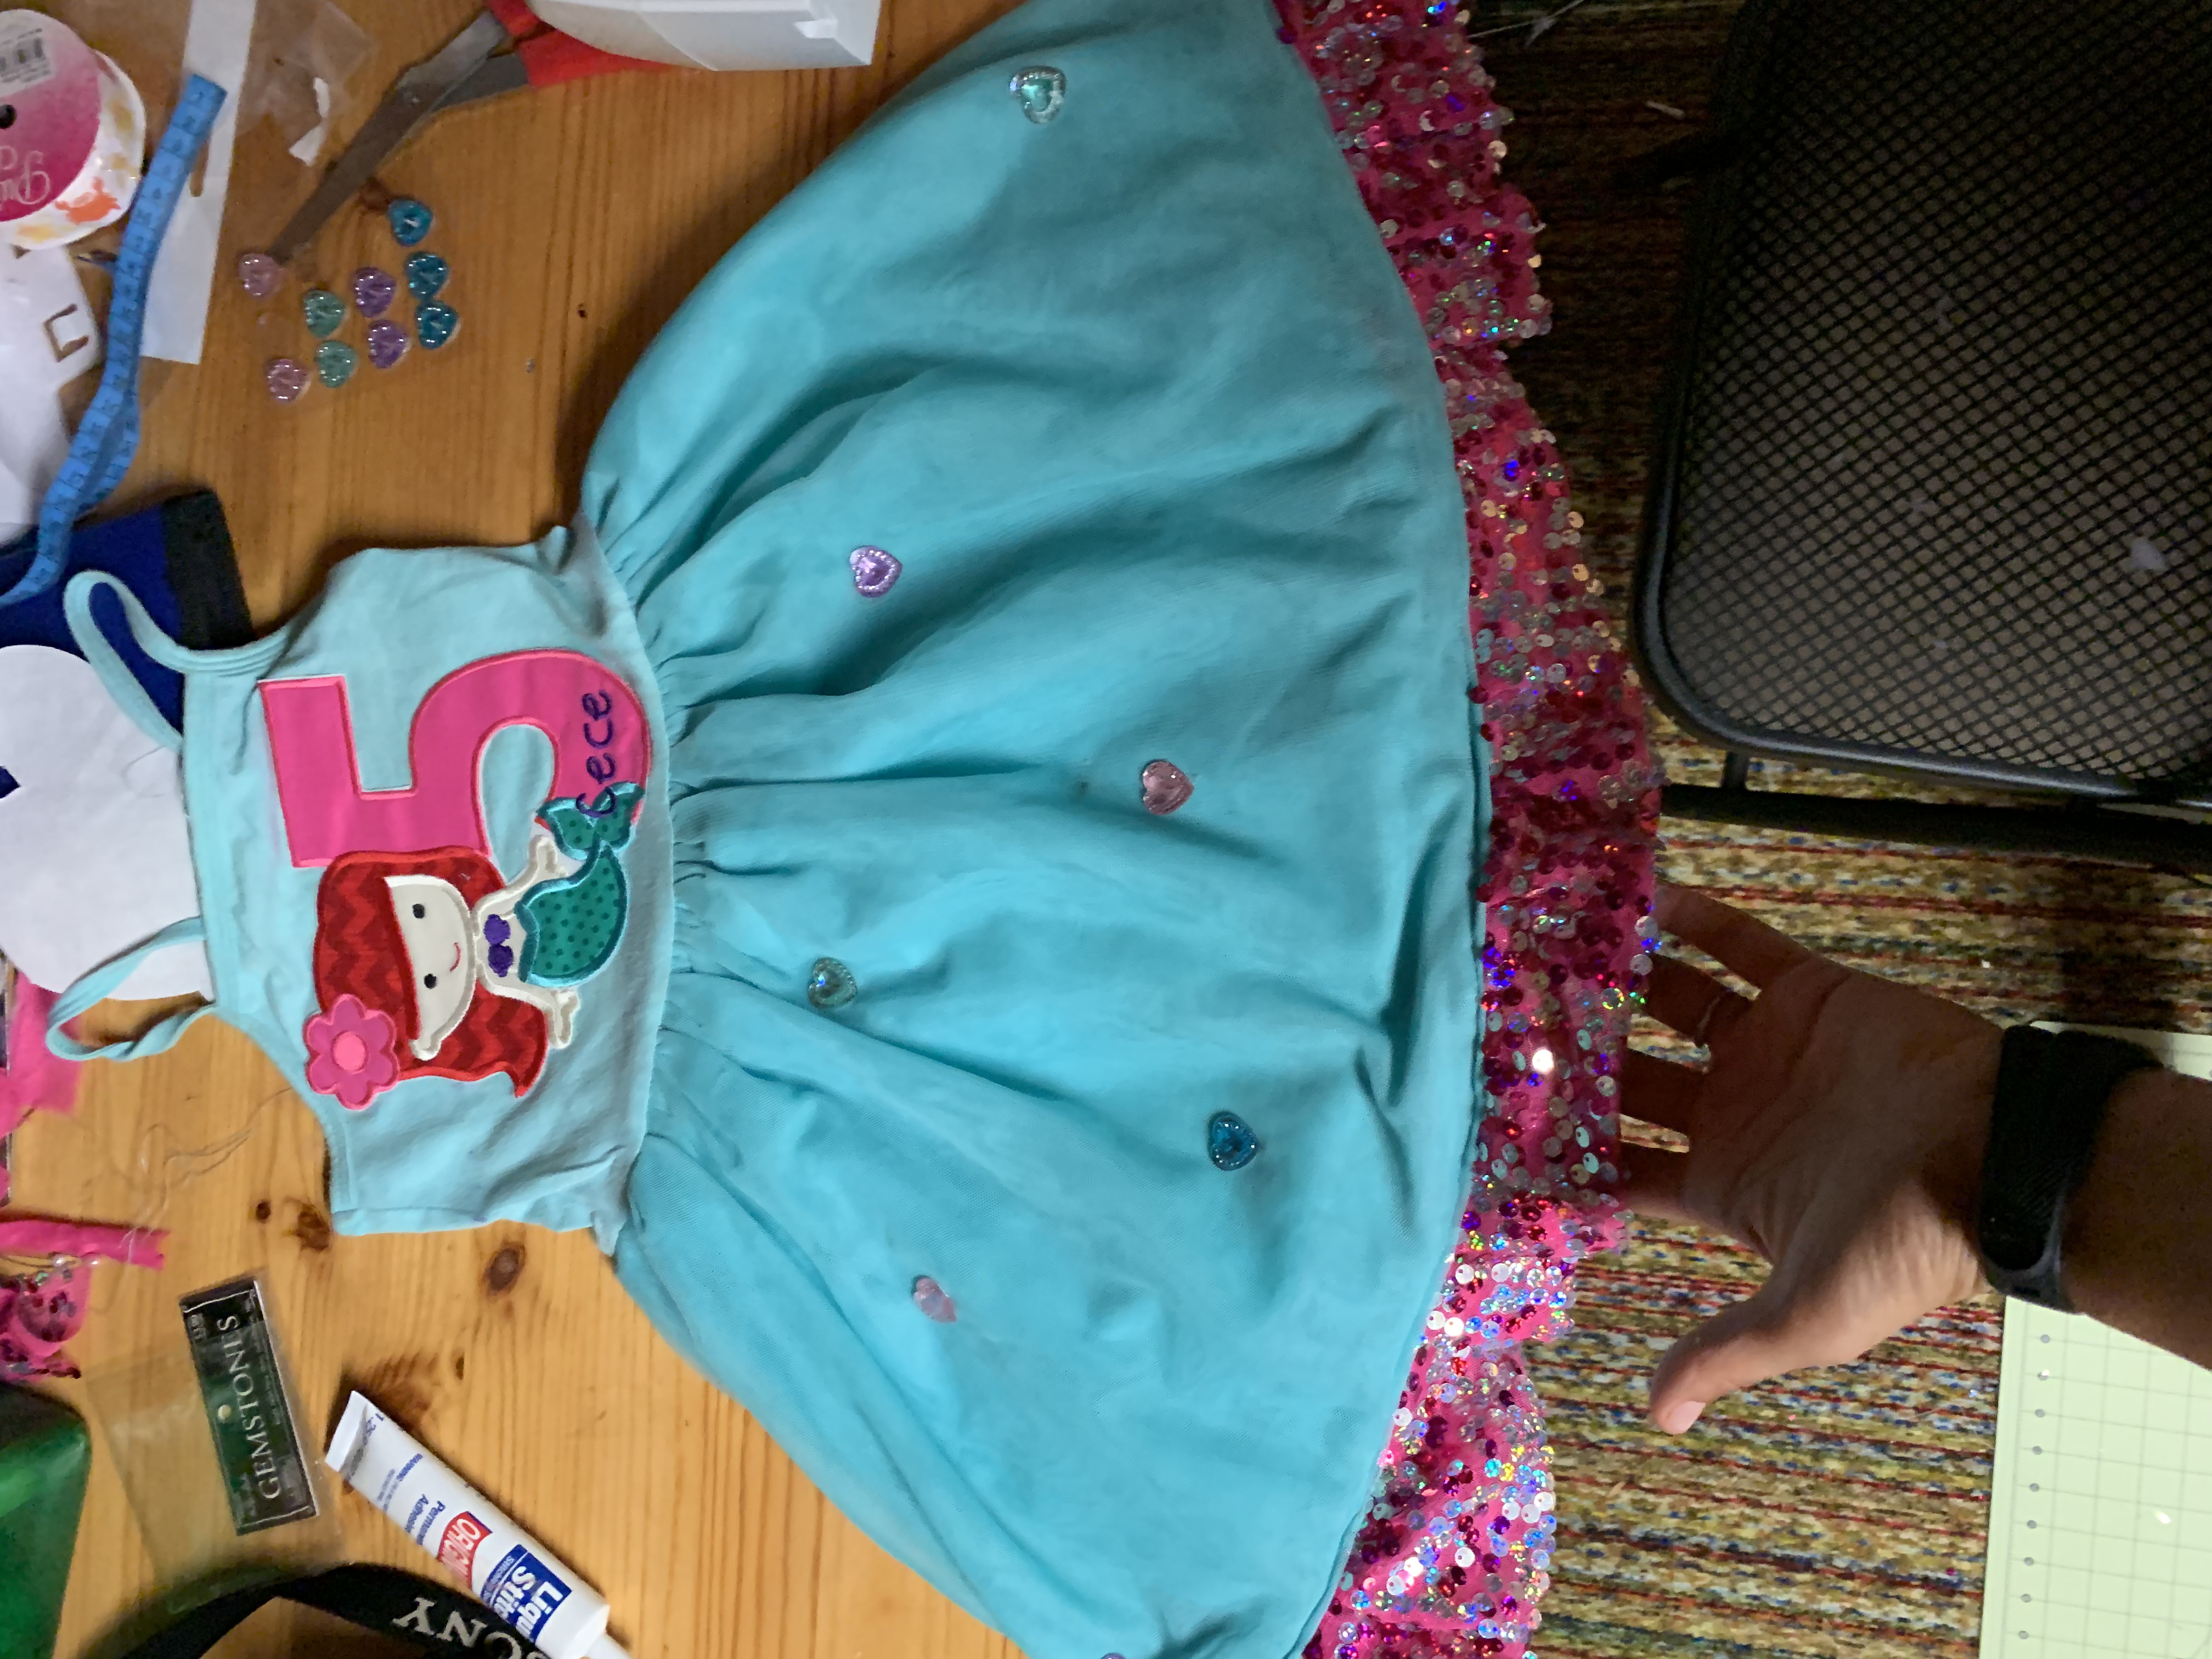
Then I ordered a special mermaid appliqué with the number 5 for my daughters birthday off of Etsy. I also had some leftover sequin fabric I wanted to add to the dress.
I used the sequin fabric and sewed it all
Around the bottom inner layer of the dress. Then I added the patch and wow what a difference with that easy change! I was going to add some puff sleeves but the weather was warm so I ended up keeping it sleeveless.
Purchased an assortment of gem heart stickers and used fabric stitch glue to place them on the dress!
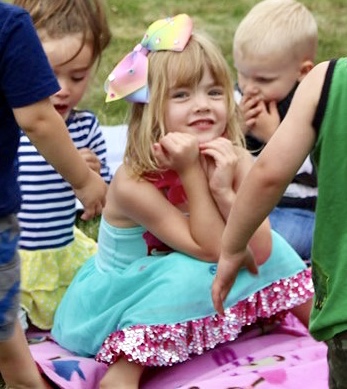
This can be done easily and quickly and you have a birthday dress! You can add sleeves, bows, a sash or belt!
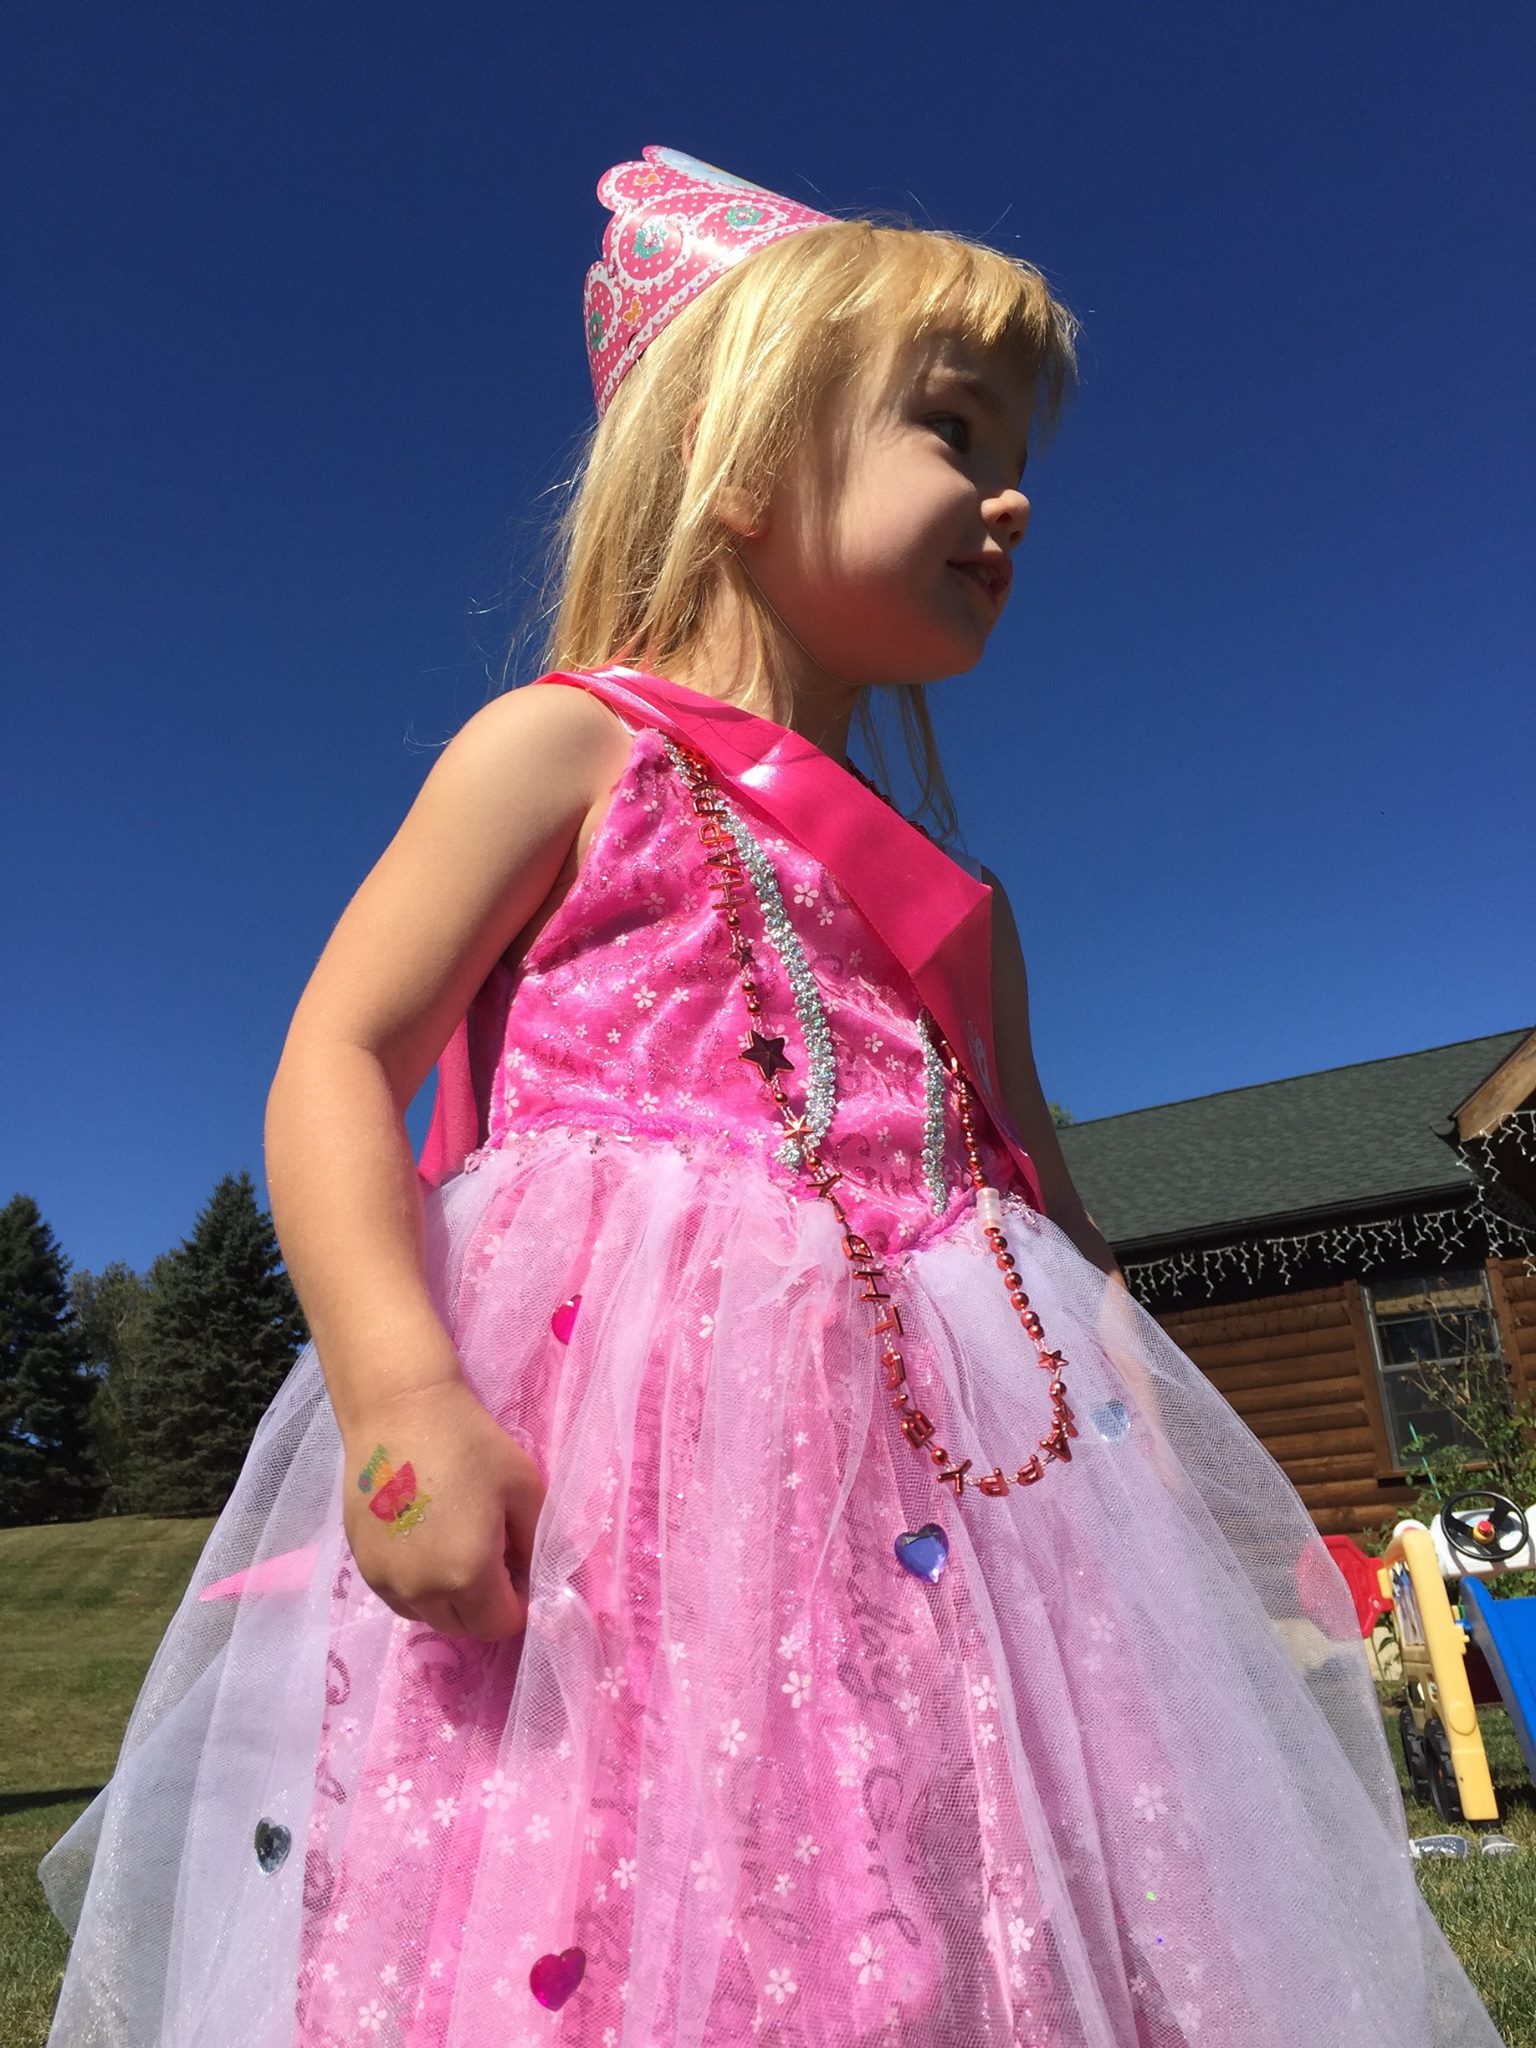
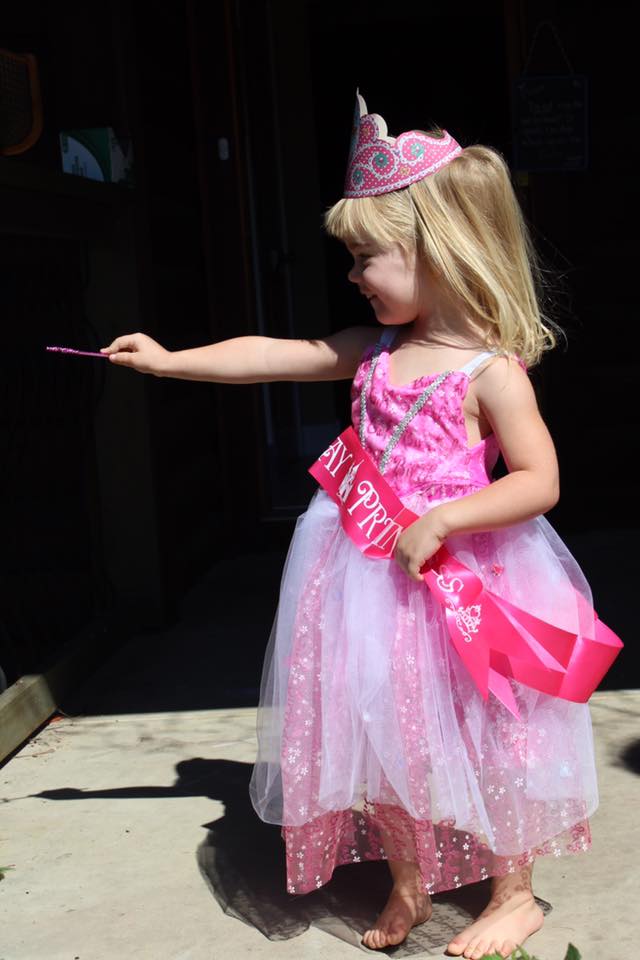
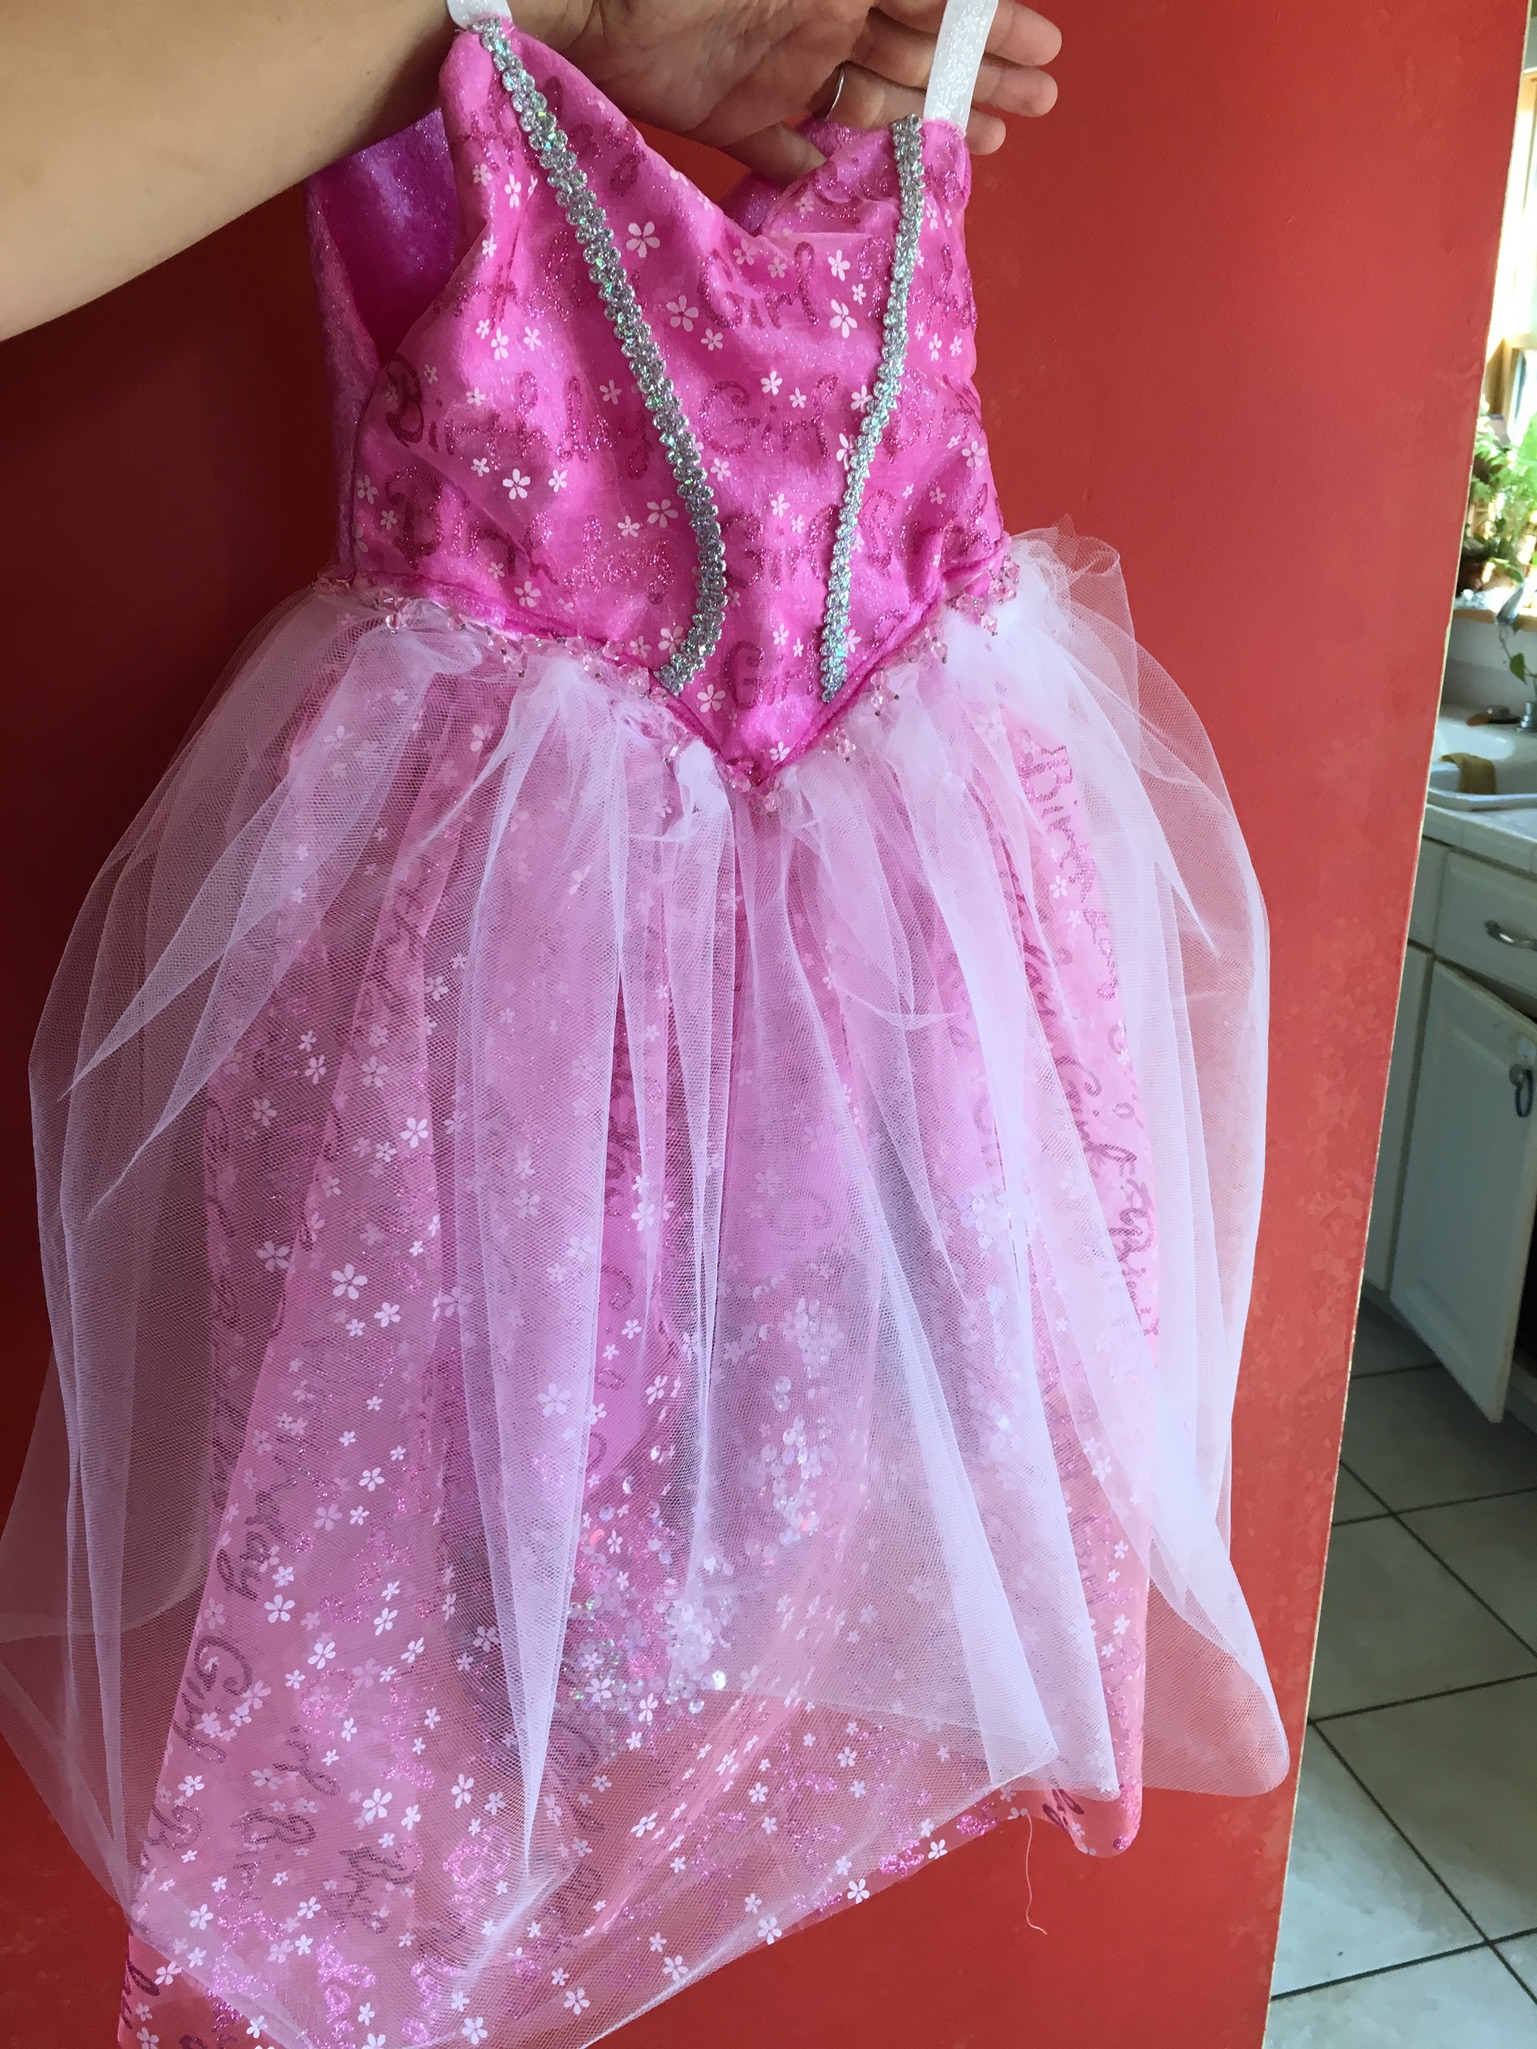
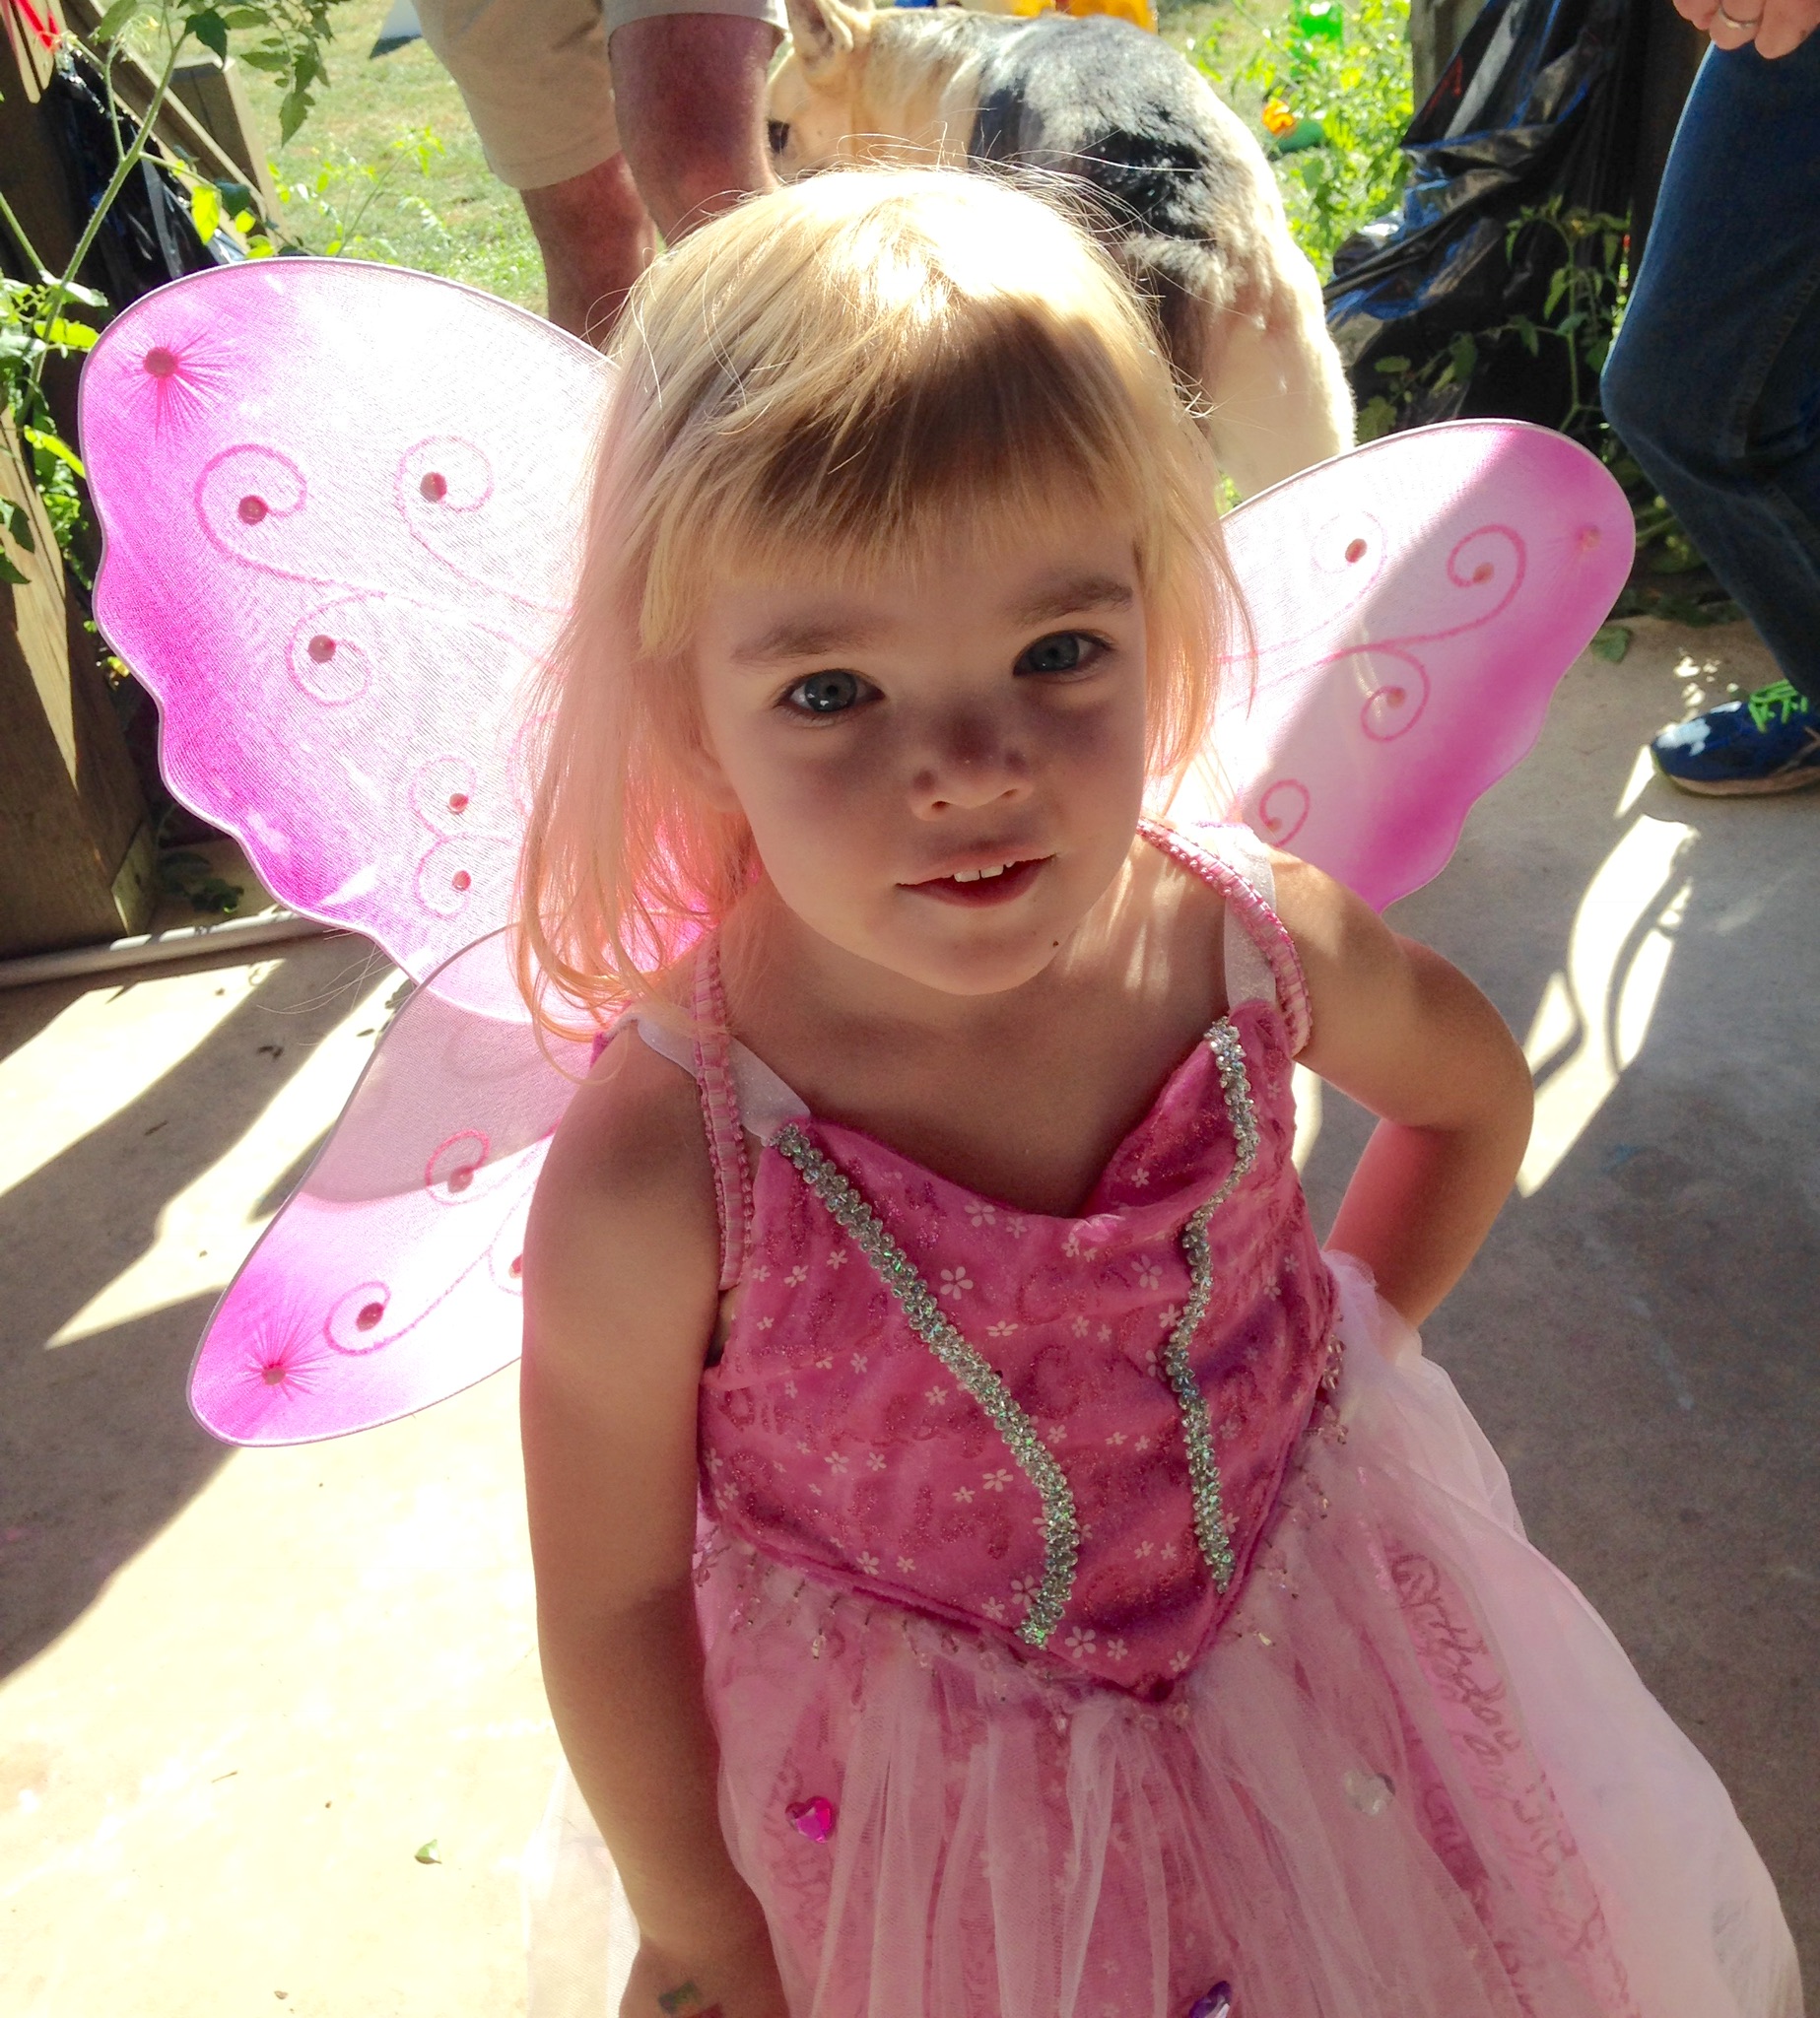
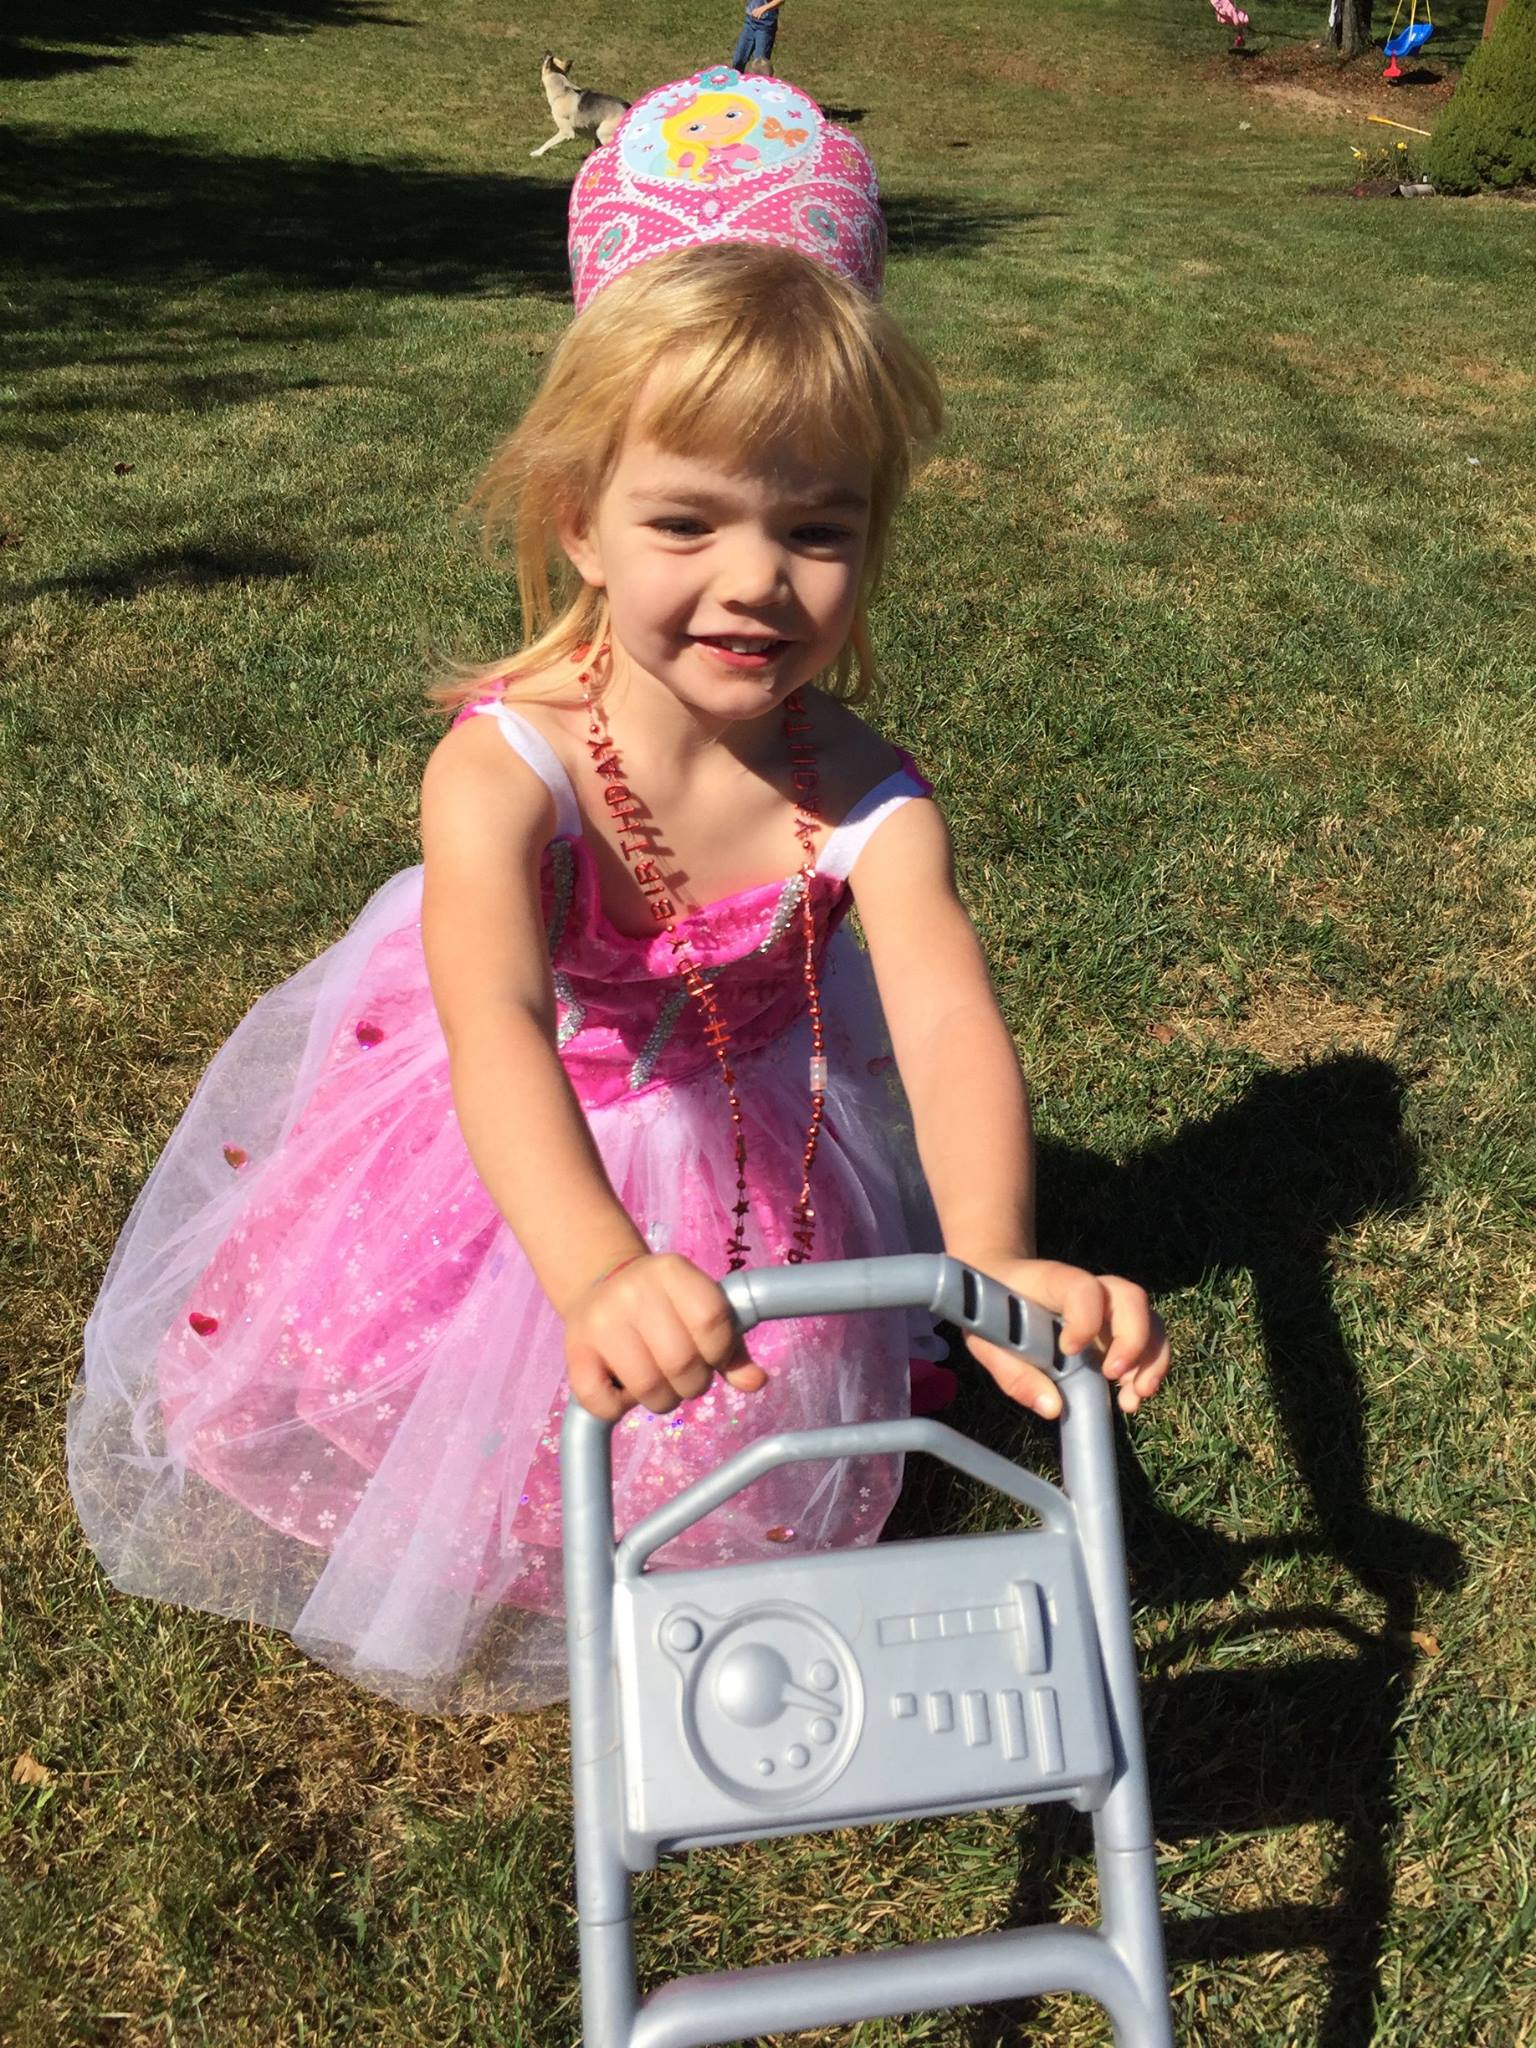
My daughter has recently developed an interest in princesses and playing dress up. I decided to take on the challenge of sewing a princess dress. I’ve made many dresses, including the princess-like 1st birthday dress, but I wanted to make something different, so I did some research and then bought fabric I thought she would love, and designed a dress. I made several adjustments during the process and added embellishments.
Since I did this all during the process of making it, I decided to take pictures instead of video like I usually do.
There is no pattern for this since I designed the dress as I went. I used one of her regular party dress to eyeball the correct sizing for a 3t dress. (This is what you can do too!)
So below are pictures and some steps. If you want to design a similar one just use a dress to get an idea of the sizing. I don’t work with a lot of tulle sewing, so it didn’t turn out the best, but I’m proud of the end results, and she loves it too!
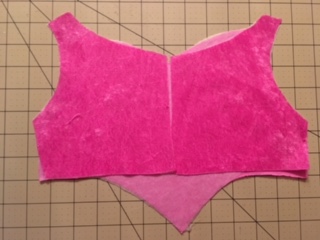
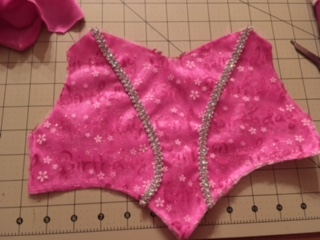
So I first made the front and two back pieces. You can copy these shapes from the picture and use a dress for sizing.
I ended up making another three pieces (another front and two back pieces) and using it as the inside of the dress. So I took pattern facing pattern for the front piece and left a 3 inch space to pull it right side out. Then I sewed this shut and ironed it all. I also used sparkly elastic and pinned it in between the pattern facing pattern (this is what I should have done but forgot and ended up just sewing it to the top).
I also added a tulle happy birthday and two pieces of silver design on the front. You can add or not add as many embellishments as you want.
Next, I used interfacing ironed on both back pieces and then used white hair ties cut in half. I pinned the half hair ties facing inwards in between the pattern facing pattern pieces then sewed all the way around except a 3 inch area and pulled it right side out and sewed then ironed it.
Following that, I placed the two back pieces on the front pattern piece and sewed the sides and then folded them back to have the top finished.
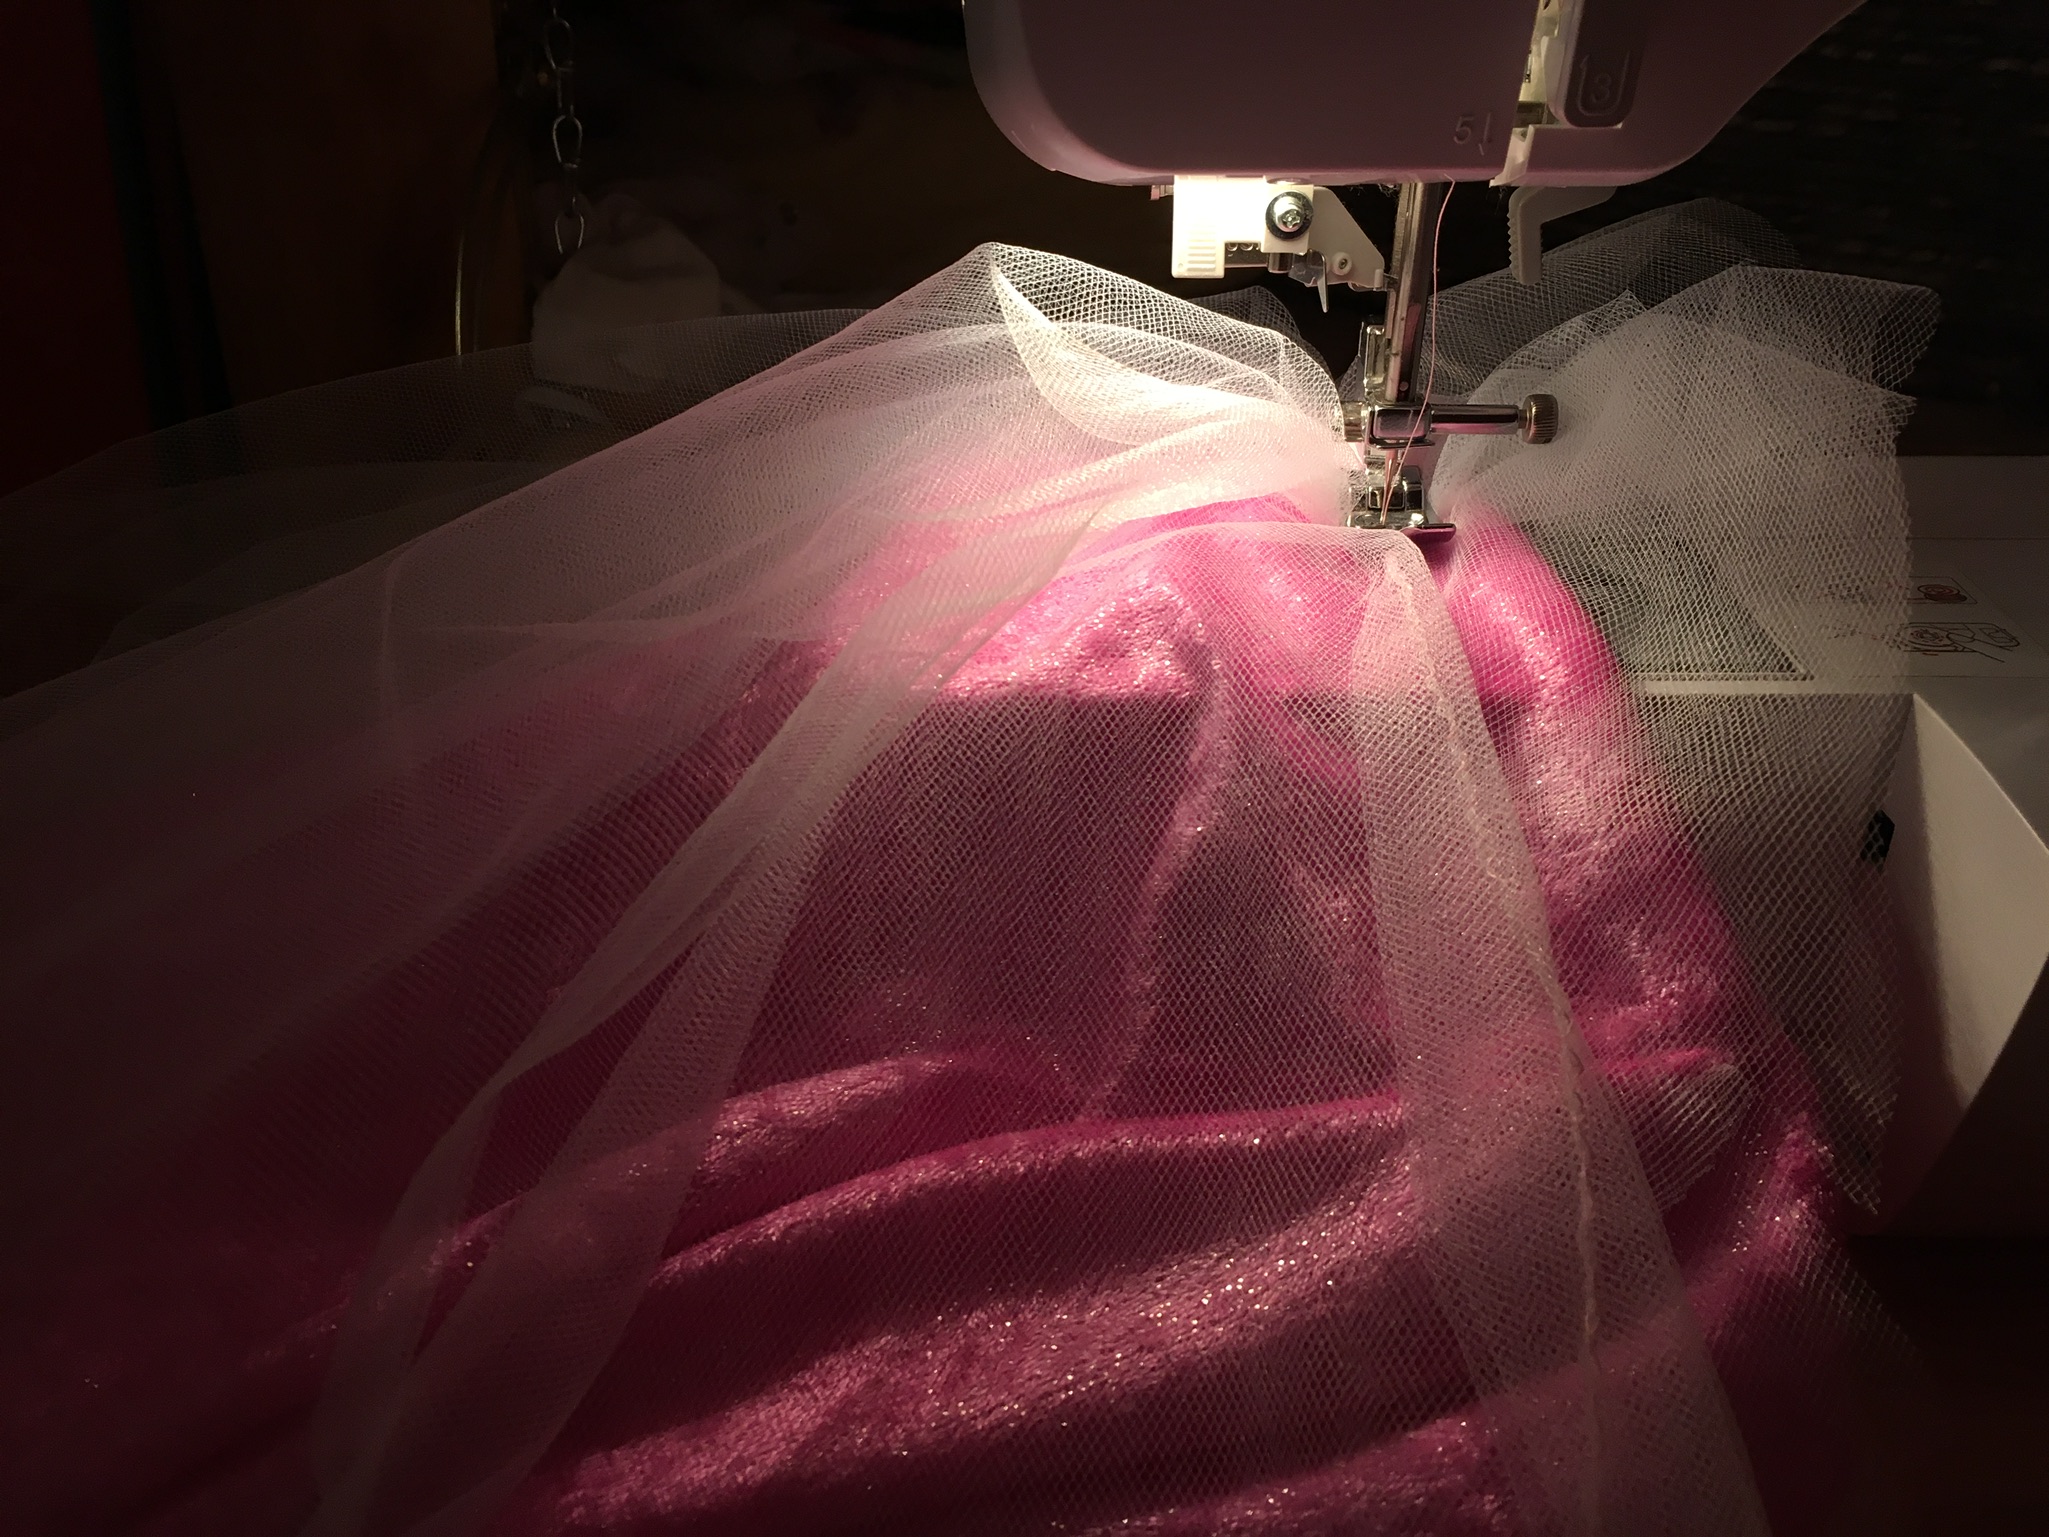
I then measured the skirt by measuring from the top down to the right length for my daughter with a measuring tape. I used the soft fabric of the top for the under-skirt and then cut happy birthday tulle and tulle for the skirt. i made the white tulle width three times the width length since I will gather it to make the skirt more “poofy.” I then gathered the tulle using the easy method of dental floss, on top of the soft under skirt. With this method, you use a large zigzag over the floss and then at the end you pull the floss out and it is gathered!
Next I decided to use the happy birthday tulle and sewed it on as well. Then, I put the layers together and I put pattern facing pattern and sewed it all together.
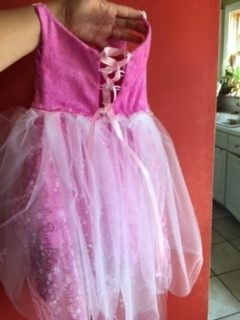
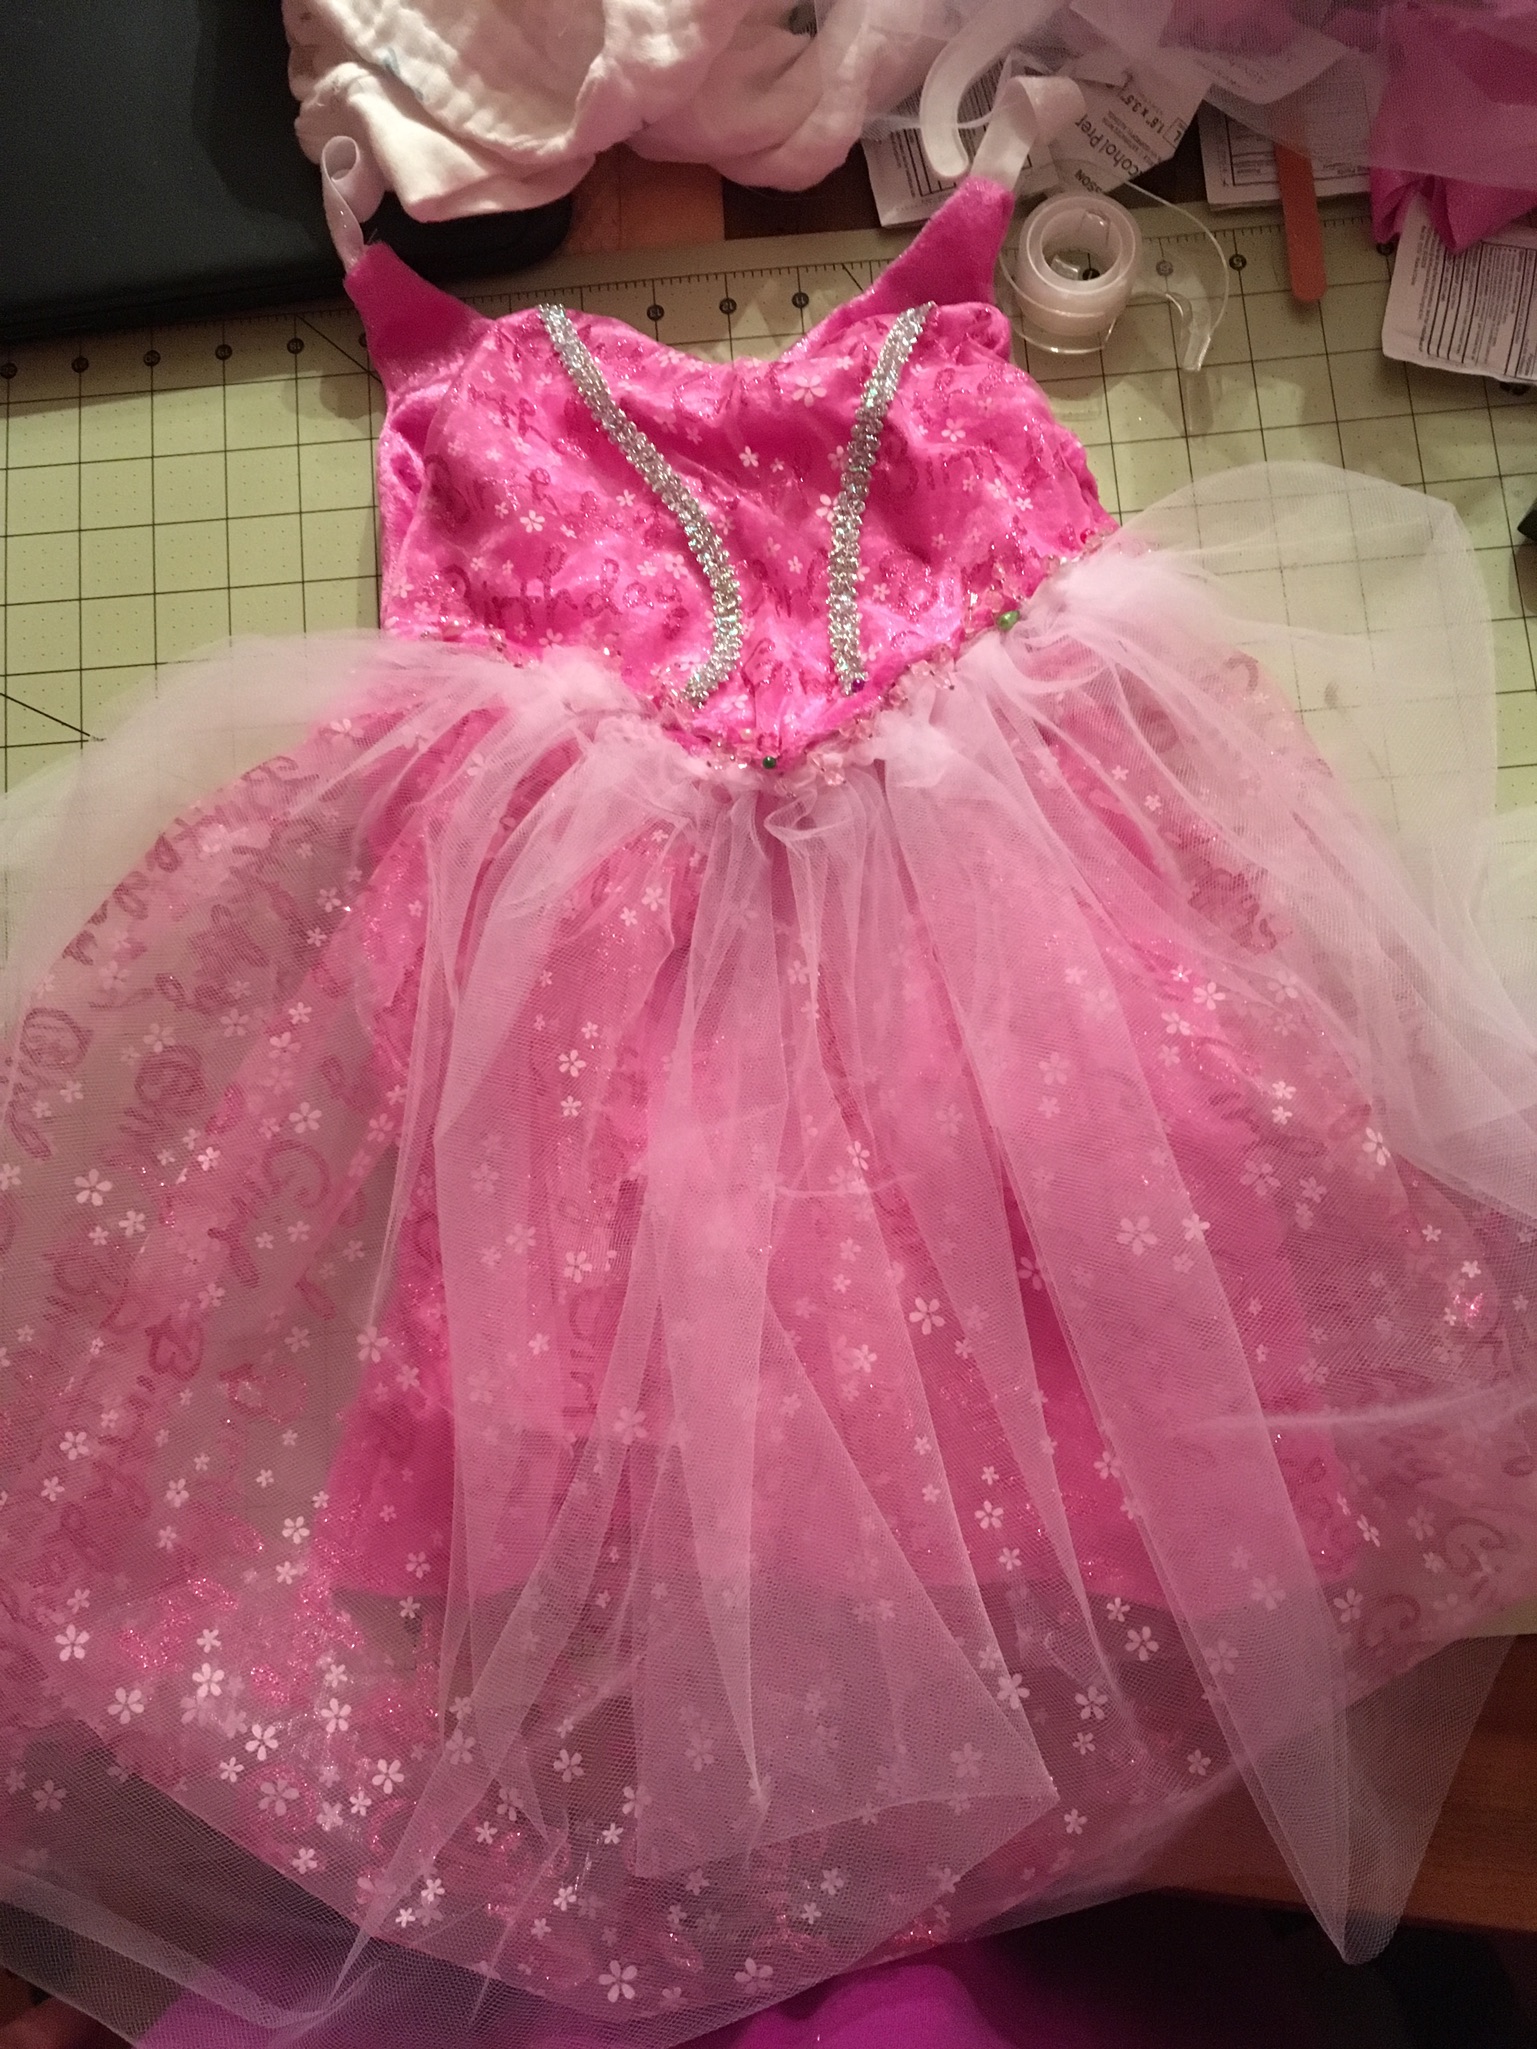
I ended up sewing on a bead embellishments on ribbon in between the top and bottom.
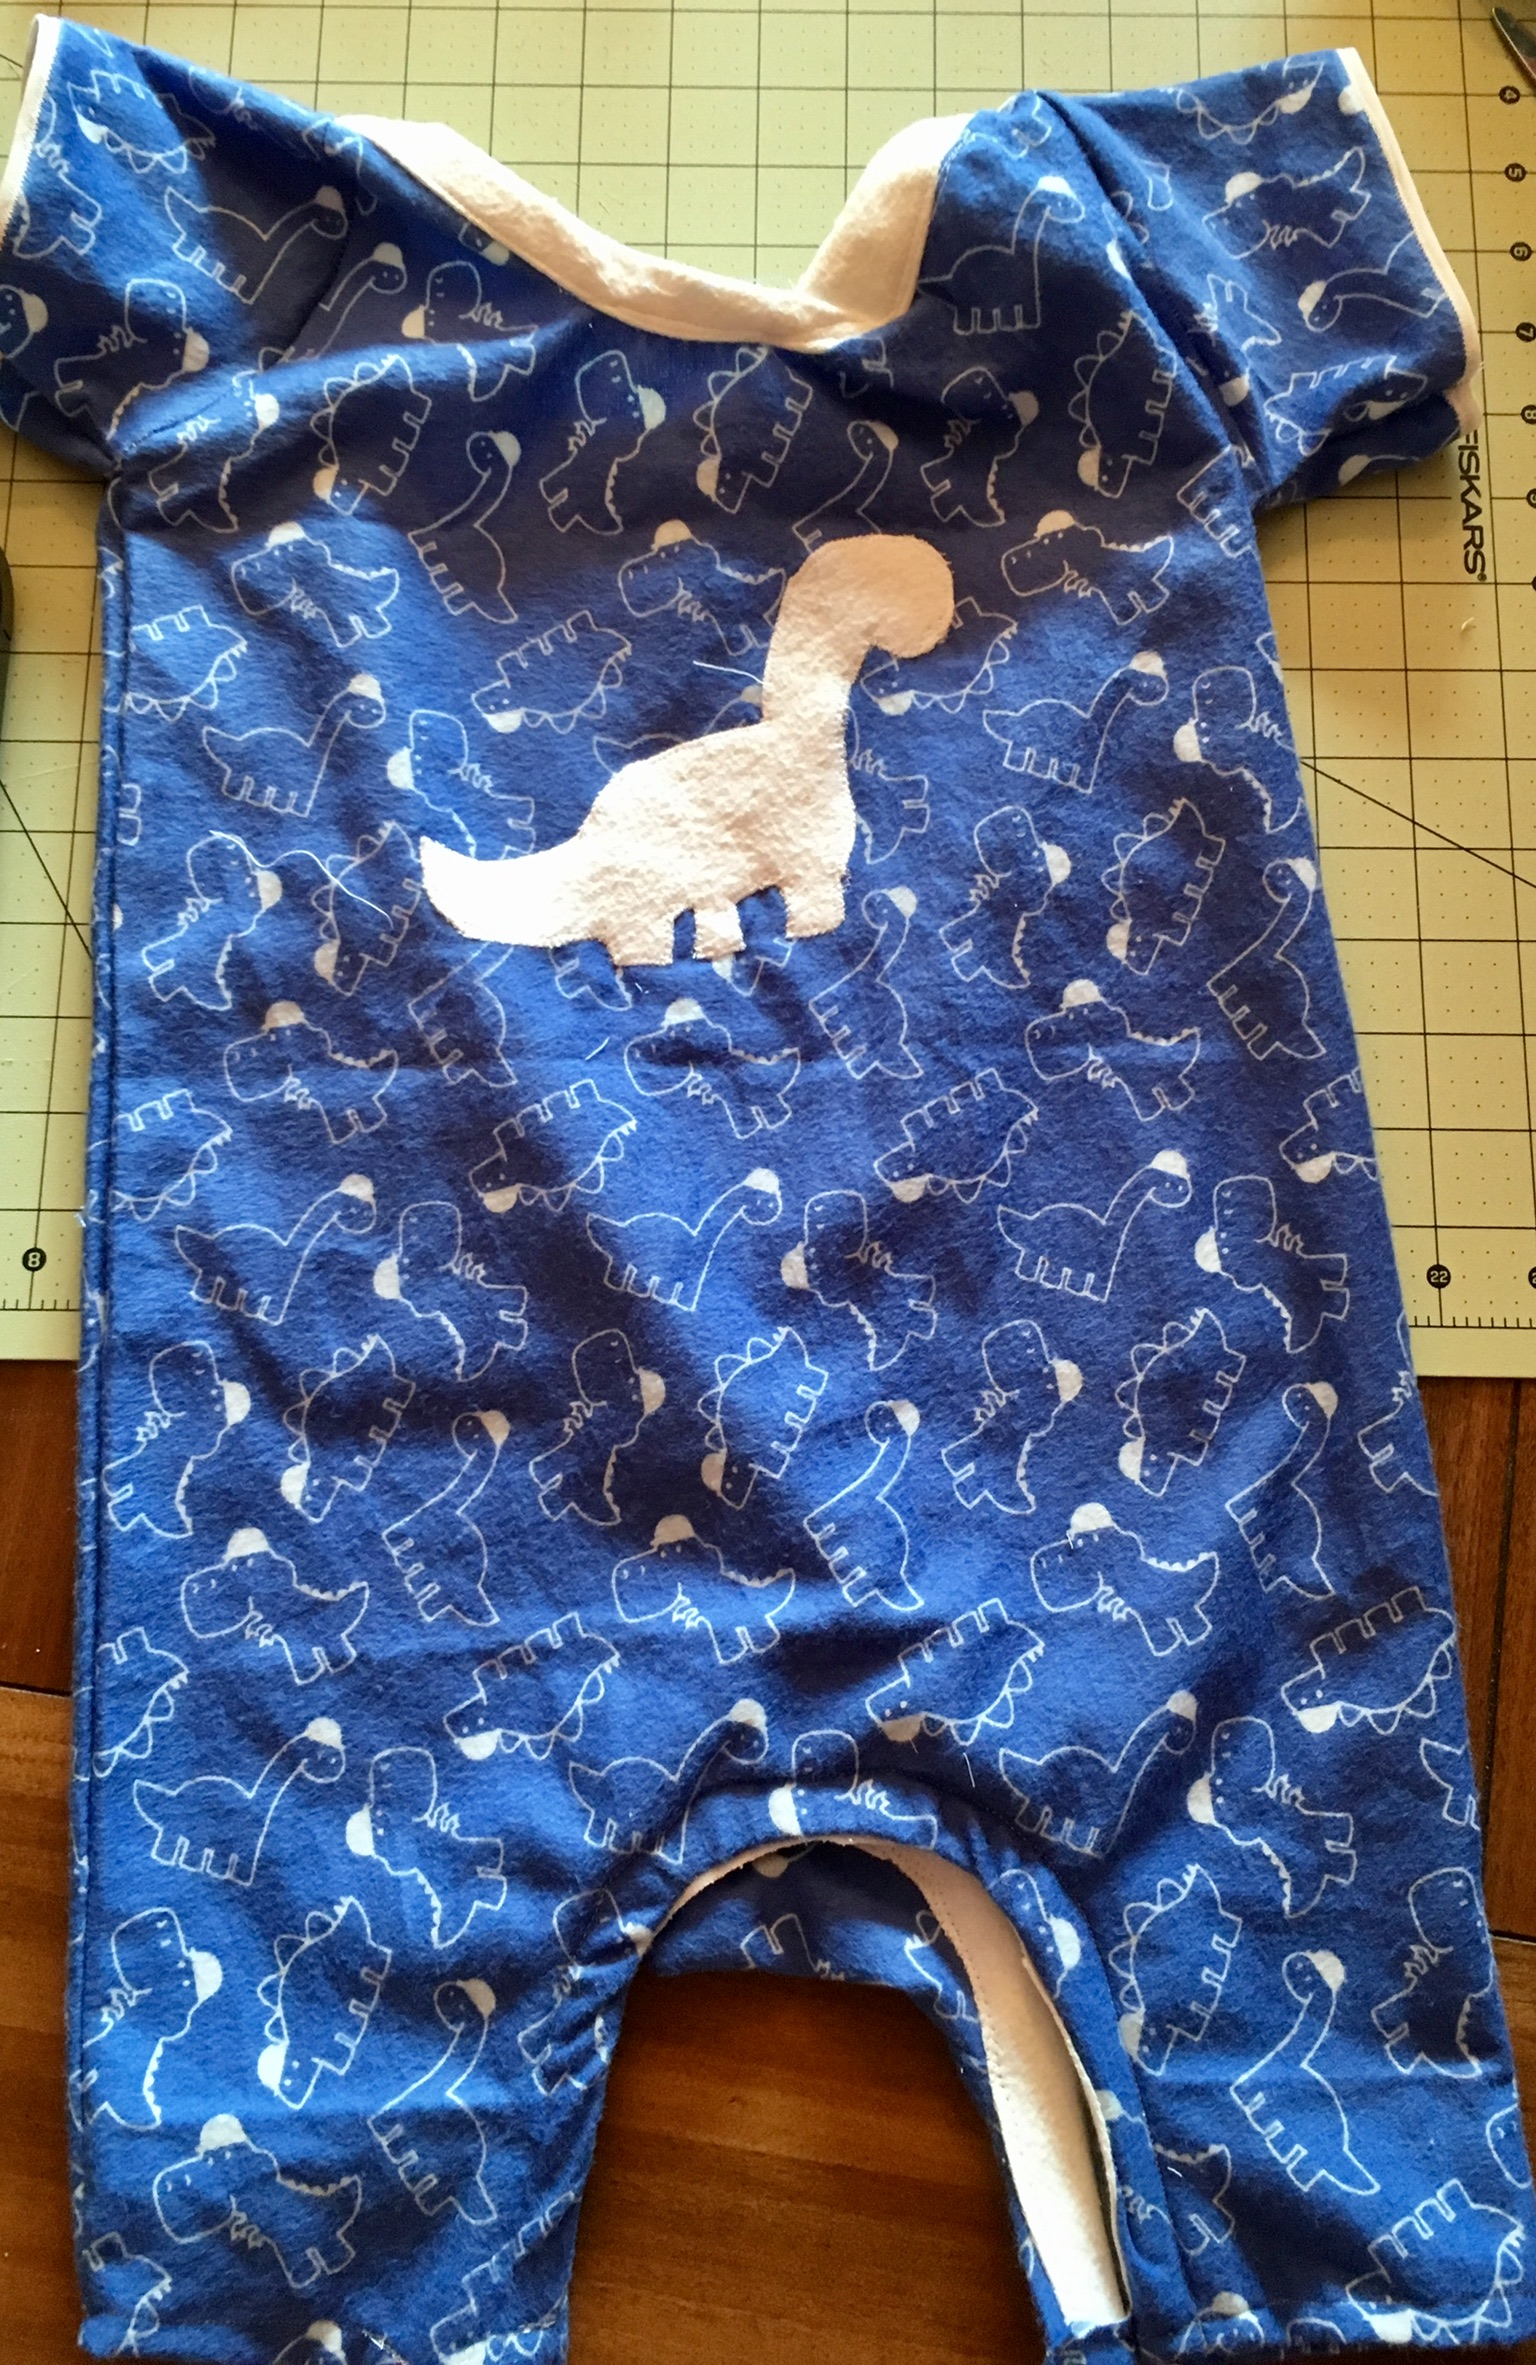
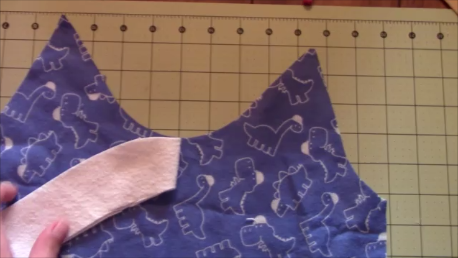
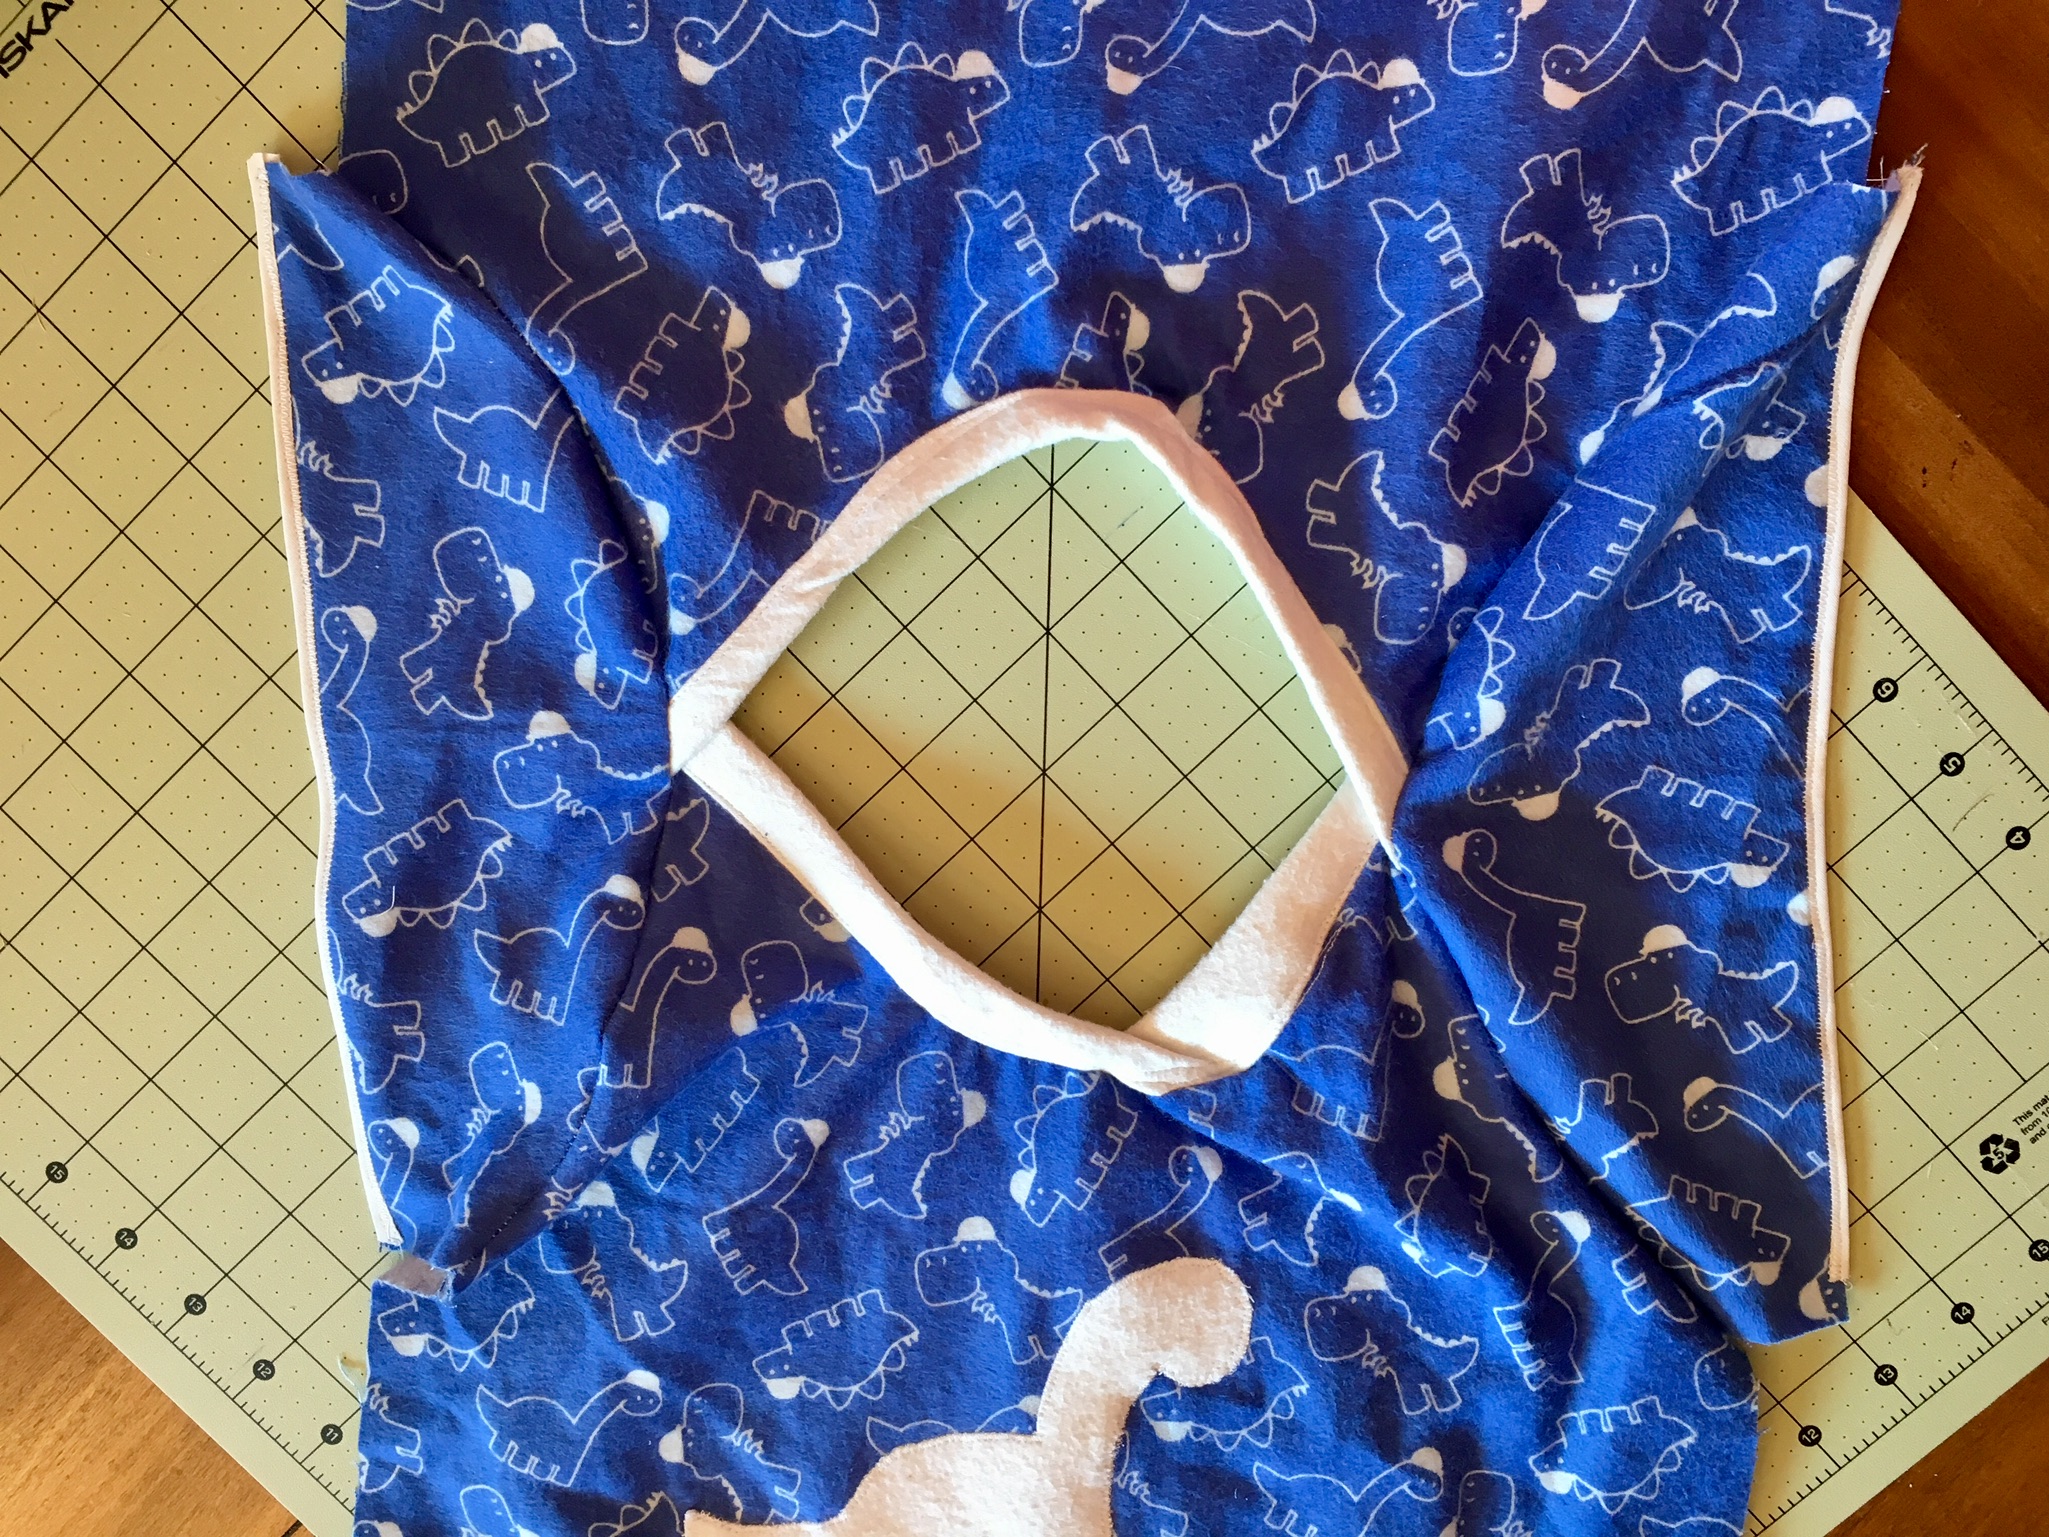
I decided it was time for the classic romper tutorial to come out. I decided to make my first one with a free pattern of dinosaurs for my little cute nephew for his first birthday! Now the size is 2-3t since he is not so little. But you can easily adjust the pattern to your little ones size, just size it up with one of your little one (or big ones) outfit and adjust! Easy Peazy!
Here are the parts of the free pattern..this is a 2-3t however just hold up a onesie or romper to the pattern and adjust for smaller or larger!
Also see the photo with the pieces cut out or the tutorial to see how they go together if you can’t tell!
Here is the written one besides what is written on the tutorial:
What you need:
Fabric choice 1-2 yards depending on size. I used flannel fabric
If you want an alternate color/fabric for for neckline and bottom (a stretcher fabric is best)
Snaps/buttons/or velcro depending on what you want to use
Steps:
Cut out fabric pieces as written out on the pieces.
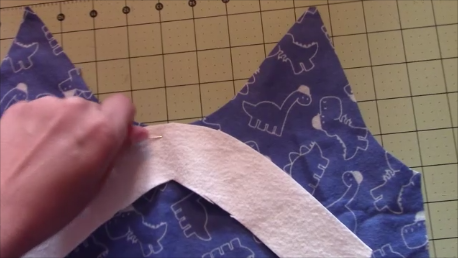
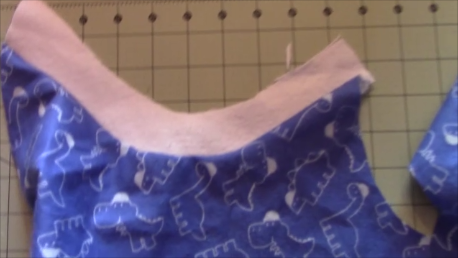
Take one main body piece and find the center by folding in half and one neckline piece (and fold it in half and mark the middle) and place pattern facing
pattern and stretch and sew. Look at the pictures below to see how you need to stretch it and sew (it is not easy if you are a beginner but it just takes practice! Also, if the neckline is a stretchy fabric it is much easier)
Line center to center
This is the end result, do for both main pieces
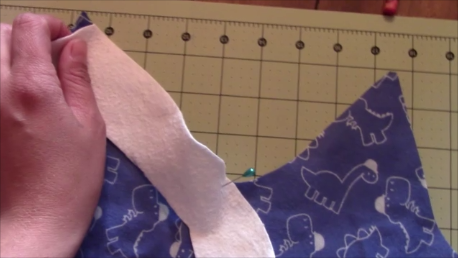
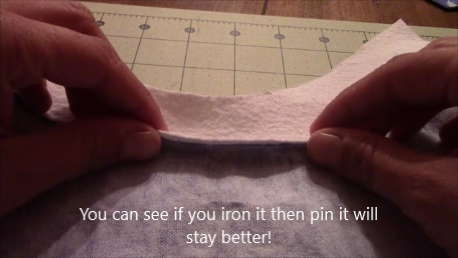
Turn to the backside of the main body piece and fold up and iron the seam line as shown below. Then fold the top down and iron to make it easier to sew and pin.
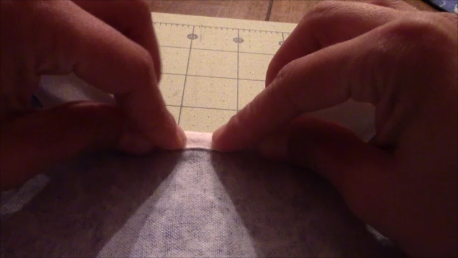
Turn it right side and either change pins to the front or be careful and take pins out as you sew bottom of collar
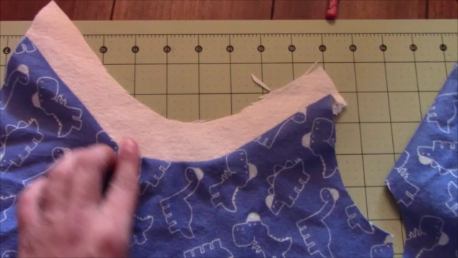
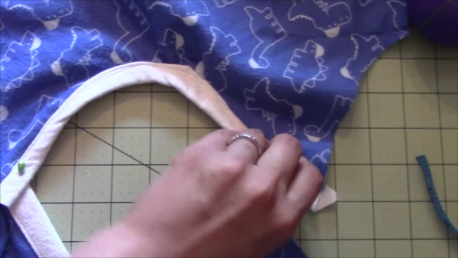
Sew both necklines like this then we will create an envelope neckline.
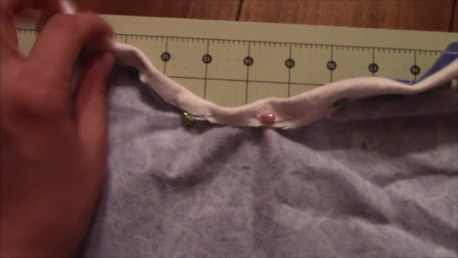
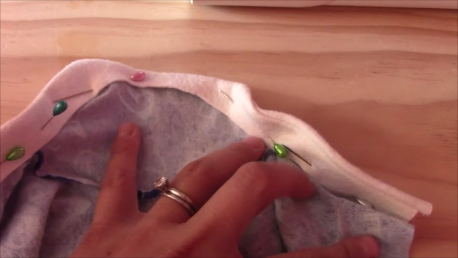
You are going to line up your front and back body piece with finished necklines and measure from the top of each side 1 to2 in down and this is where the top of one side touches the other side and you pin together (this may not be true if you need a bigger opening or smaller based on head size, adjust opening based on head size). Pin this on both sides
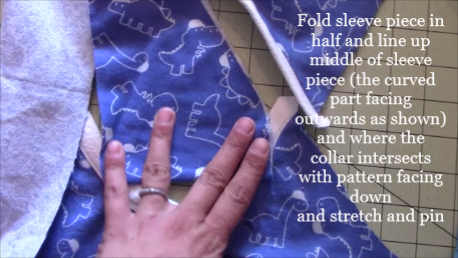
Fold sleeve piece in half and line up middle of sleeve piece (the curved part facing outwards as shown) and where the collar intersects with pattern facing
down and stretch and pin (see pics)
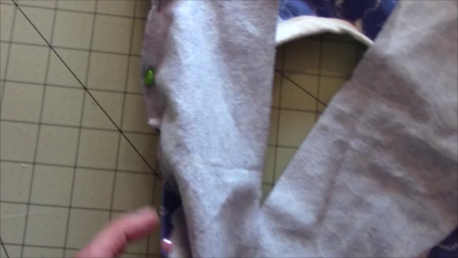
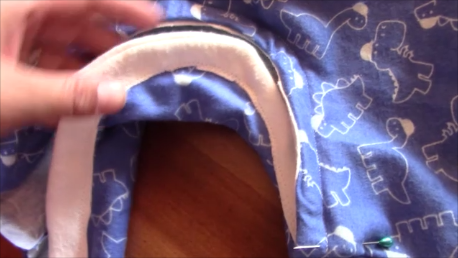
Then sew using a zig zag stitch (which keeps it strong). Do this for both sides and it will look like…
I then added double sided bias tape, for convenience and time saving, to the outside of the sleeve edge.
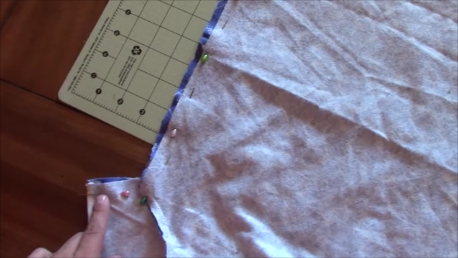
19. Body pieces and sleeve pattern facing pattern, pin around sleeve and down straight to bottom again I used the zig zag stitch. Then I trimmed the sides. Then you can iron it out.
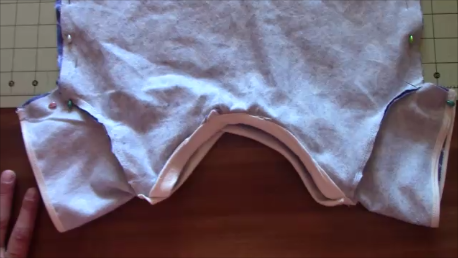
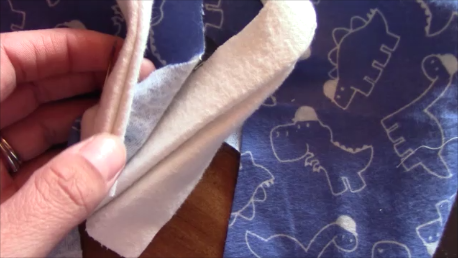
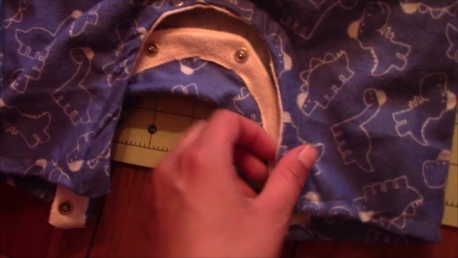
20. Turn your project to the backside and take your football piece and fold in half and line up middle of football with middle of opening pattern facing pattern, pin middle and stretch and pin around then sew. Make sure the front piece is pushed out of the way (you don’t want to sew it shut! Just sew onto the back piece
21. Take two of your leg banding strips and line up pattern facing pattern and sew the outside 1/8th straight stitch and then do this for the other two as well and turn right side out and iron.
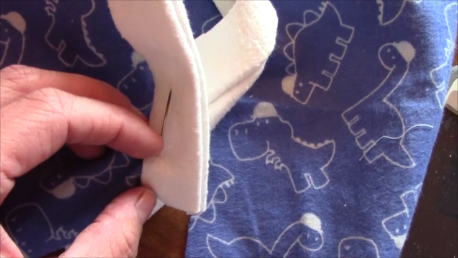
22. The binding piece ends up in the inside and it is used for the buttons or snaps (you can alternatively use fusible interface)
23. Next take your one banding piece and line it up with the front bottom with the fold on the inside and then stretch and sew (see video if this is too confusing!) You pin the outside and sew 1/8th zig zag around
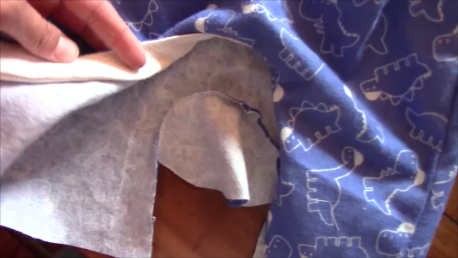
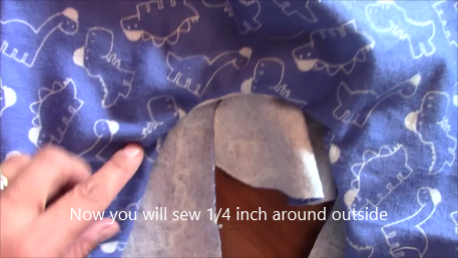
24. Now you will sew 1/4 inch around (the white part as shown will now be in the inside after you do step 23.
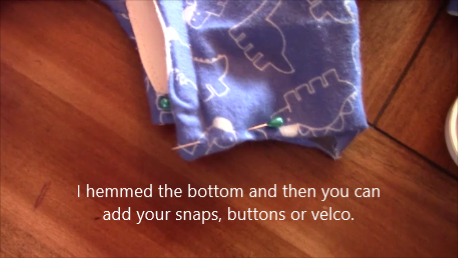
25. Next (phew we are getting there- keep going!) is the back banding strip, Same method for the back piece, except you just sew the one time and not the second sew around as in setp 24 because of the flap (you will see what I mean after you do the first sew.
26. I hemmed the bottom leg openings and then did my snap buttons using the hammer method! I used thick material for the banding which I regret (also that it was not stretchy!) I had to use bigger than normal snaps to get it through the fabric!
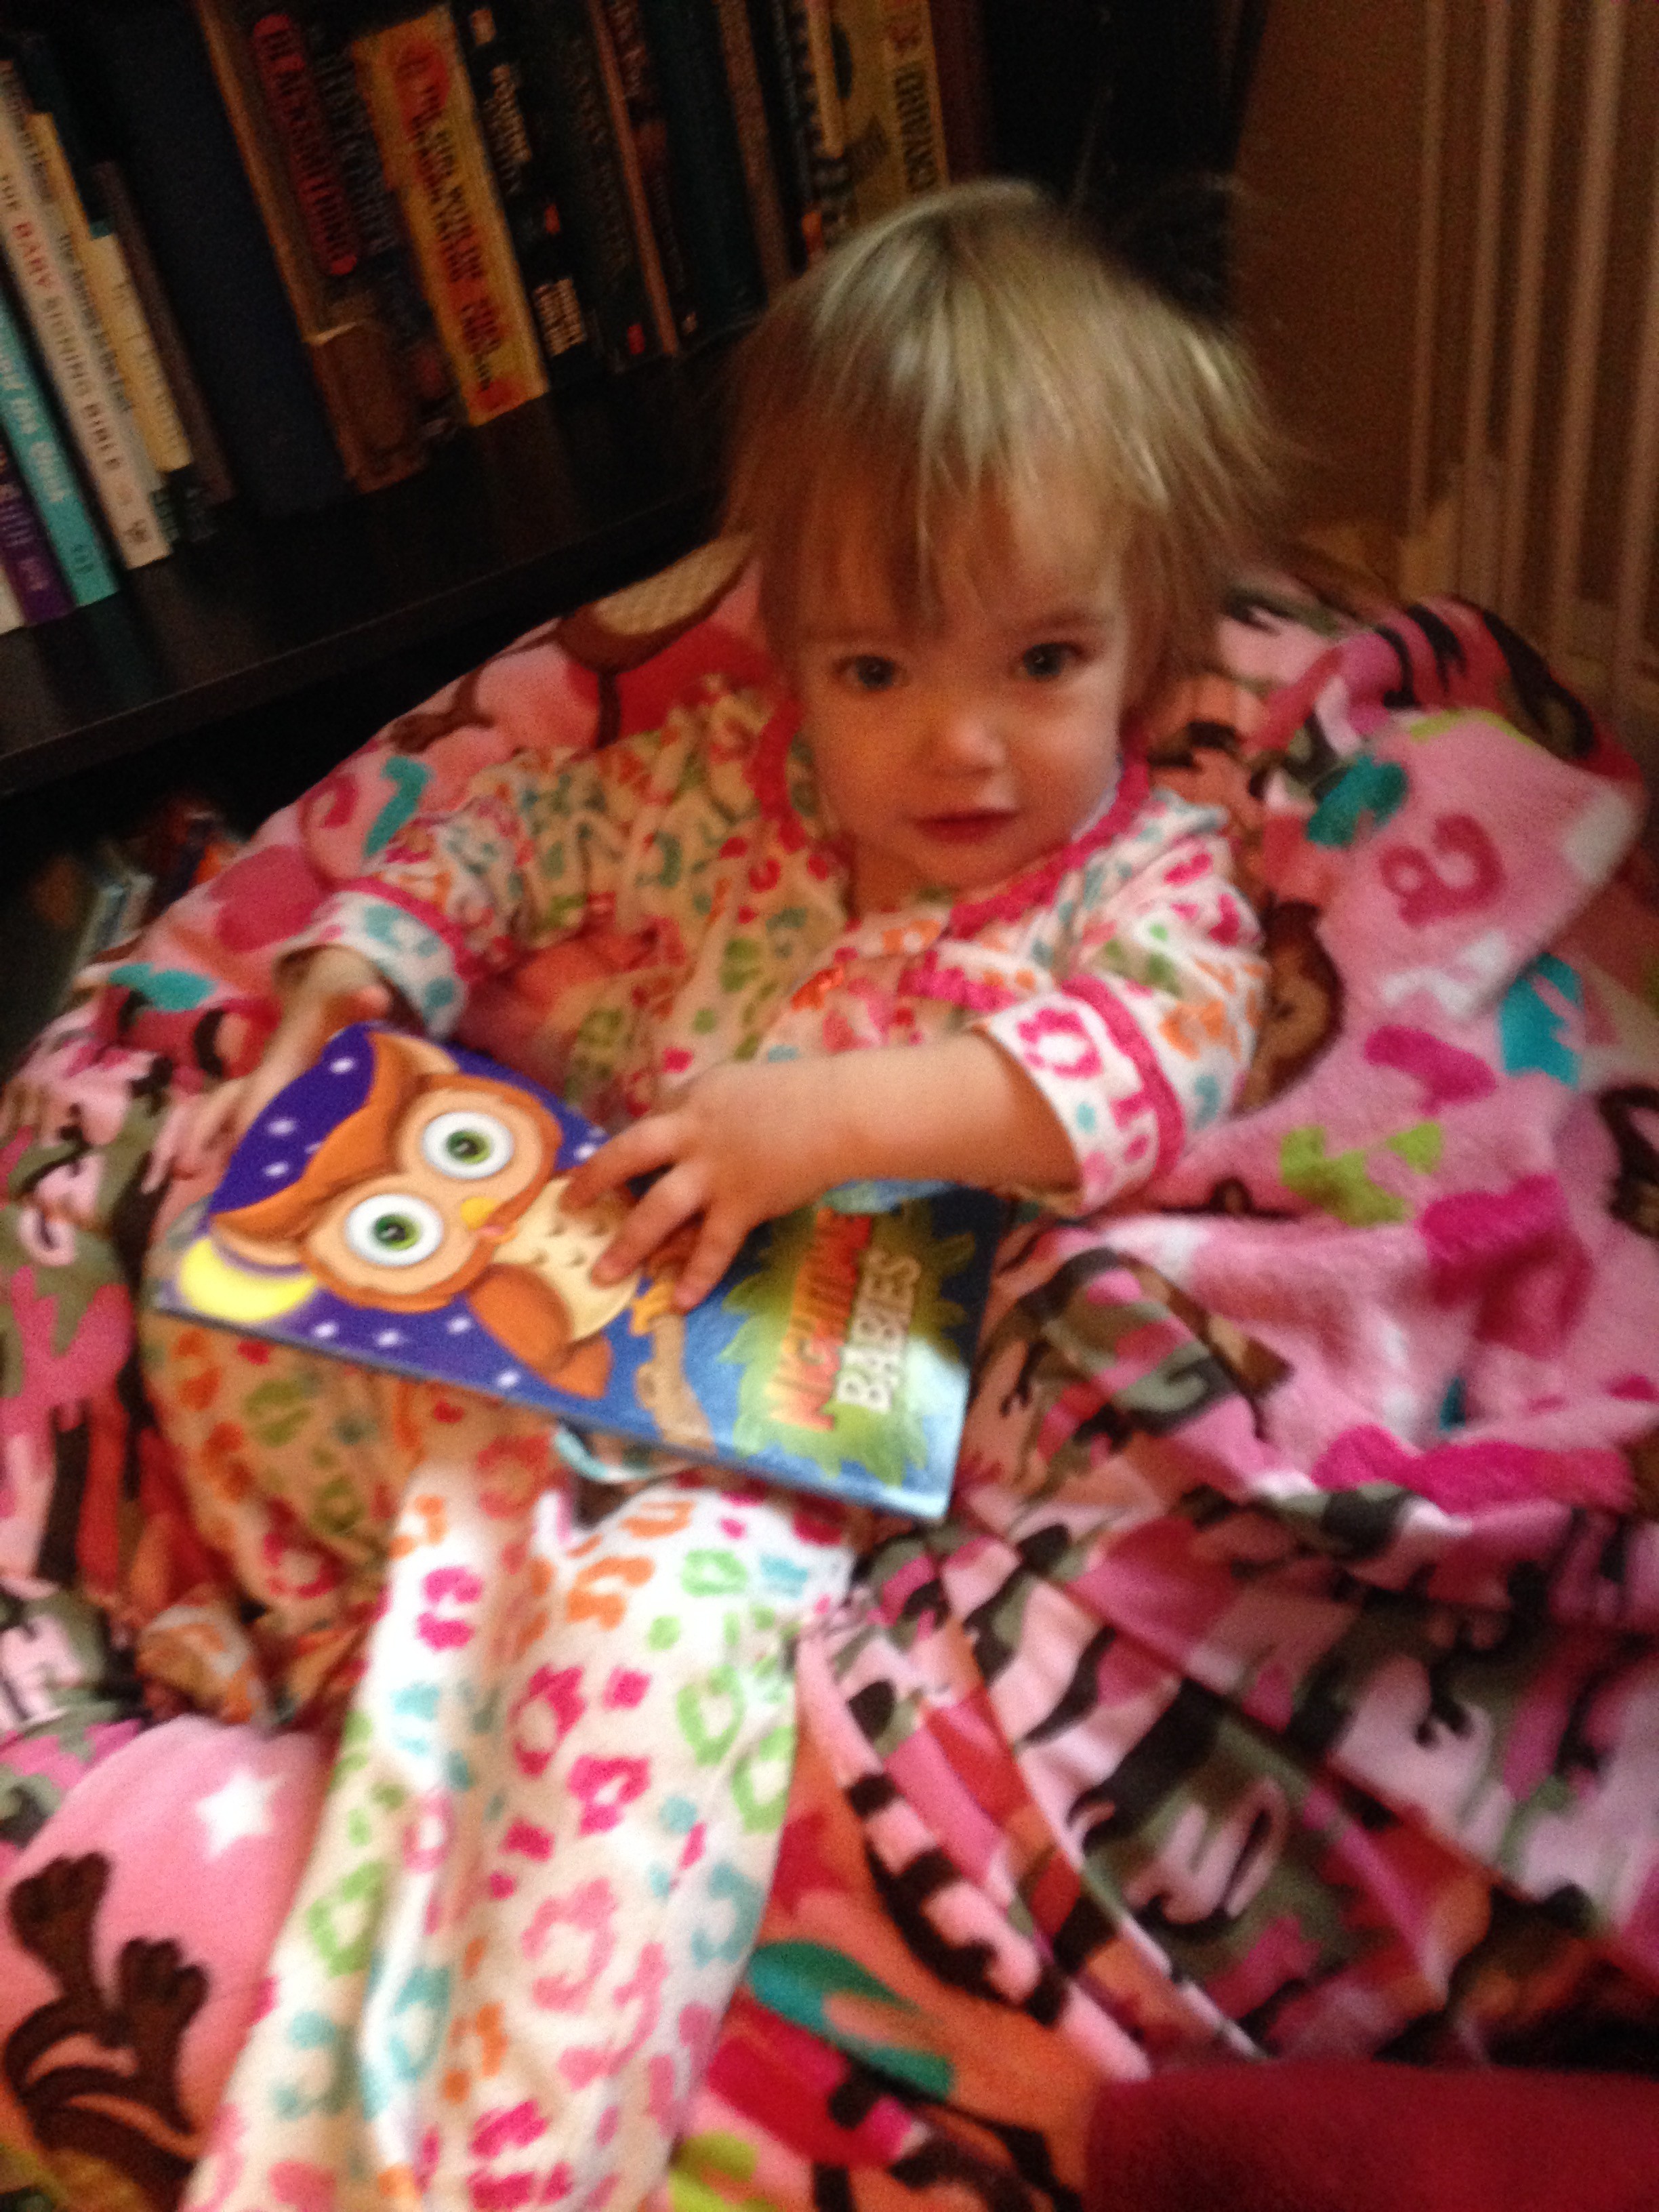
I don’t know about your little one, but mine sure does love to read! Well at this age, it is more like browse through the pages and pictures! She sits by the book shelf and pulls out book by book looking at each page.
At first I thought maybe I should purchase her a bean bag chair, and then I thought, well lets just make one! This can also be a great gift for anyone! I actually sometimes sit in it too (shhhh!)
So of course I have the video tutorial on youtube below and then the written and picture tutorial below that. Let me know if you have any questions!
What you need:
Fabric (you can use two or one color) 2 yards total of each color (or 4 yards of one color)
A 24 inch zipper (or you can use velcro or buttons)
4 yards of muslin or cheap fabric
Bean bag filling (100L) (I couldn’t find a large bag at my local craft store so I bought mine on amazon with free shipping)
Make panels of 40×16 inches. You should do 6 outside (3 of one color and 3 of the other color) and 6 inner panels.
Take one of your panels and fold once long way and once width. Have your fold on top and side when measuring to cut. Measure bottom to 6 inches (the long side) and start a curve and cut right up to the right corner. See picture below.
Line up two inside pieces and sew up and down one side. I did this twice for more strength. For the outside you will have the patterns facing inside towards each other and sew.
Once sewn open the panel up. Then place another panel on the original piece and sew the opposite side (you will end up with three pieces sewn together)
Then sew the other 3 inside pieces together and you will have two sets of three.
Take the two sewn together pieces and face pattern side in (doesn’t matter with the inside bean bag layer) and sew all the way around the outside leaving a couple inches hole.
Turn right side out. Then you will put the bean bag filling it! Ah what a challenge!
Note: I did not completely fill and sew this until I was sure the outside would fit over properly. I waited to finish this until the end of the project.
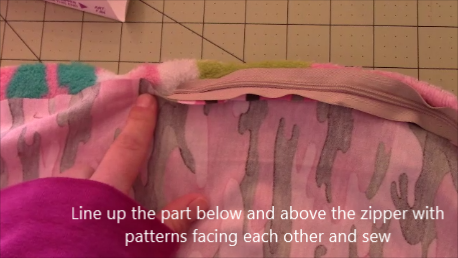
Take one of your outside panels and face the zipper down on the pattern. Line it up on your machine and sew the zipper on.Take one of your outside panels and face the zipper down on the pattern. Line up the right outside part of the zipper to the outside of the panel (as shown) and sew the zipper on.
See the video for more of a demonstration on how to attach a zipper
Sew pattern and right side of the next panel to zipper right sides facing each other (inside) and sew together.
Line up the part below and above the zipper with patterns facing each other and sew
Then sew your 3rd panel on…complete another 3 panels together as done with the inside pieces.
**Open your zipper all the way. Take each 3 piece panel set and place them facing each other (inside) and sew all the way around the edges. Do not leave a hole this time, you will pull it out through the zipper opening!
Next you will place your inside bean bag that is partially full inside. If its full then you are done! However, if you partially filled…continue to fill all the way and sew the inside bag shut.
Congrats you are done! Enjoy! Post your pics below!
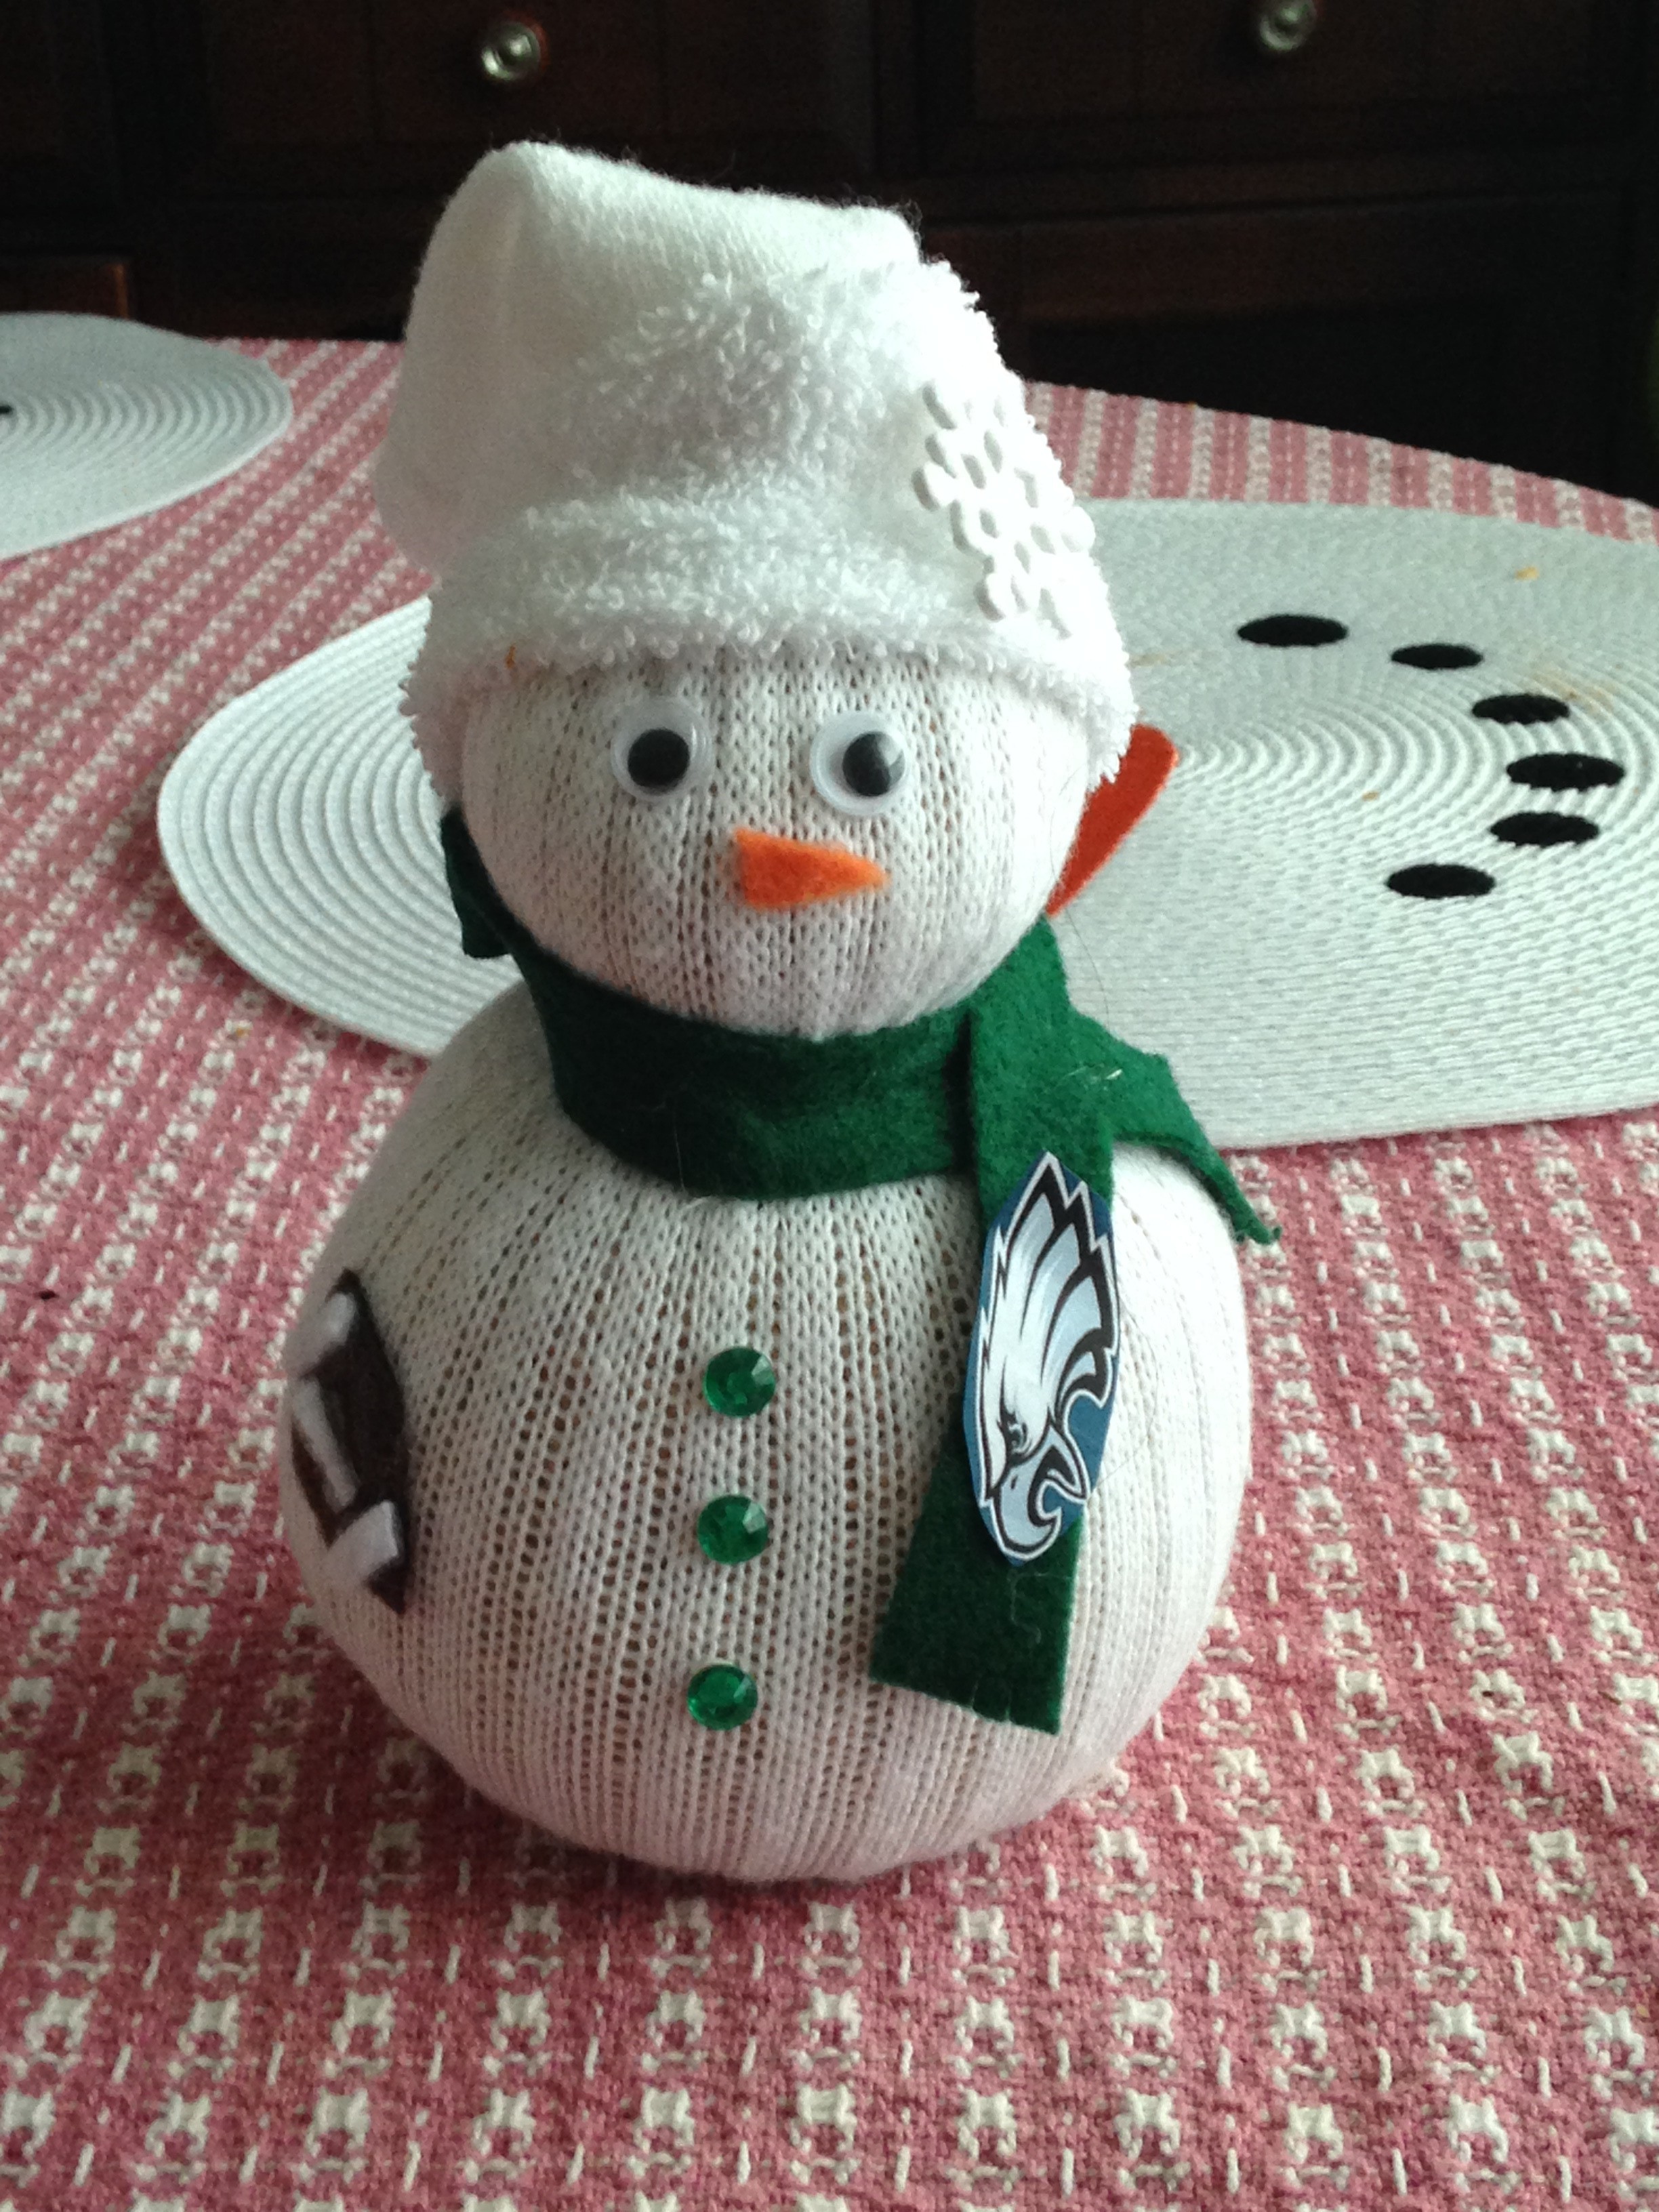
What’s an easy gift that can be personalized and made in 15mins? A sock snowman of course!
A what? A Sock Snowman? What is that????
Well, let me tell you. A sock snowman is a snowman made with rubber bands, rice, men’s socks, a hot glue gun, and personalized items. It is easy, fast, and I love that you can personalize it any way you want for any time of the year! I made 10 of them for Christmas gifts. You can see the harry potter and eagles one above. I also made a hunter, patriots, and princess snowman. Then I made the usual Christmas snowman for decorations as well. I even got most of my supplies at the dollar store!
As usual, there is a youtube video tutorial and the written instructions below. These make great gifts for any occasion and are quick and easy! Enjoy!
What you need:
-Hot glue gun
-Crew socks or longer
-Any type of rice
-Rubber bands
-Decorations such as eyes, stick ons, felt, buttons, bows, pins
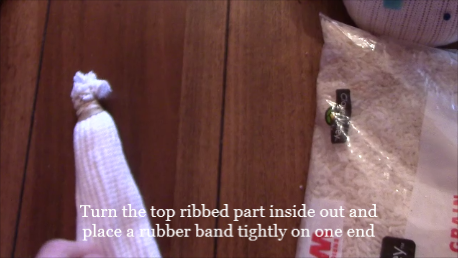
Take your crew sock and cut below the ribbed area (the bigger the snowman the lower you want to cut (the bottom part will be the hat of the snowman).
Turn the top ribbed part inside out and place a rubber band tightly on one end
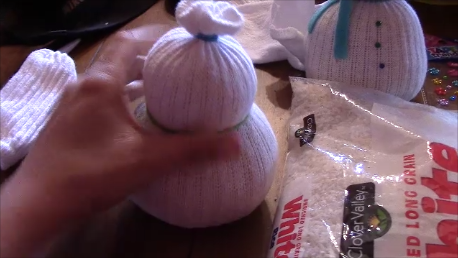
Turn it right side out and pack with rice. Make sure you continuously pack it down with your hands to give the snowman a fuller shape. Leave a small area on the top and then close it with another rubber band.
Put a rubber band on the top then 1/3 of the way down place another rubber band as tight as you can and adjust the rice to form the body and head of the snowman.
Now time for the fun part- decorating!
The scarf can be made out of felt, scrap fabric, or even a crocheted or knitted scarf! I did this with camo yarn for a hunter snowman.
I used the hot glue gun to make sure everything stayed in place including the scarf and hat!
Take the bottom part of the sock and fold top of it and place on top of the snowman’s head for the hat! Feel free to decorate the hat as well.
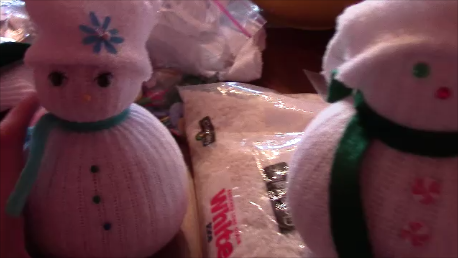
I made my sister a harry potter snowman. I also made a hunter camo snowman, princess snowman, patriots snowman, soccer player, and Christmas themed
snowmen.
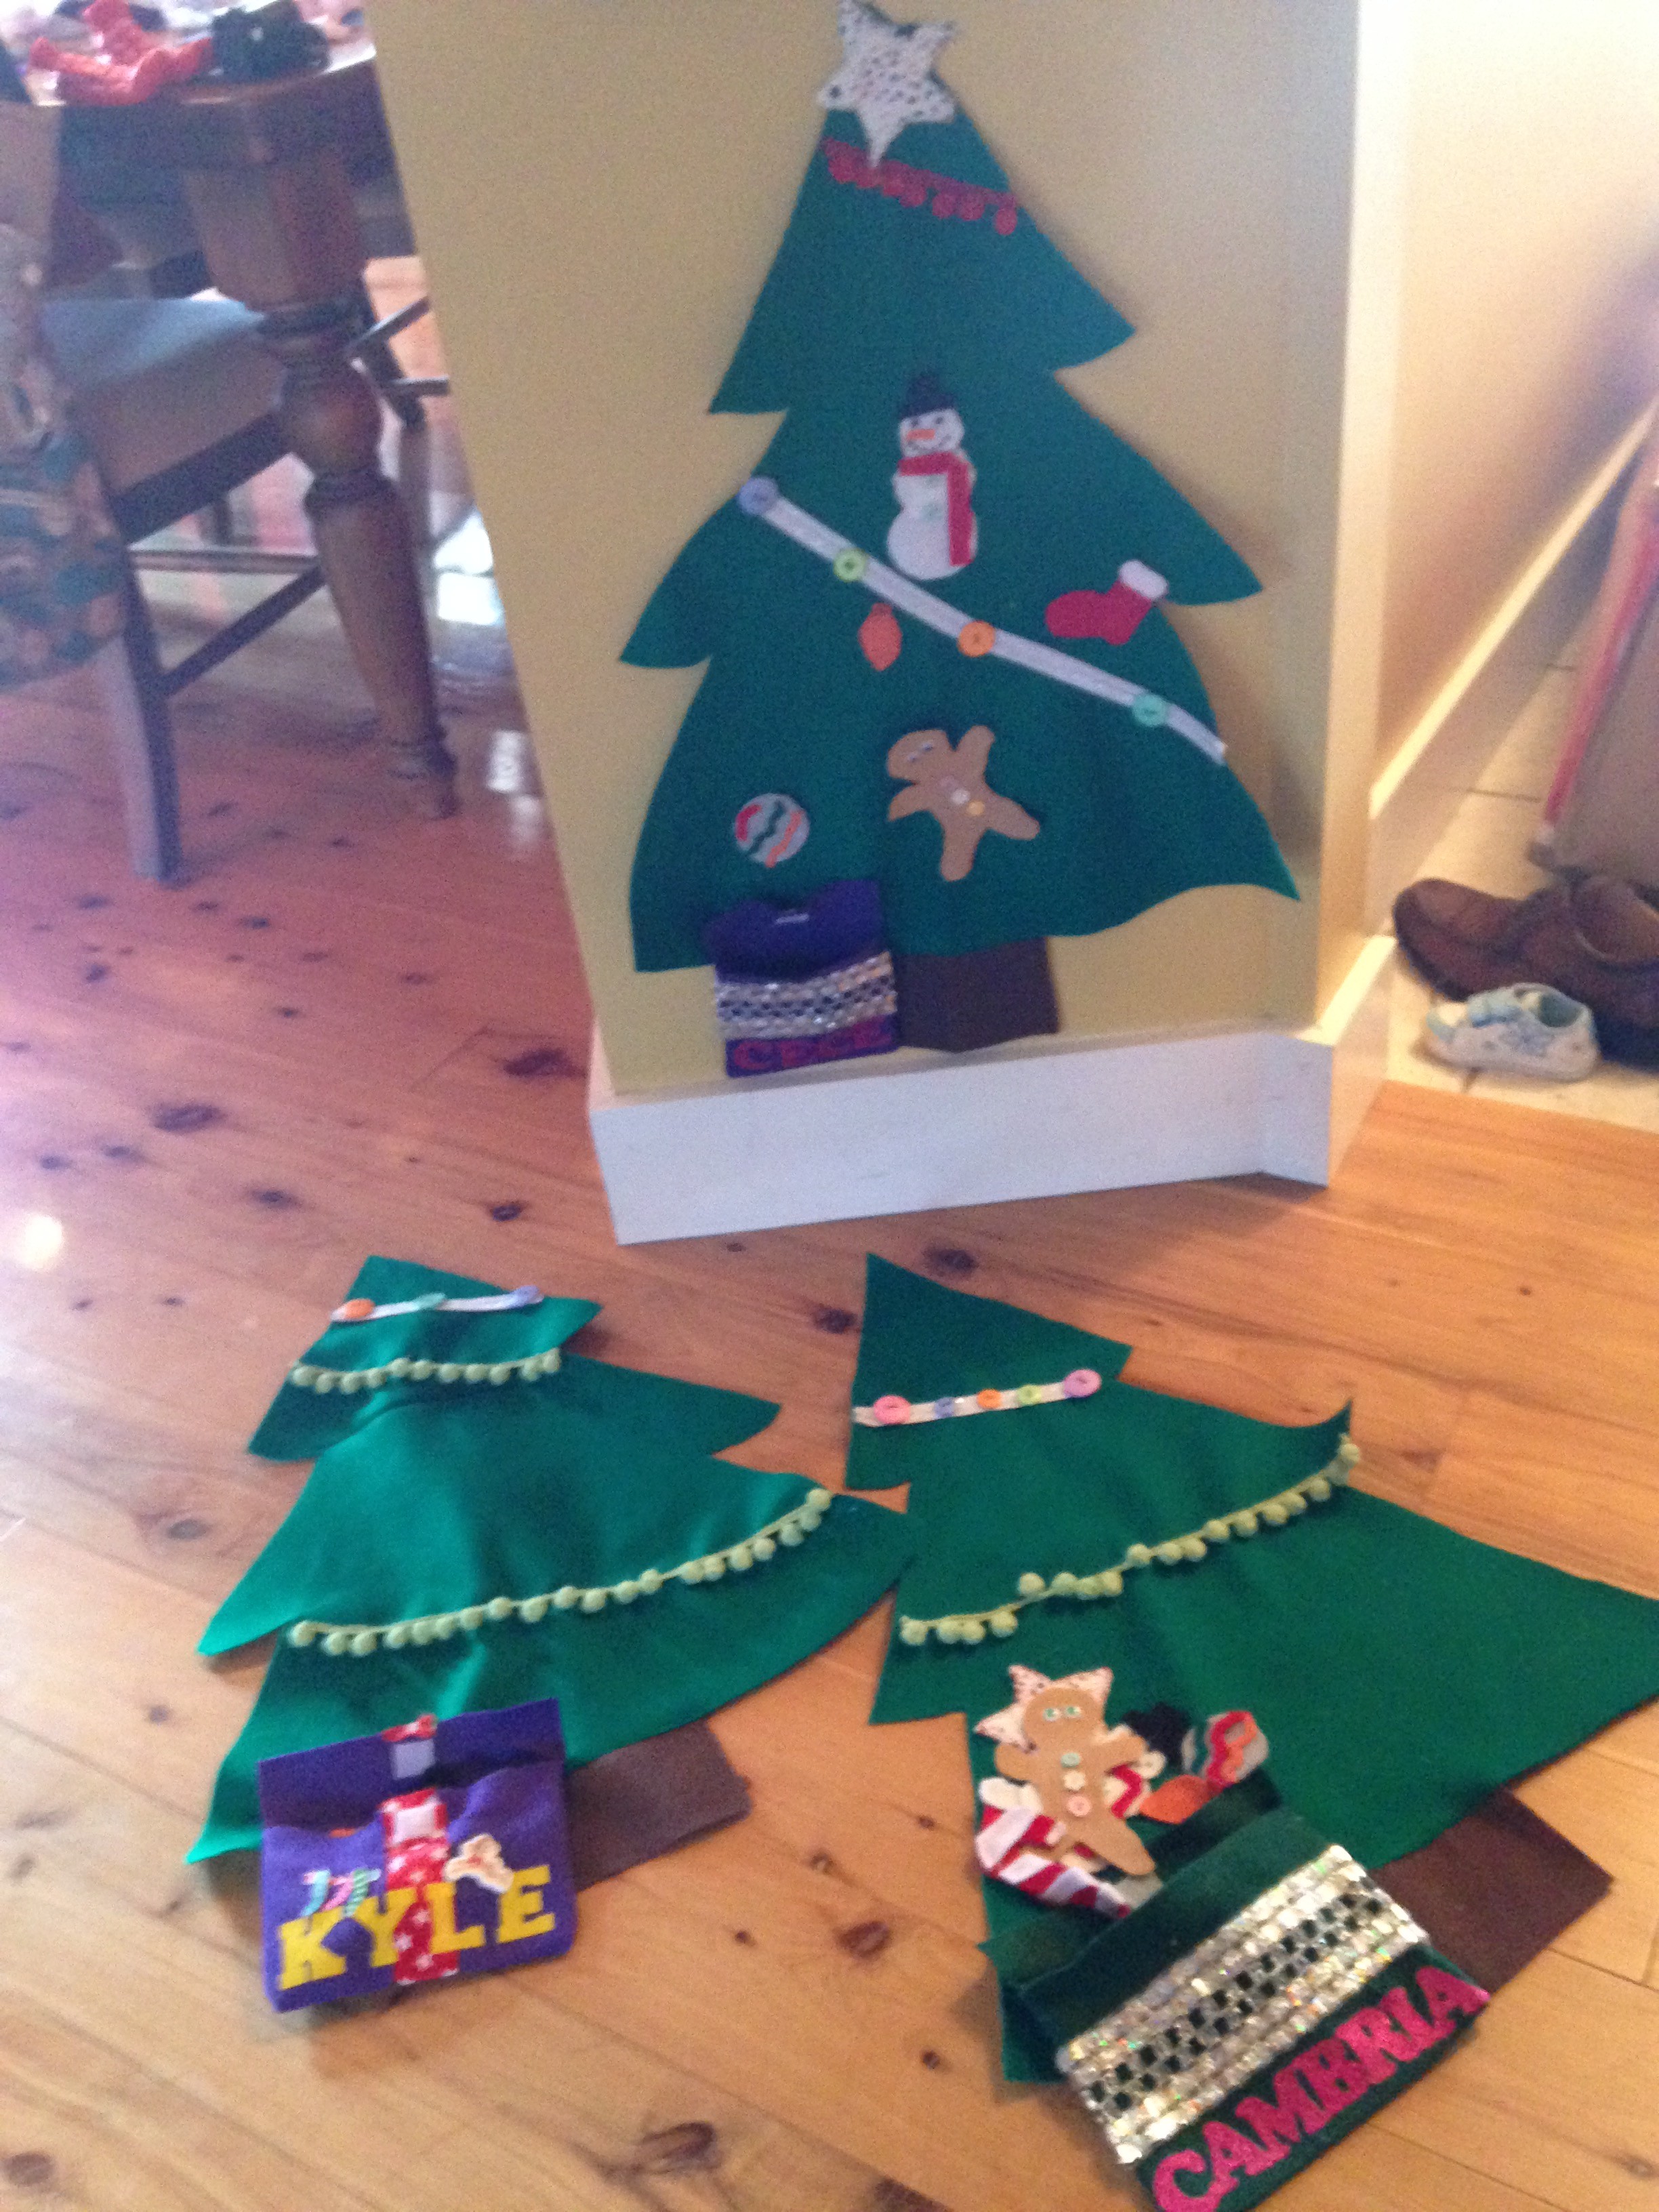
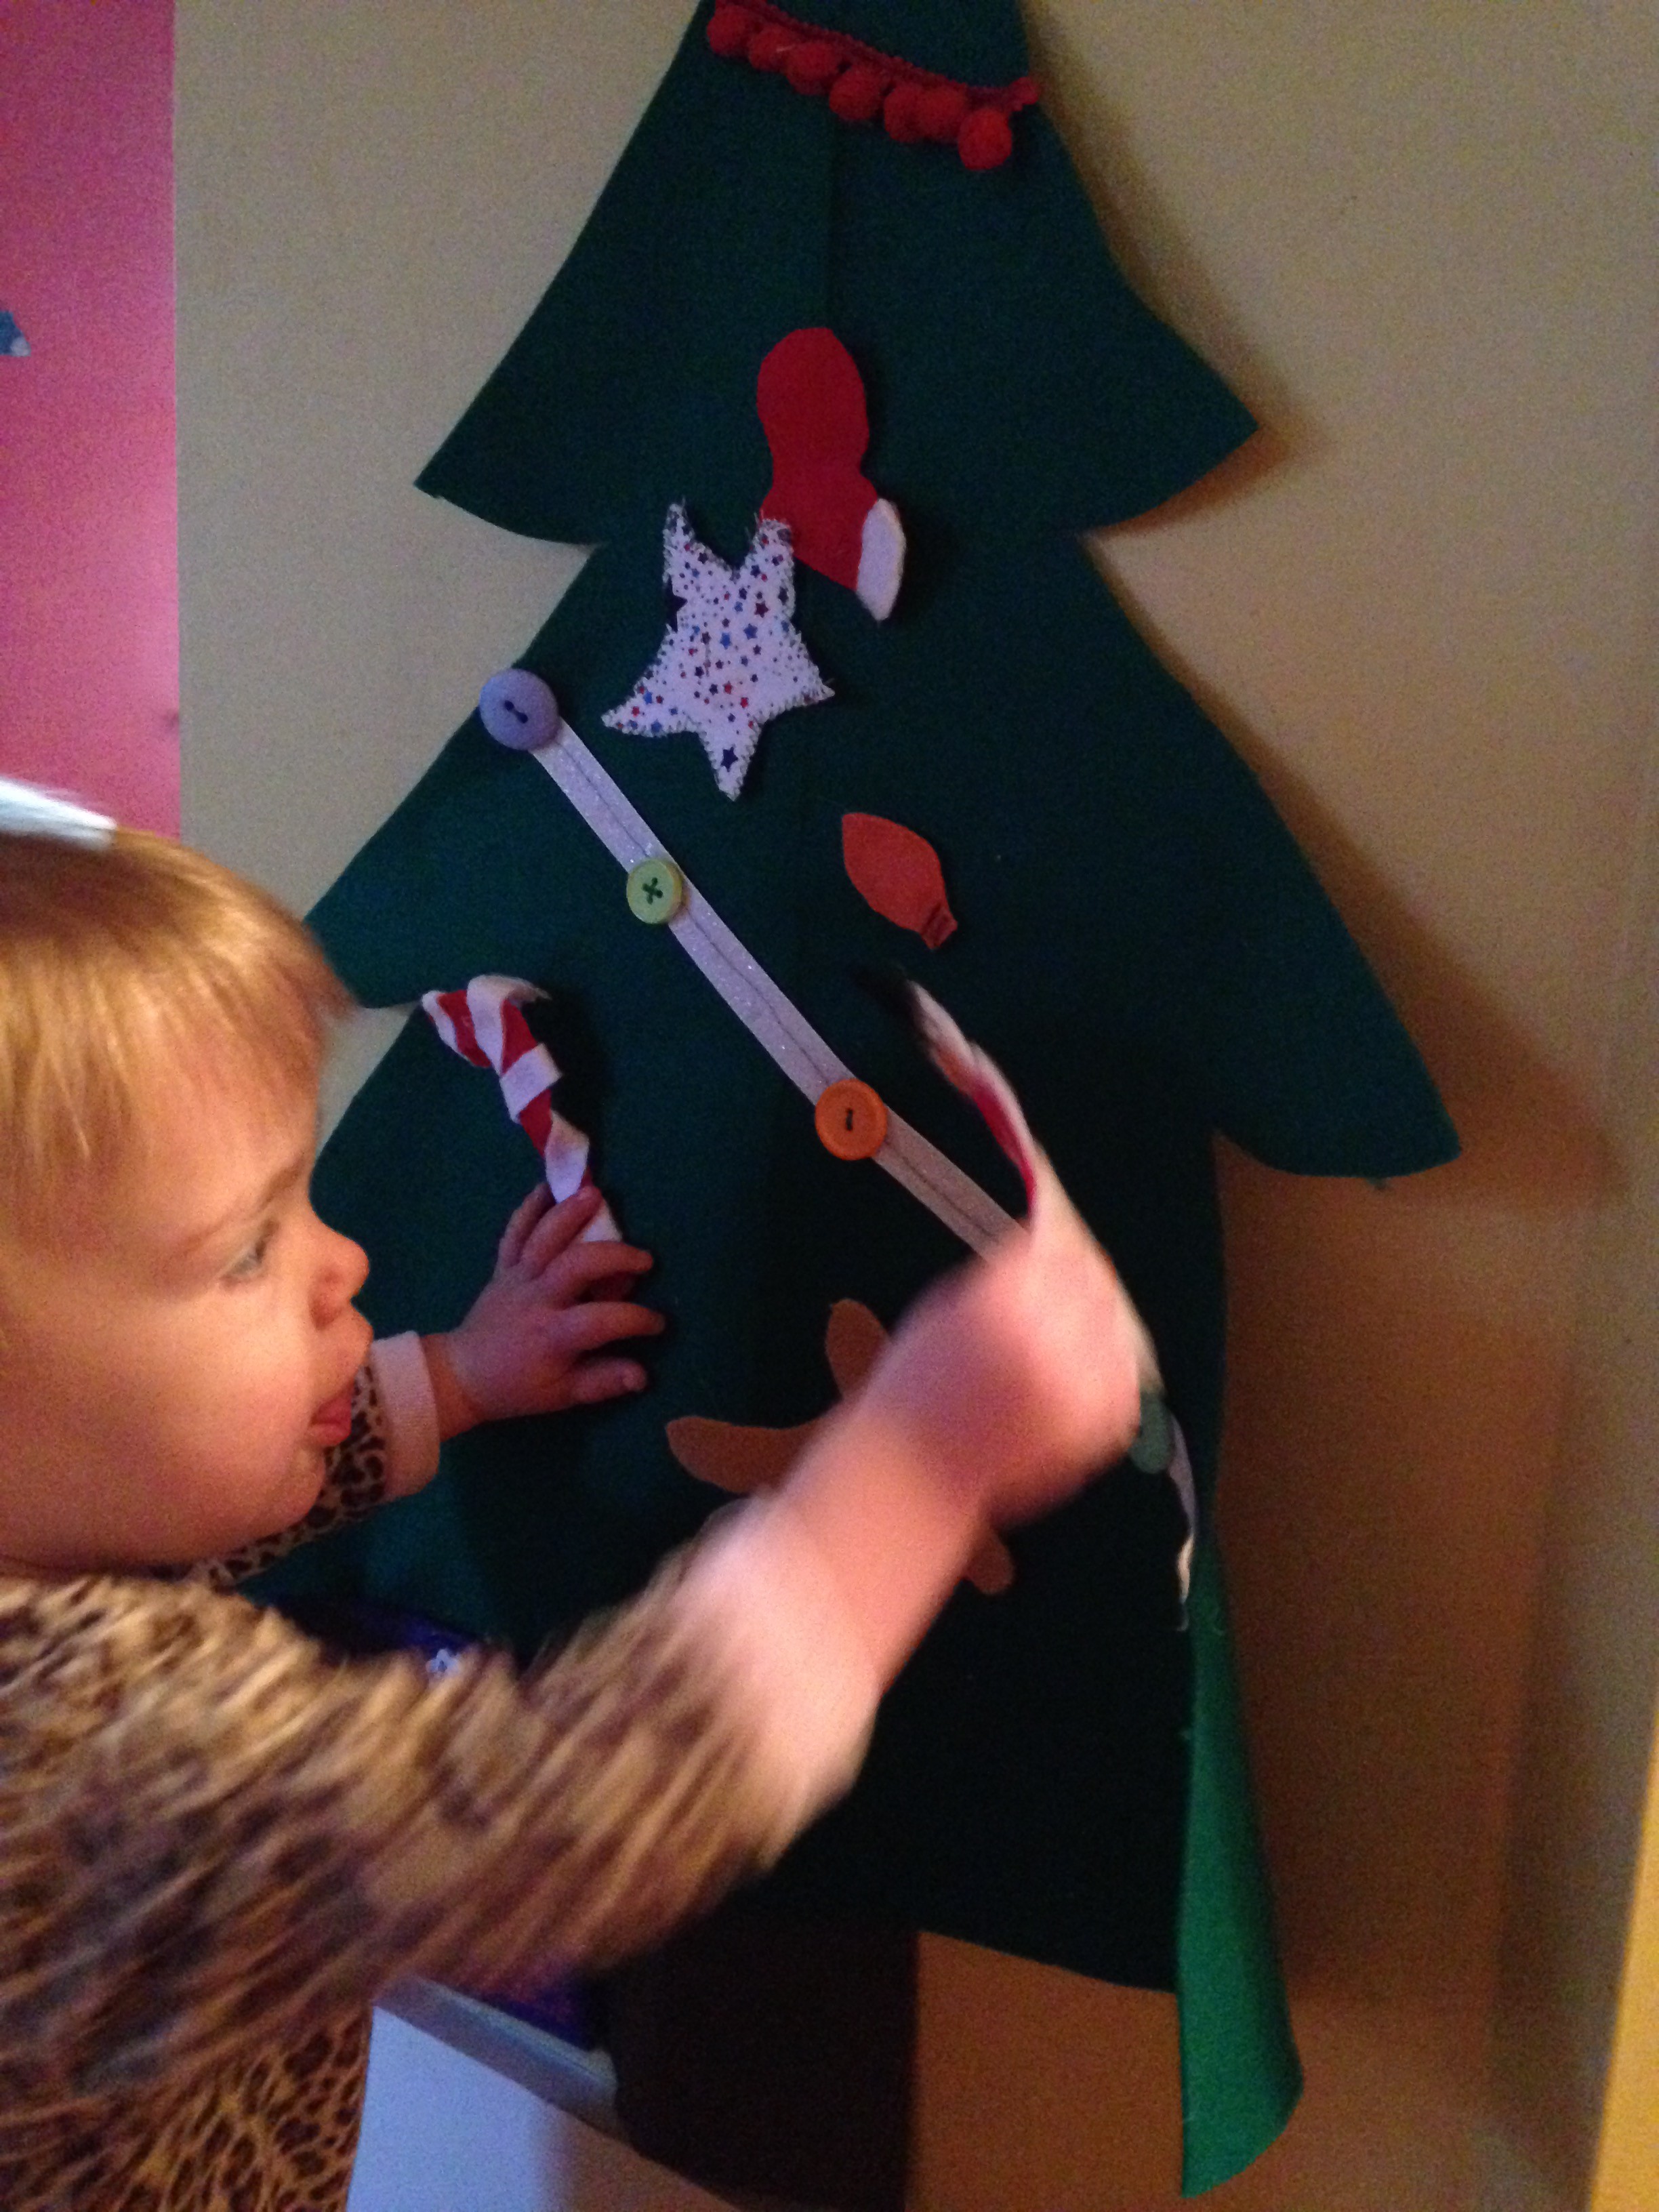
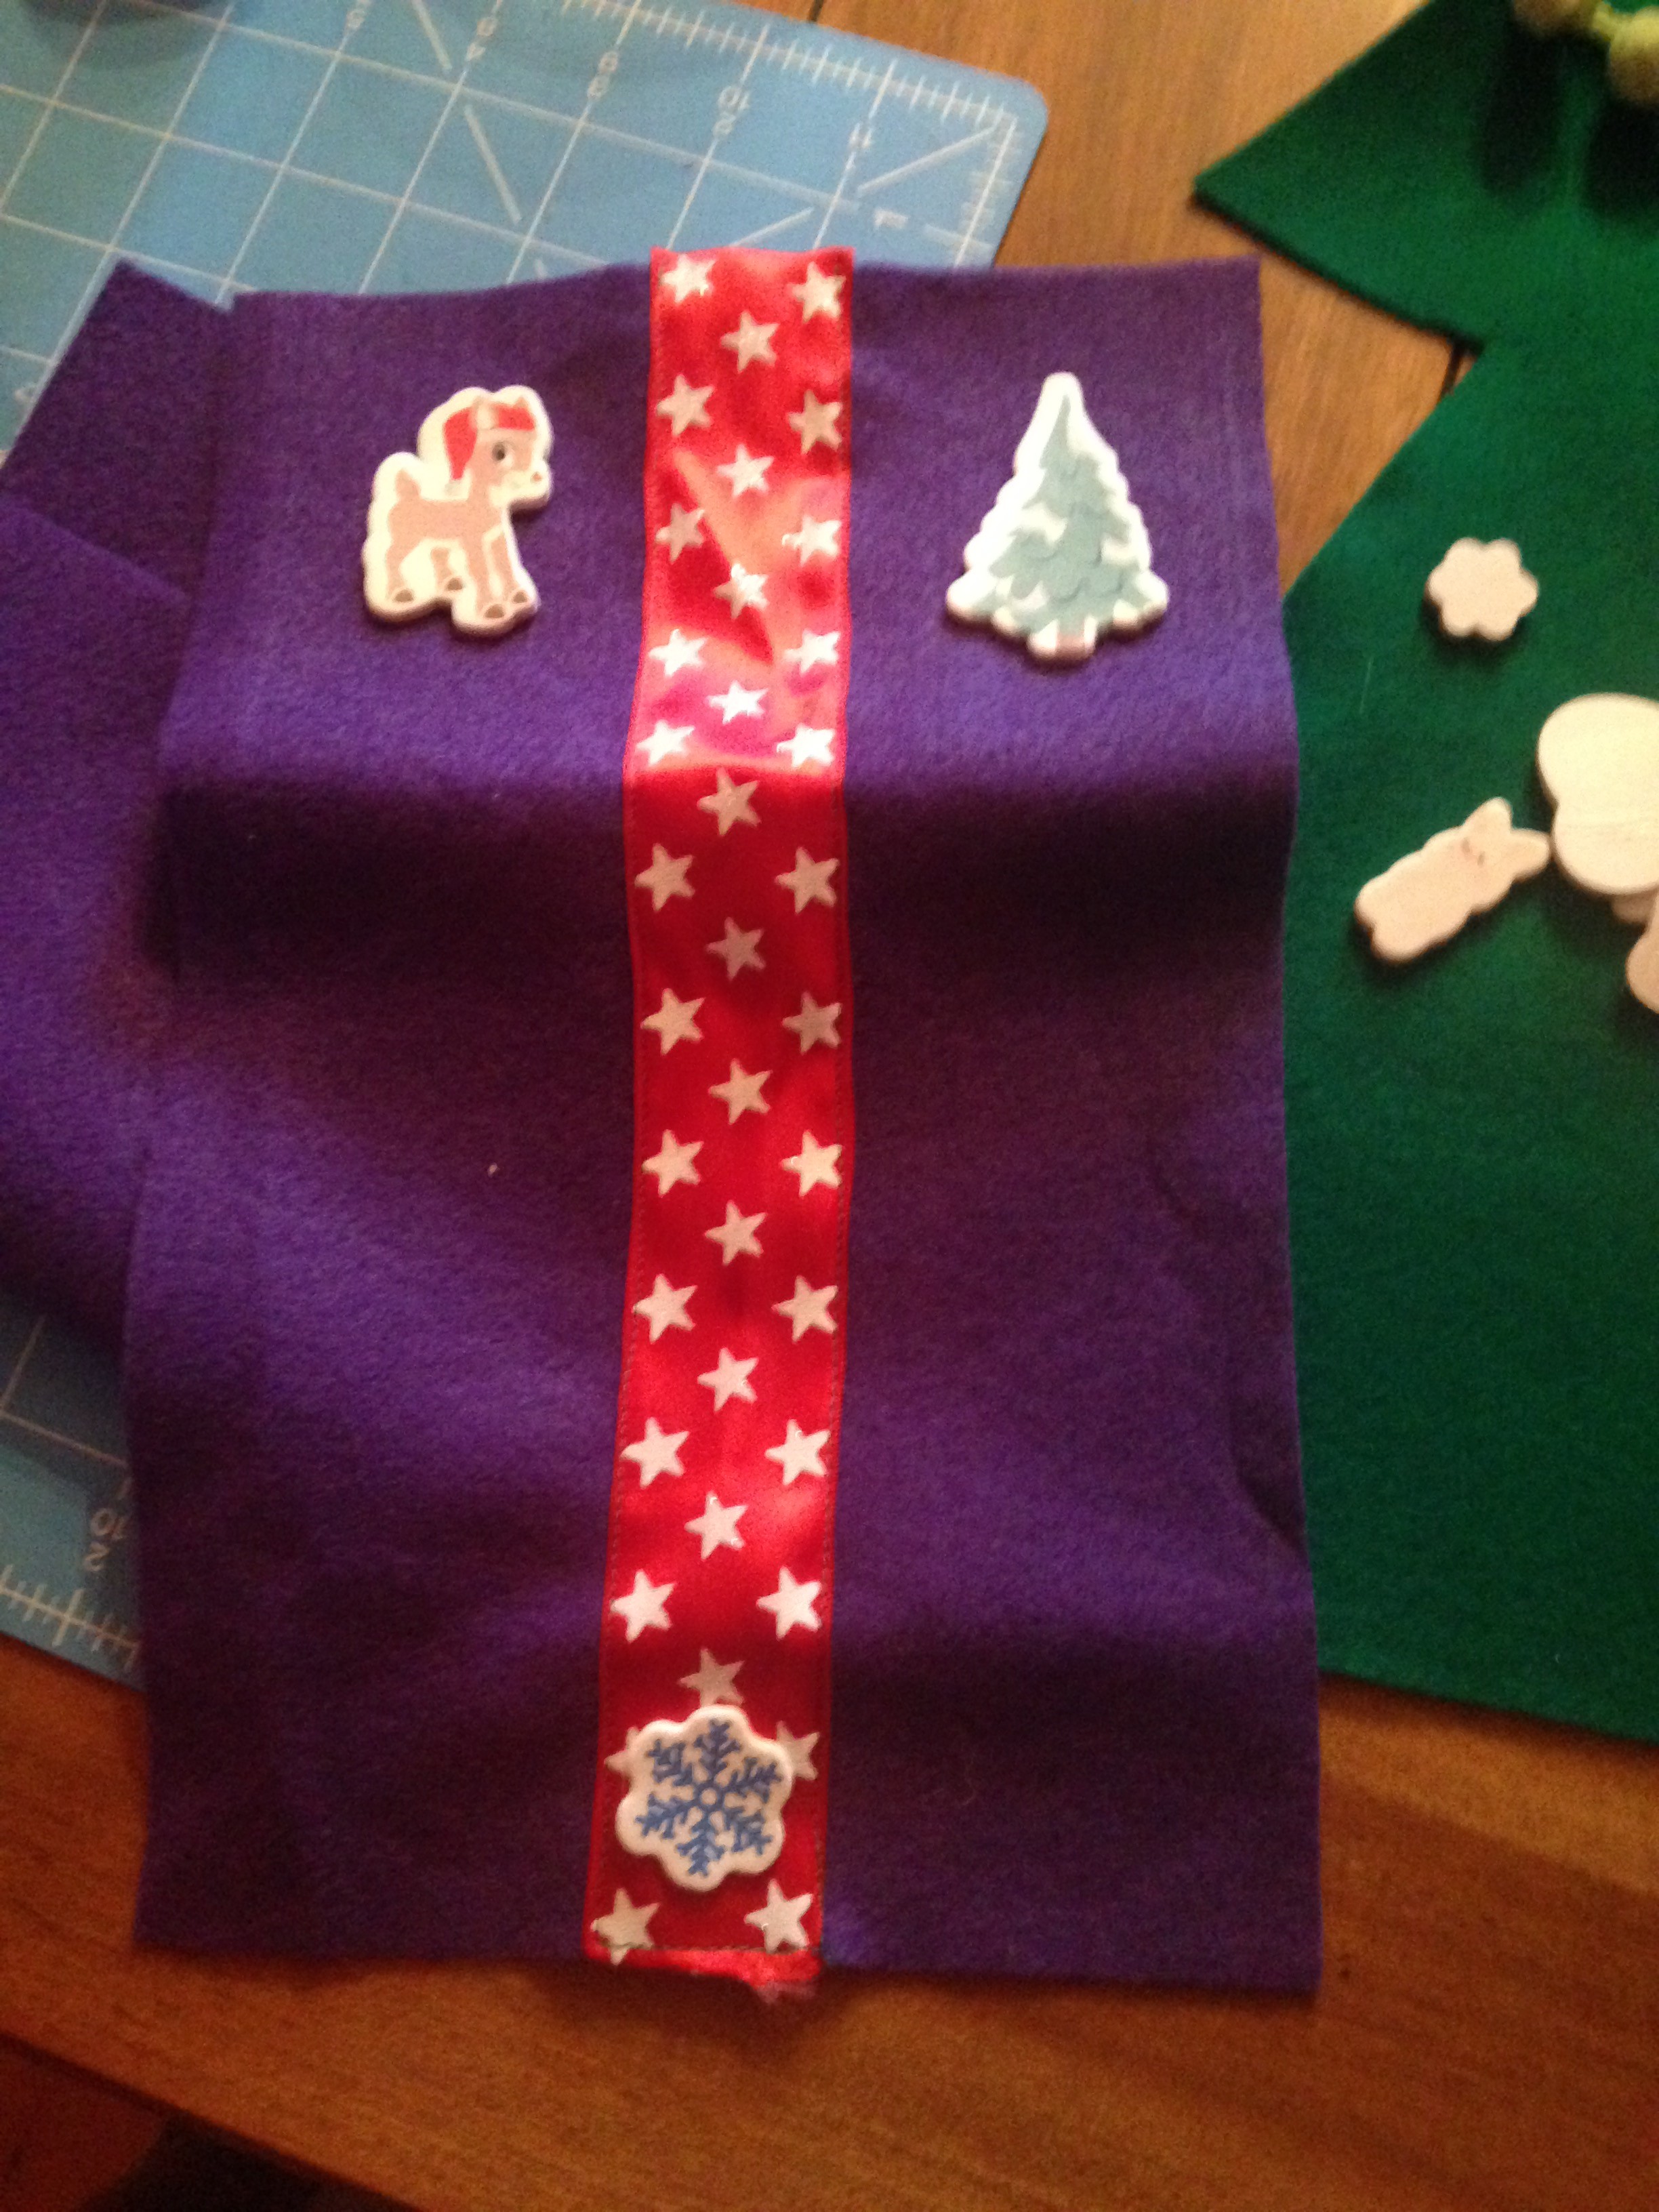
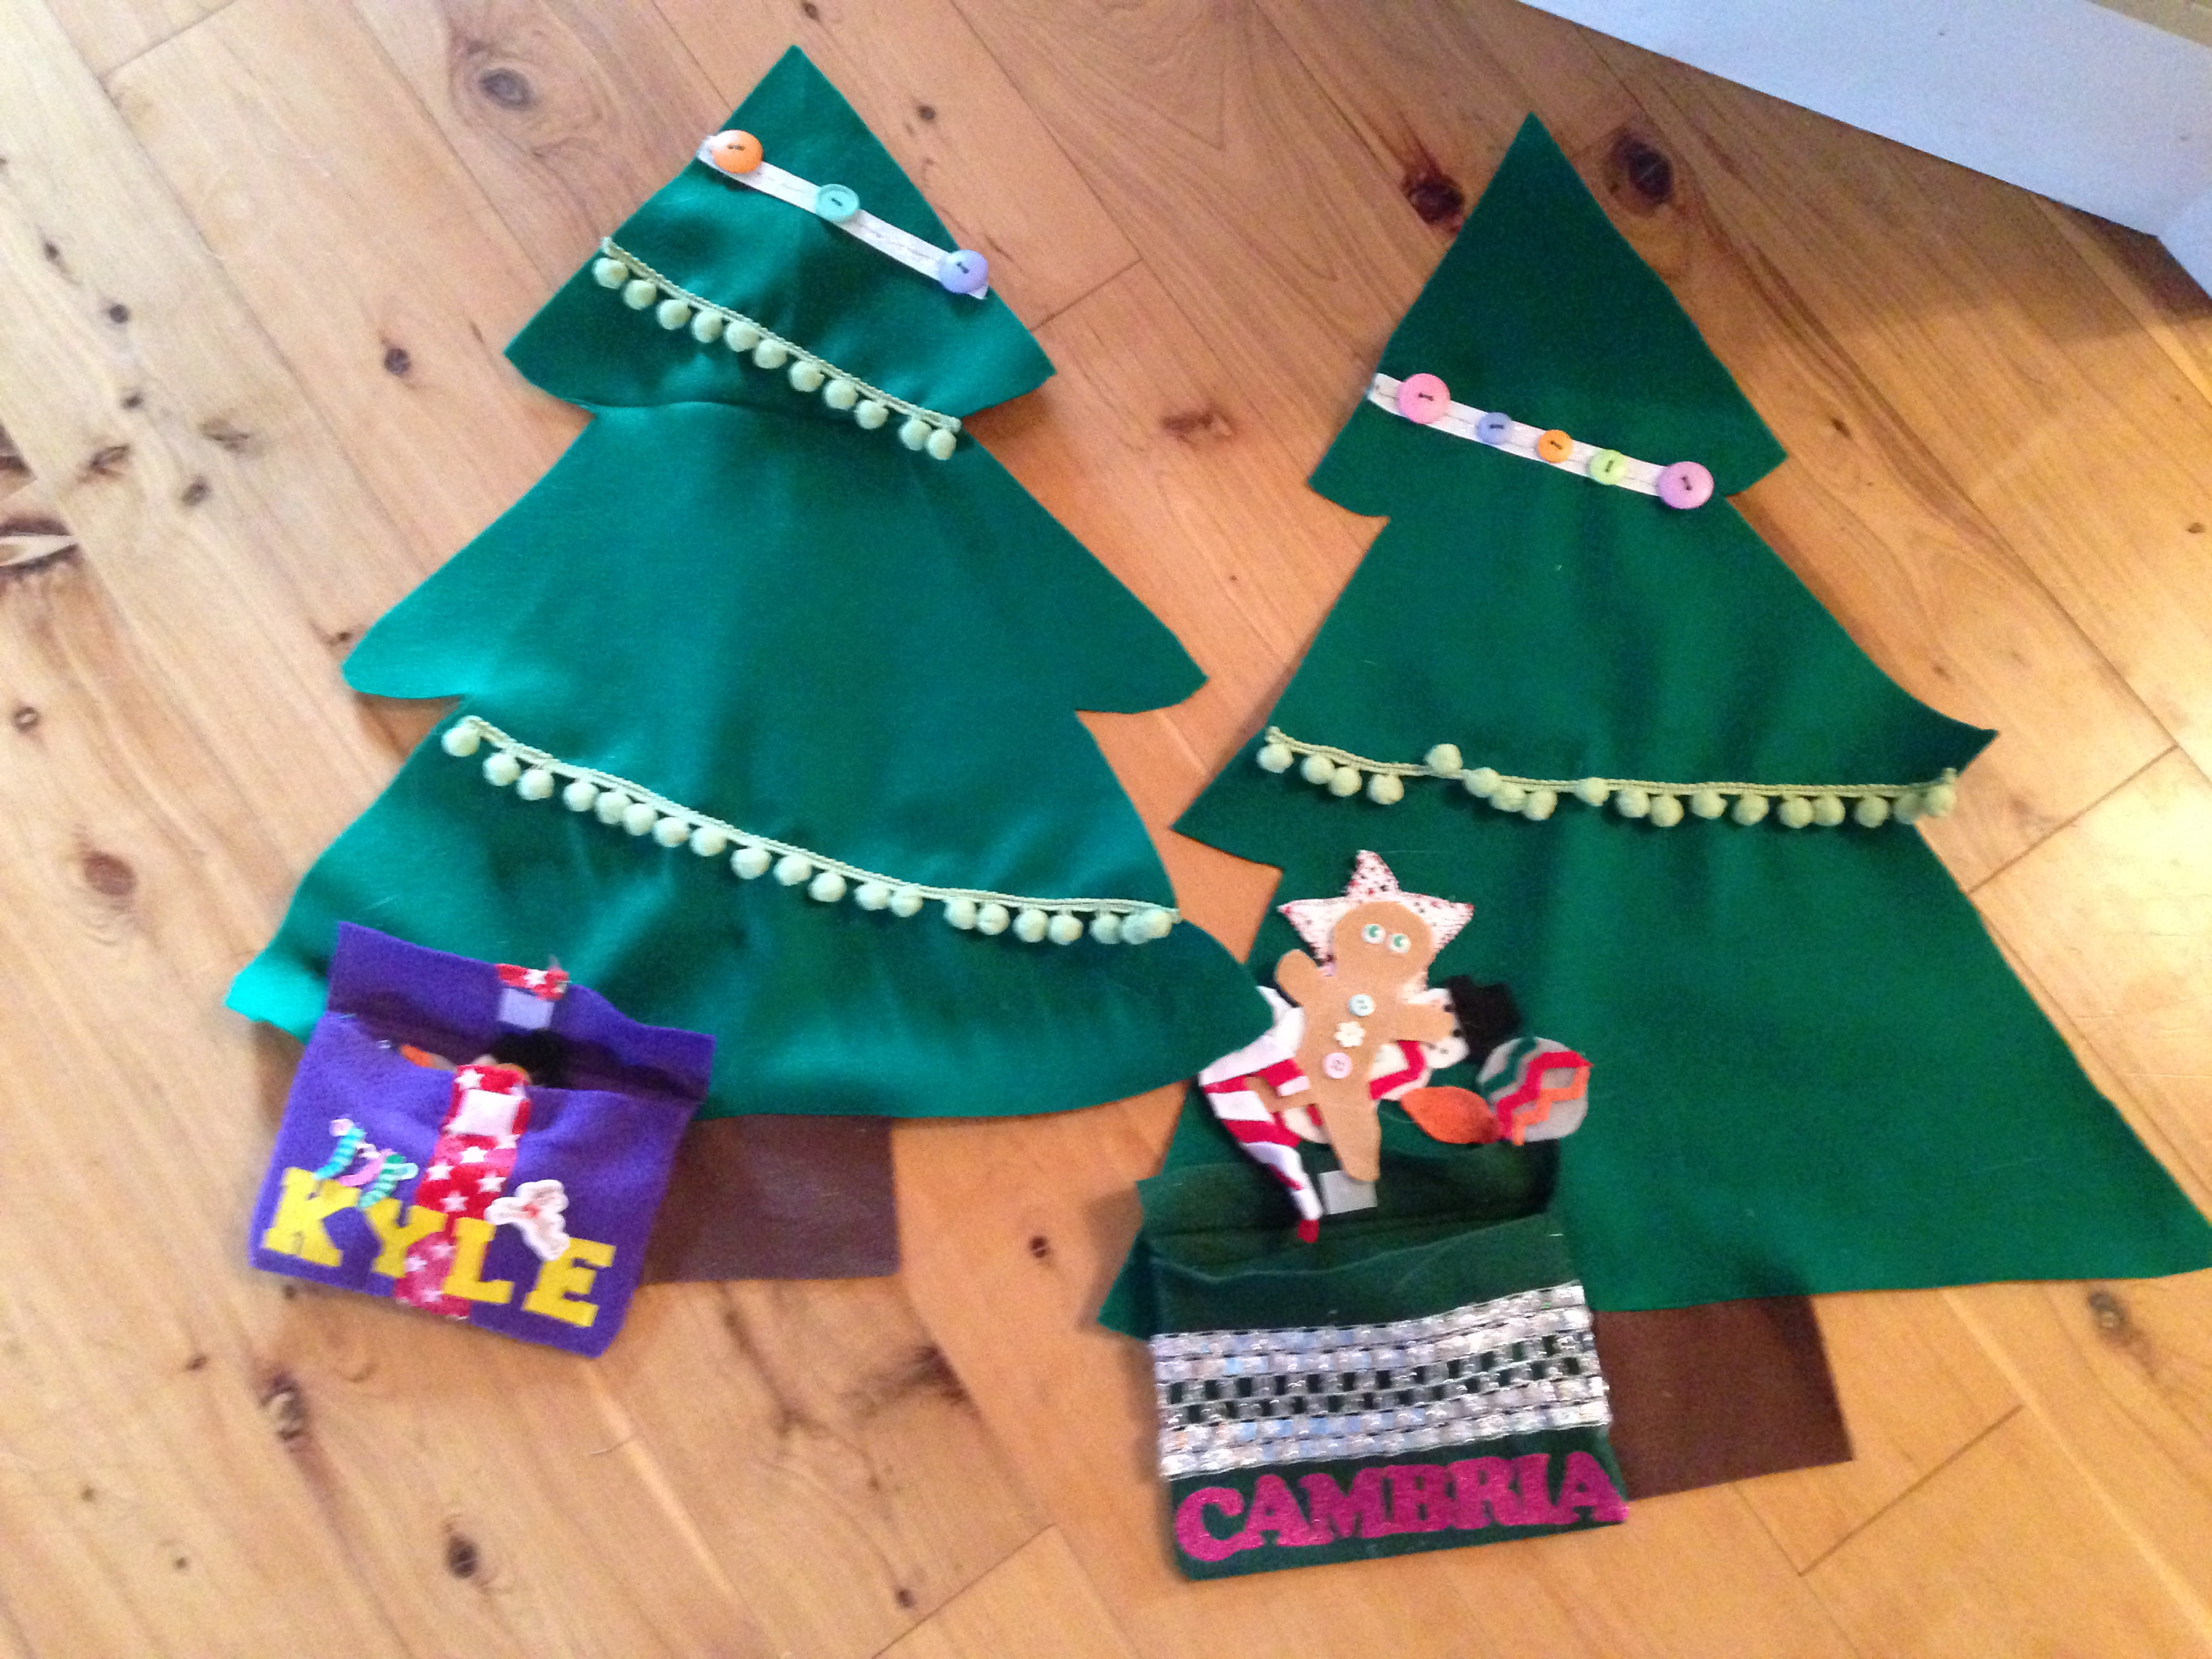
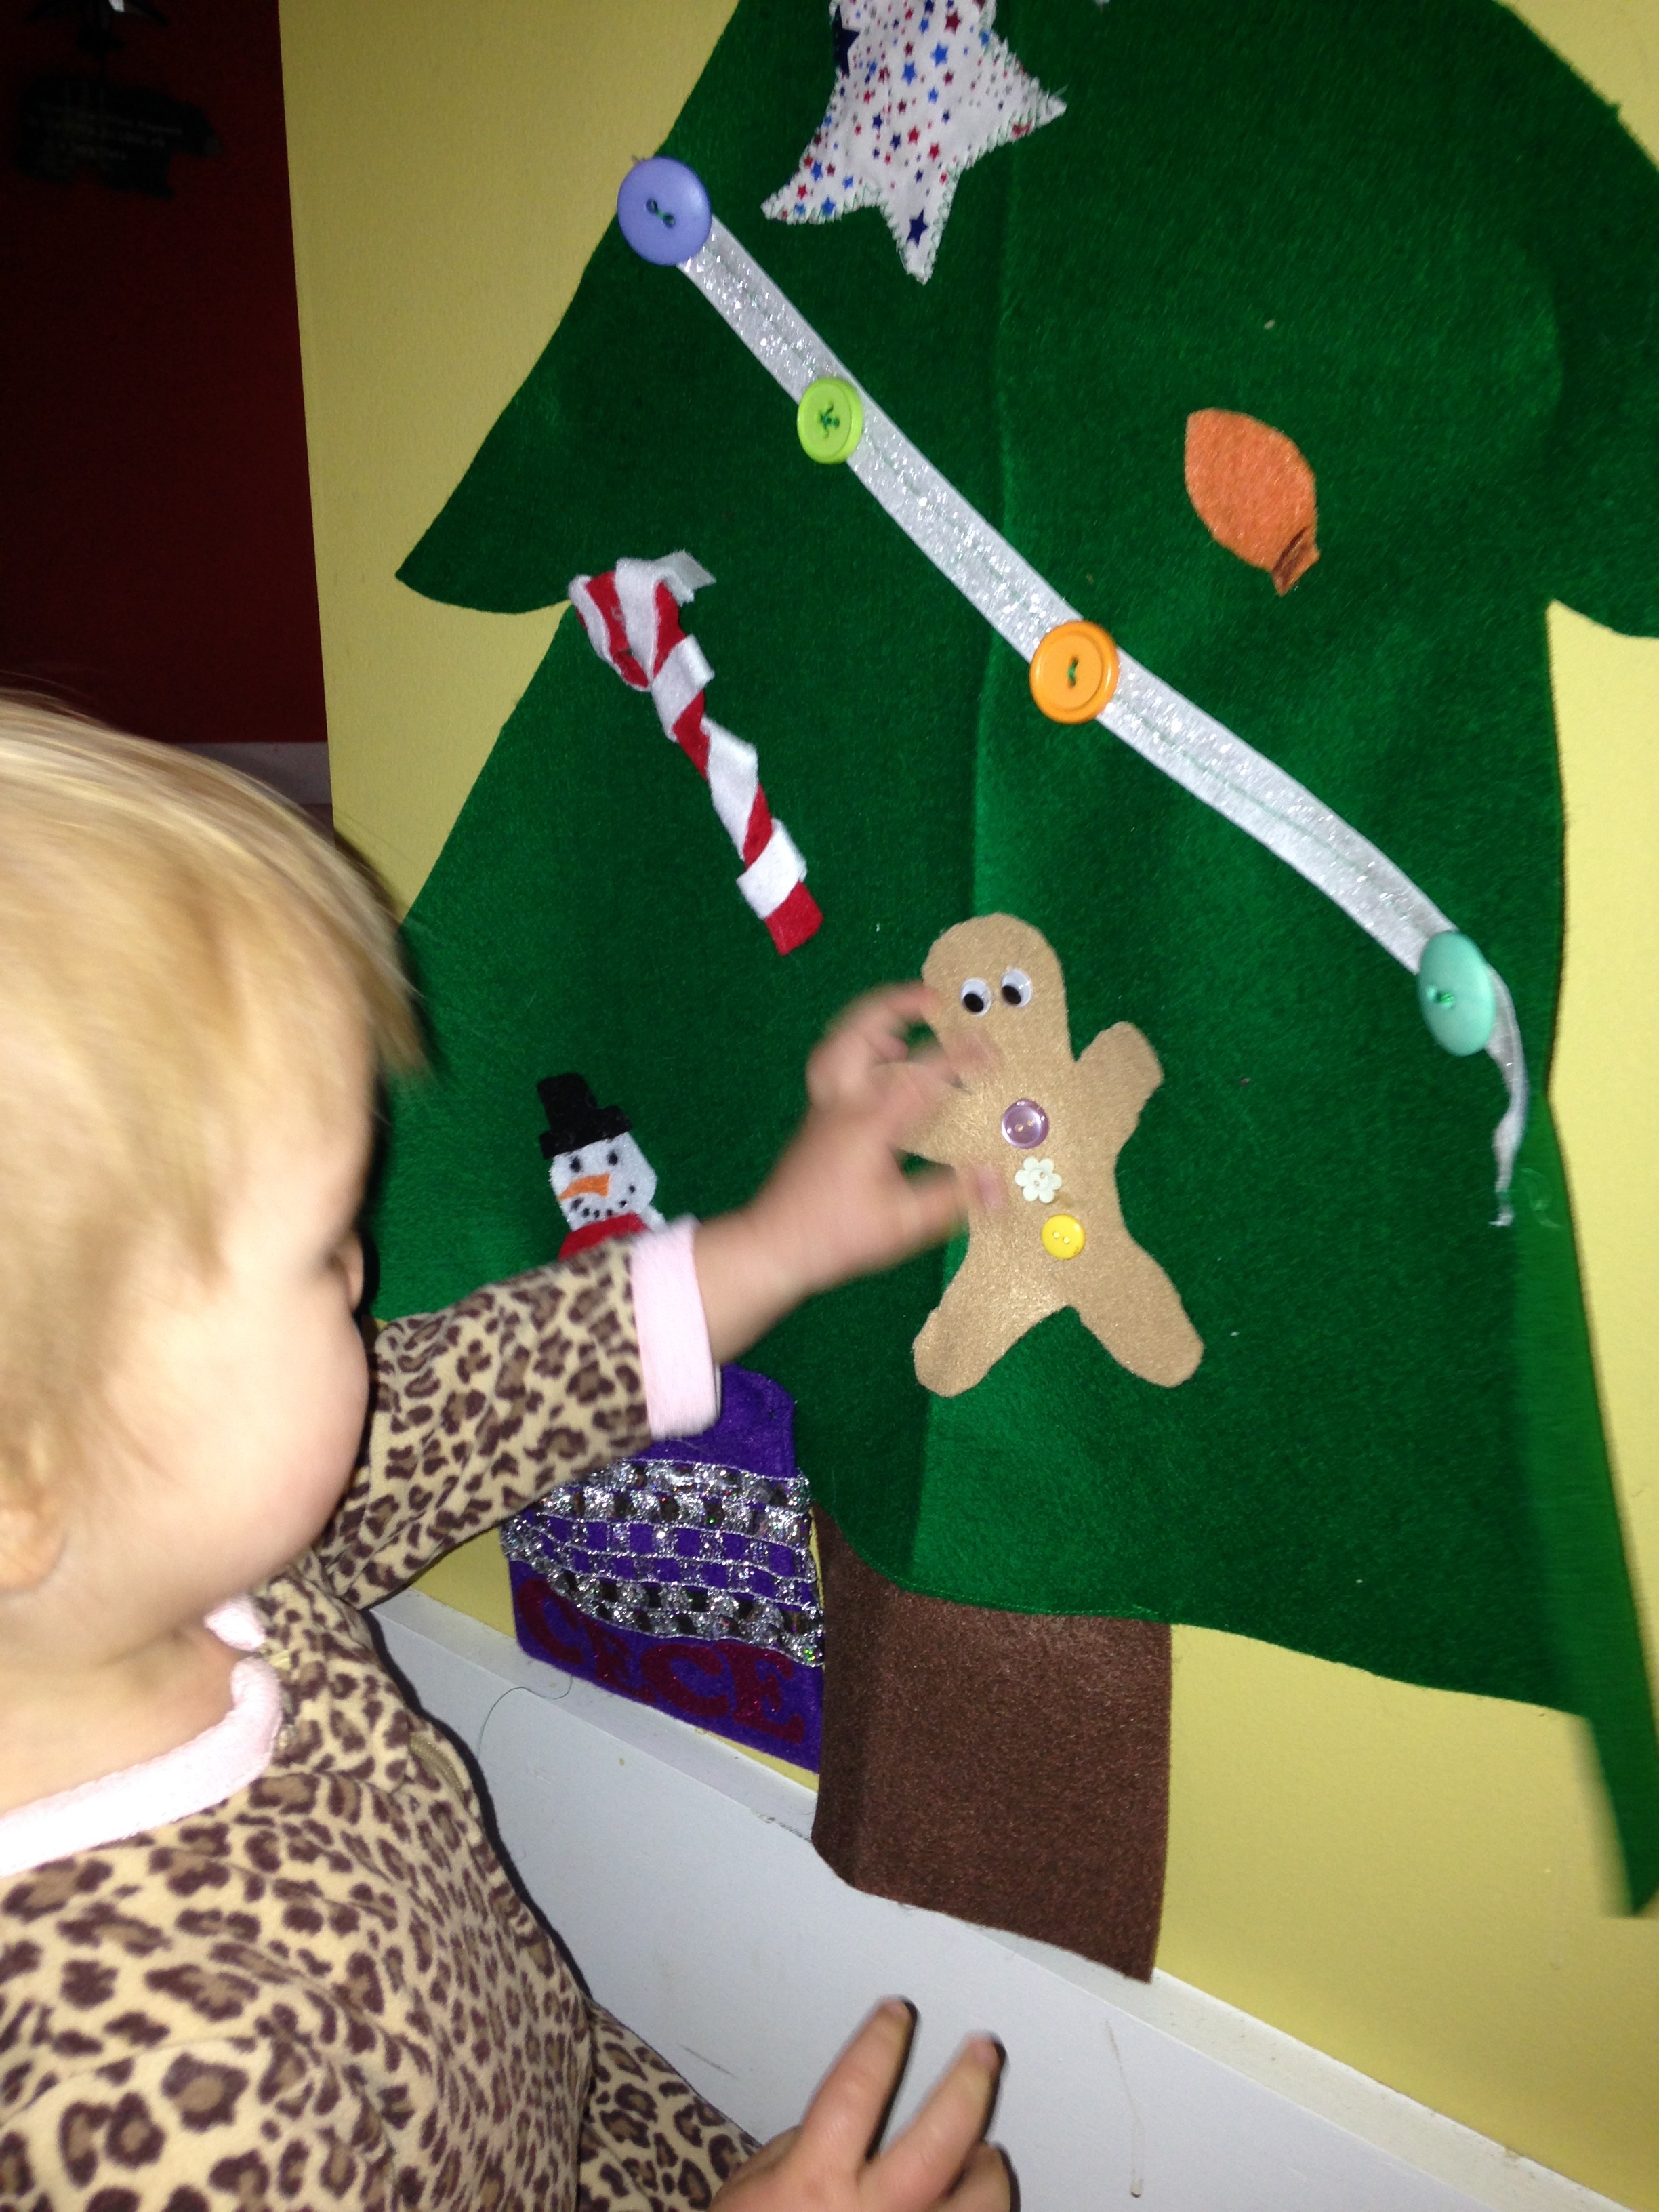
Cece bear loves to pull toys out of baskets and put them back in. She also likes to build blocks and figure out other puzzles. So I thought to myself, what can I make for Christmas that she can play with? And a mini Christmas tree came to mind. Eventually, I figured out a felt Christmas tree with all sorts of sensory stimulation and Velcro ornaments would work! So I decided to get to work.
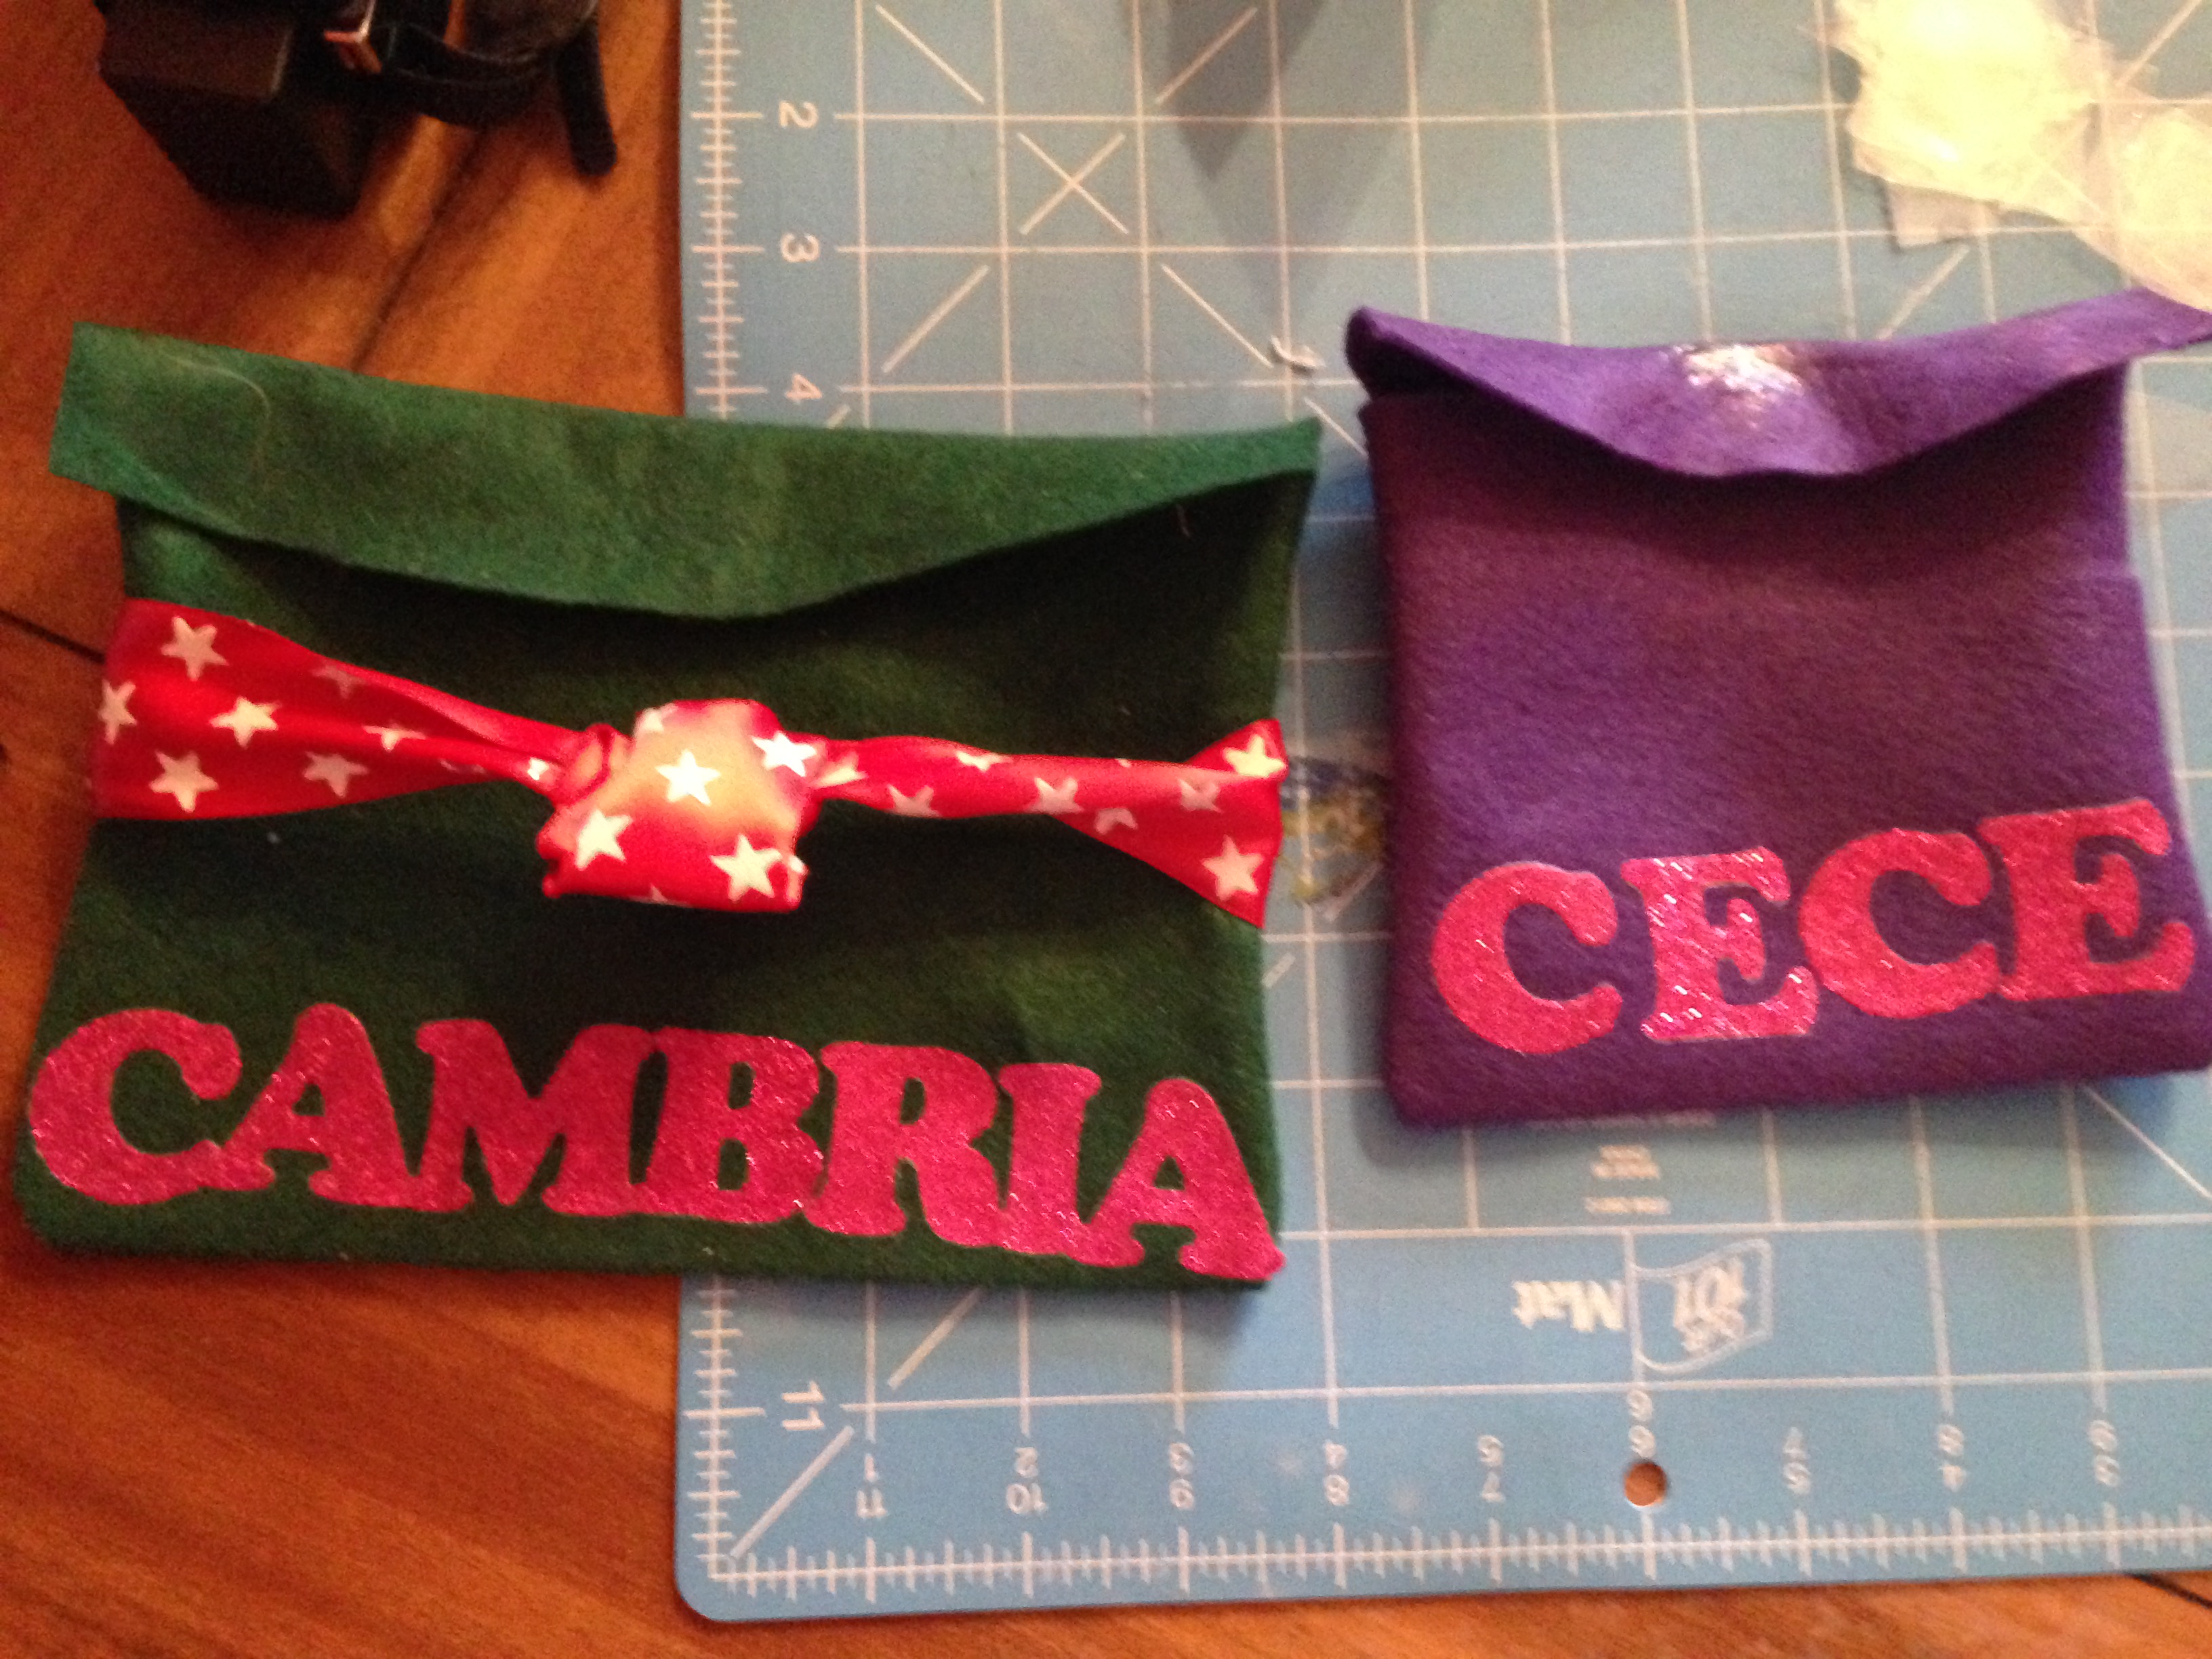
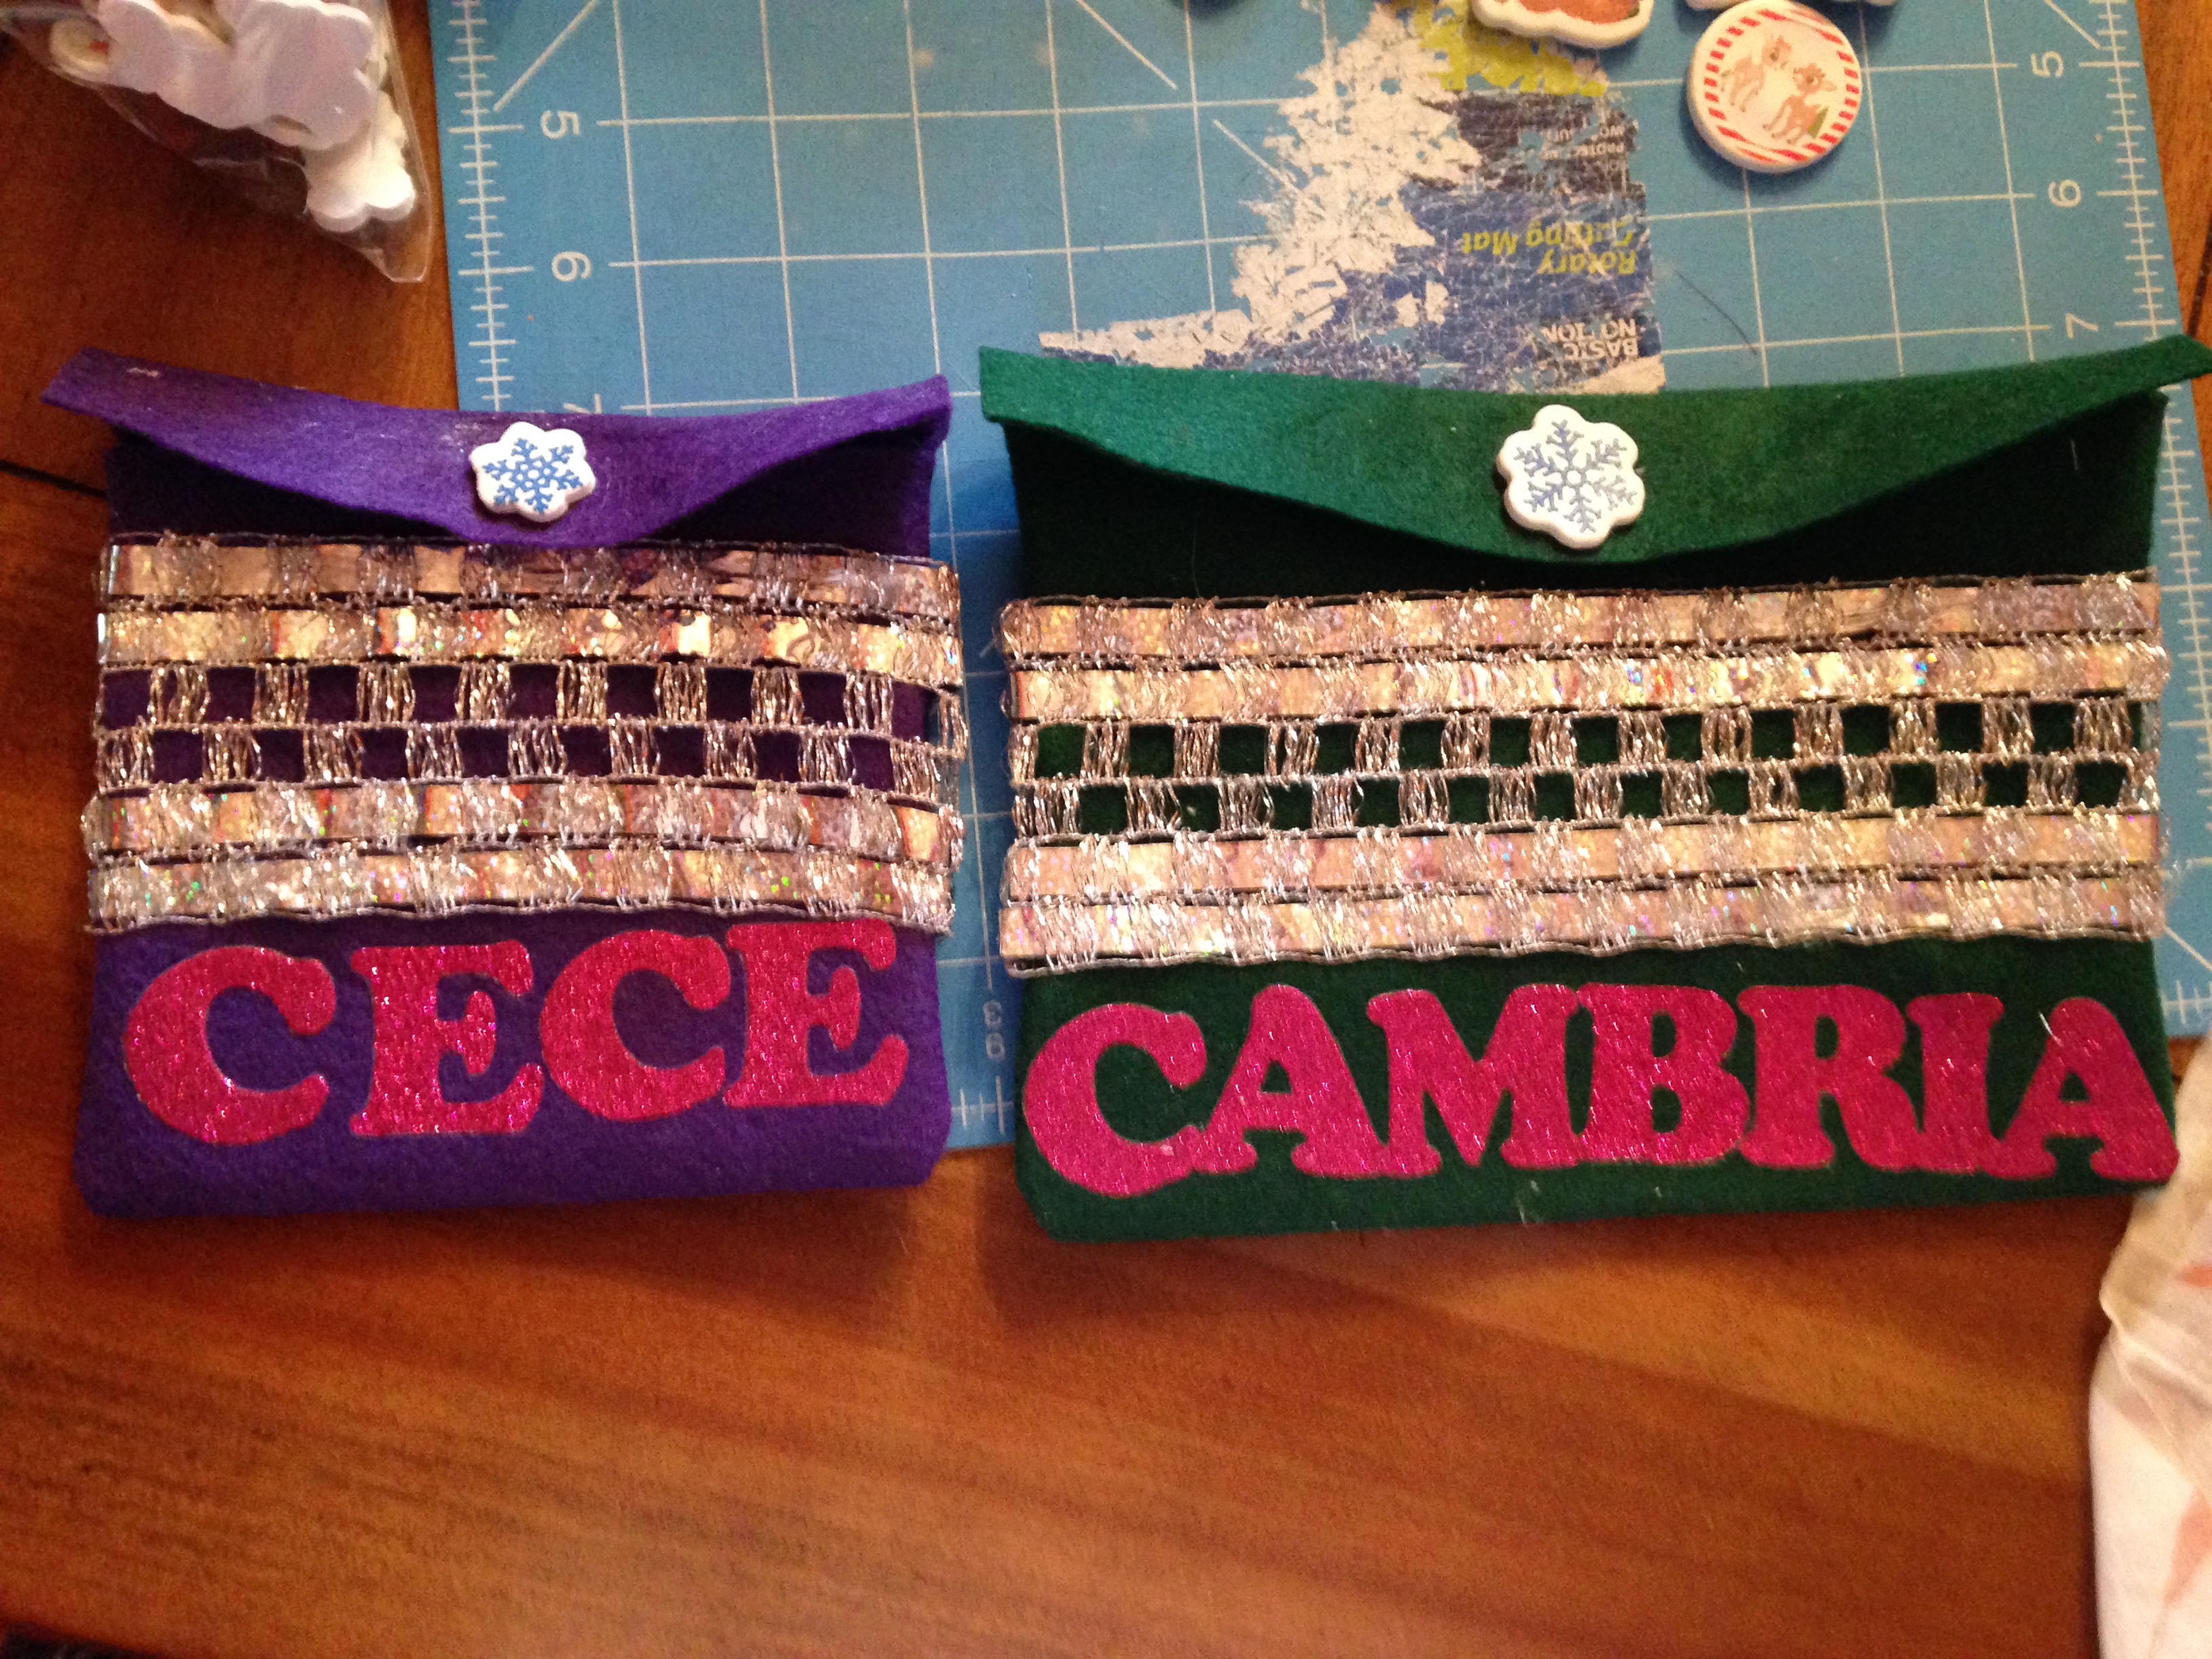
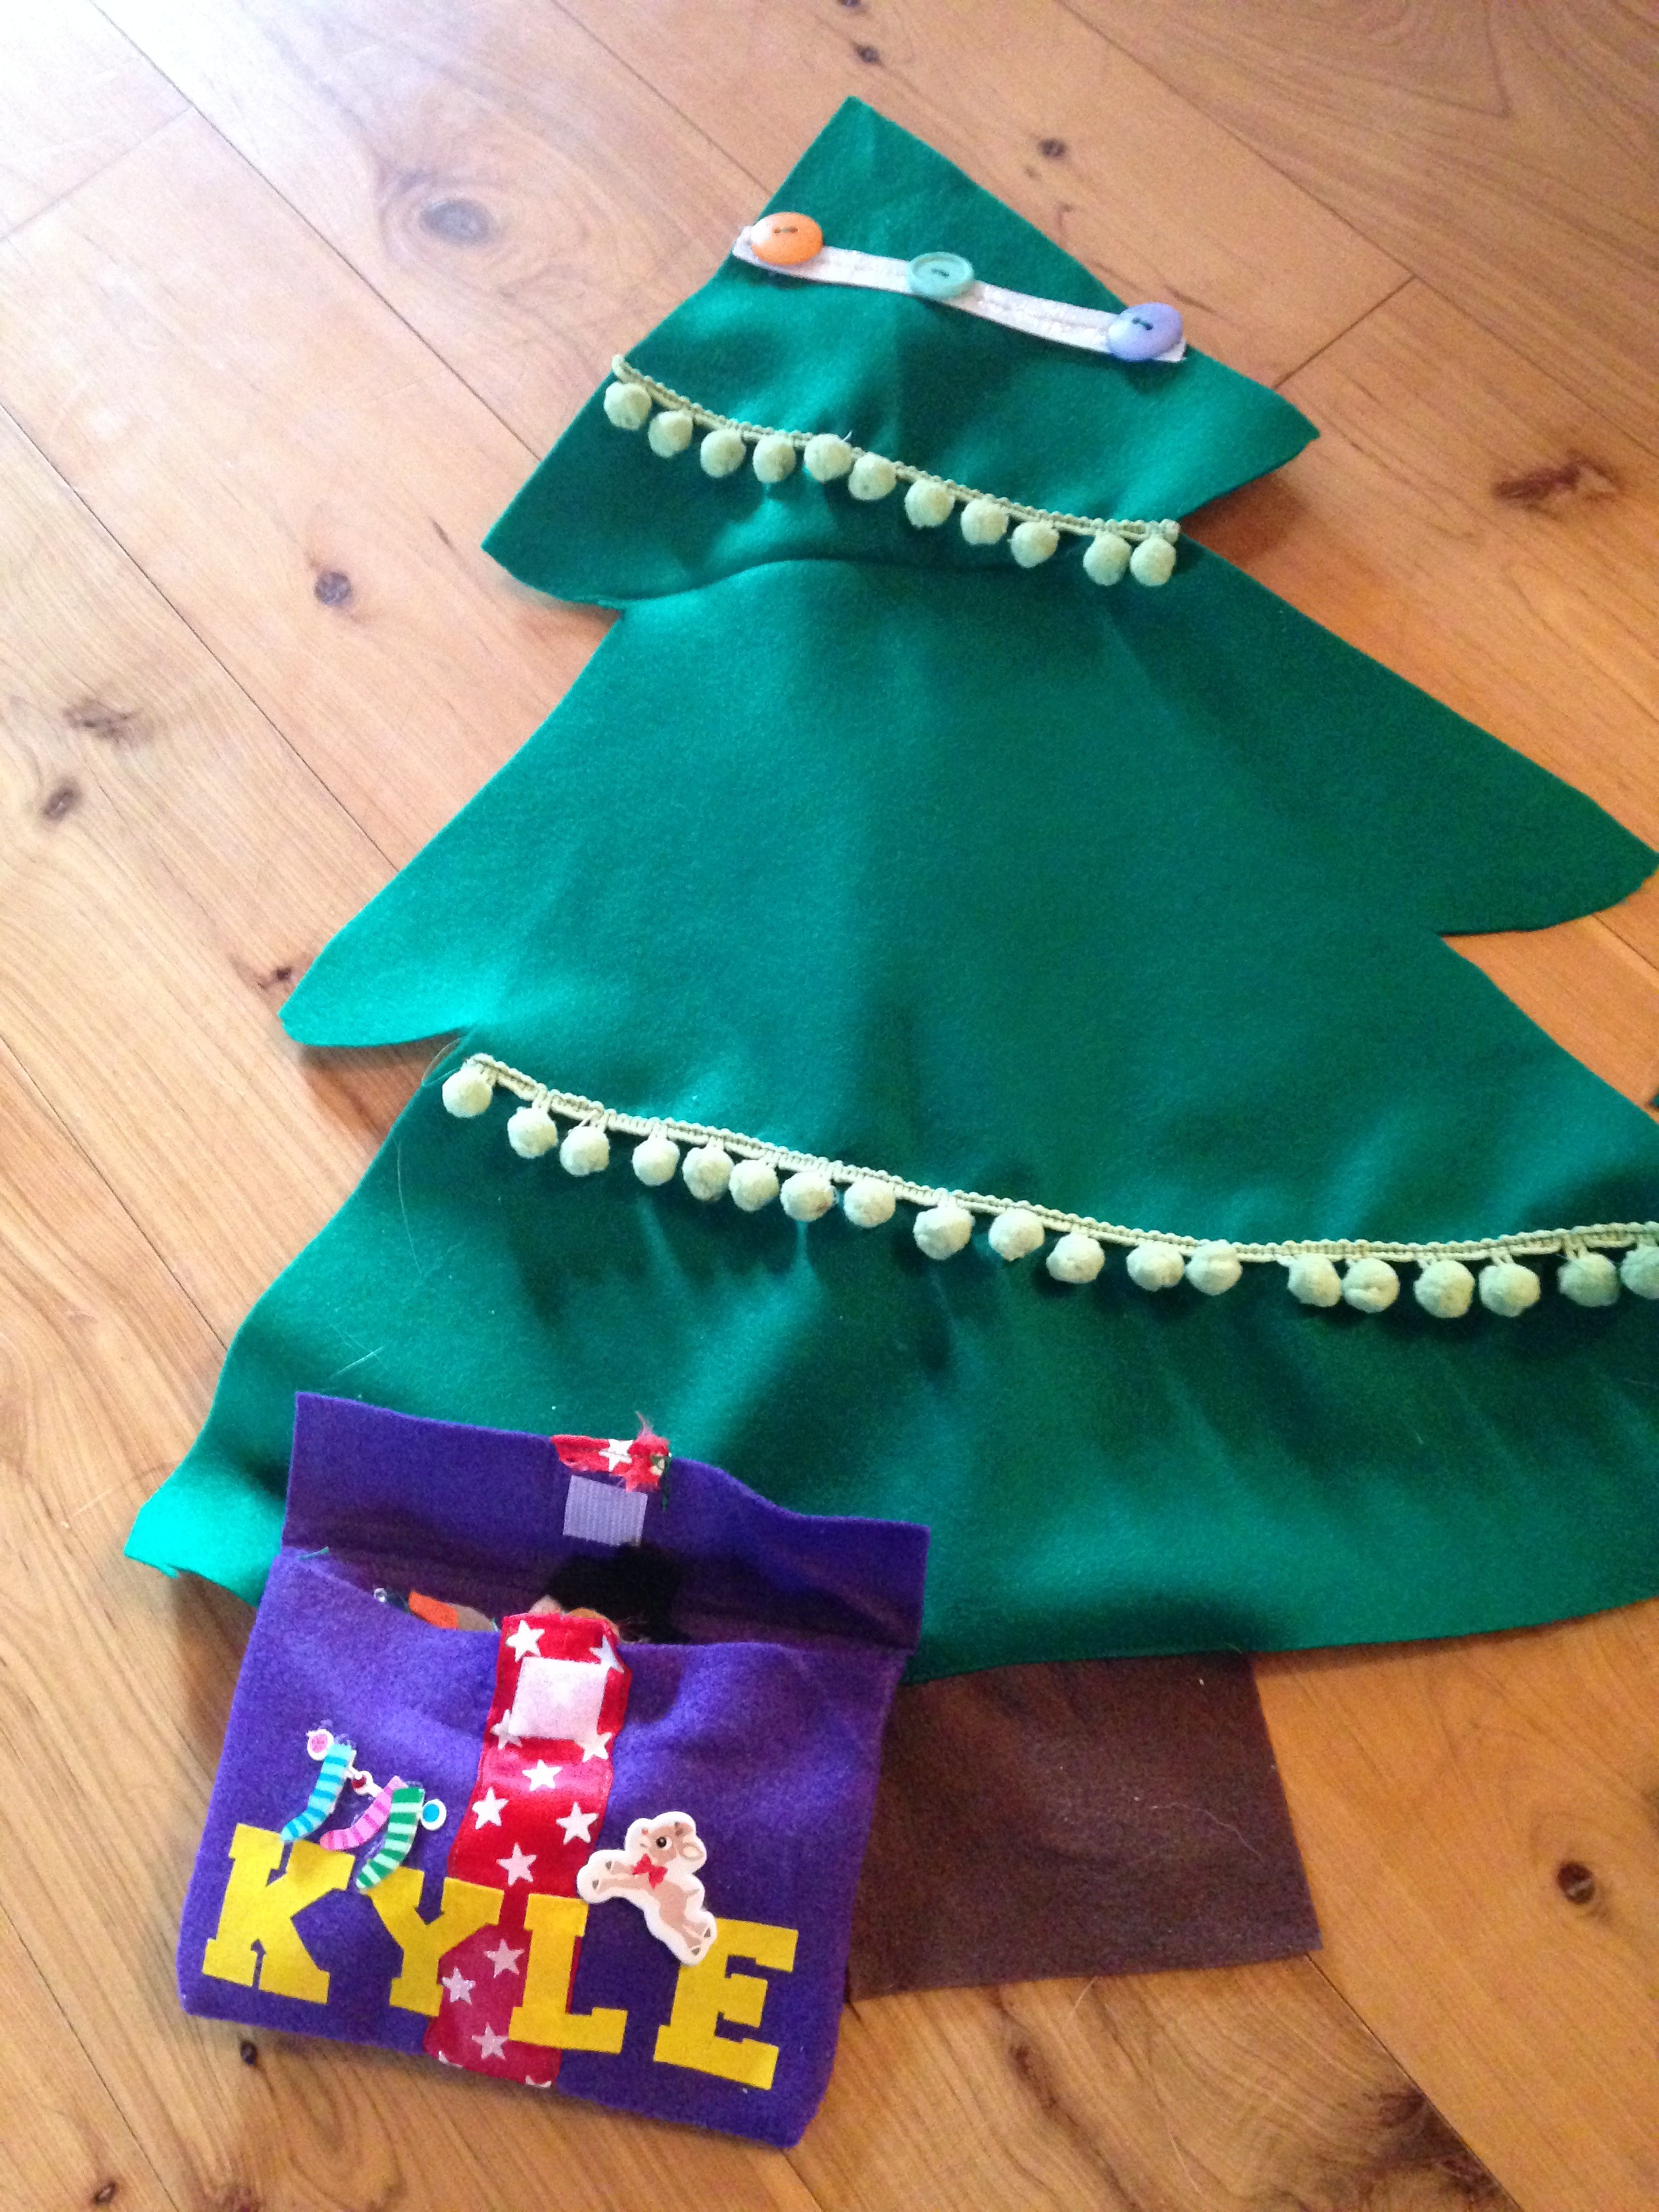
I decided to make three trees, one for each of Cece’s friends. It also made a great birthday gift for her friend Kyle’s first birthday! This is a great activity to do with older children as well. They can make their own ornaments and decorate the tree! There are a variety of ways to put the tree, ribbons, buttons, and ornaments together. The two I used were sewing and hot glue gun, but you can do one or the other as well. Just make sure if you have a baby, infant, or toddler, to make sure everything is very secure so they can’t pull it off!
As always, there is a youtube video and written steps and pictures. Feel free to add your own creativity and pizzazz!!!
If you have an older child, instead of using velcro to stick the ornaments on, you can use string or twine looped on the ornament and they can put them around buttons on the tree!
What you need:
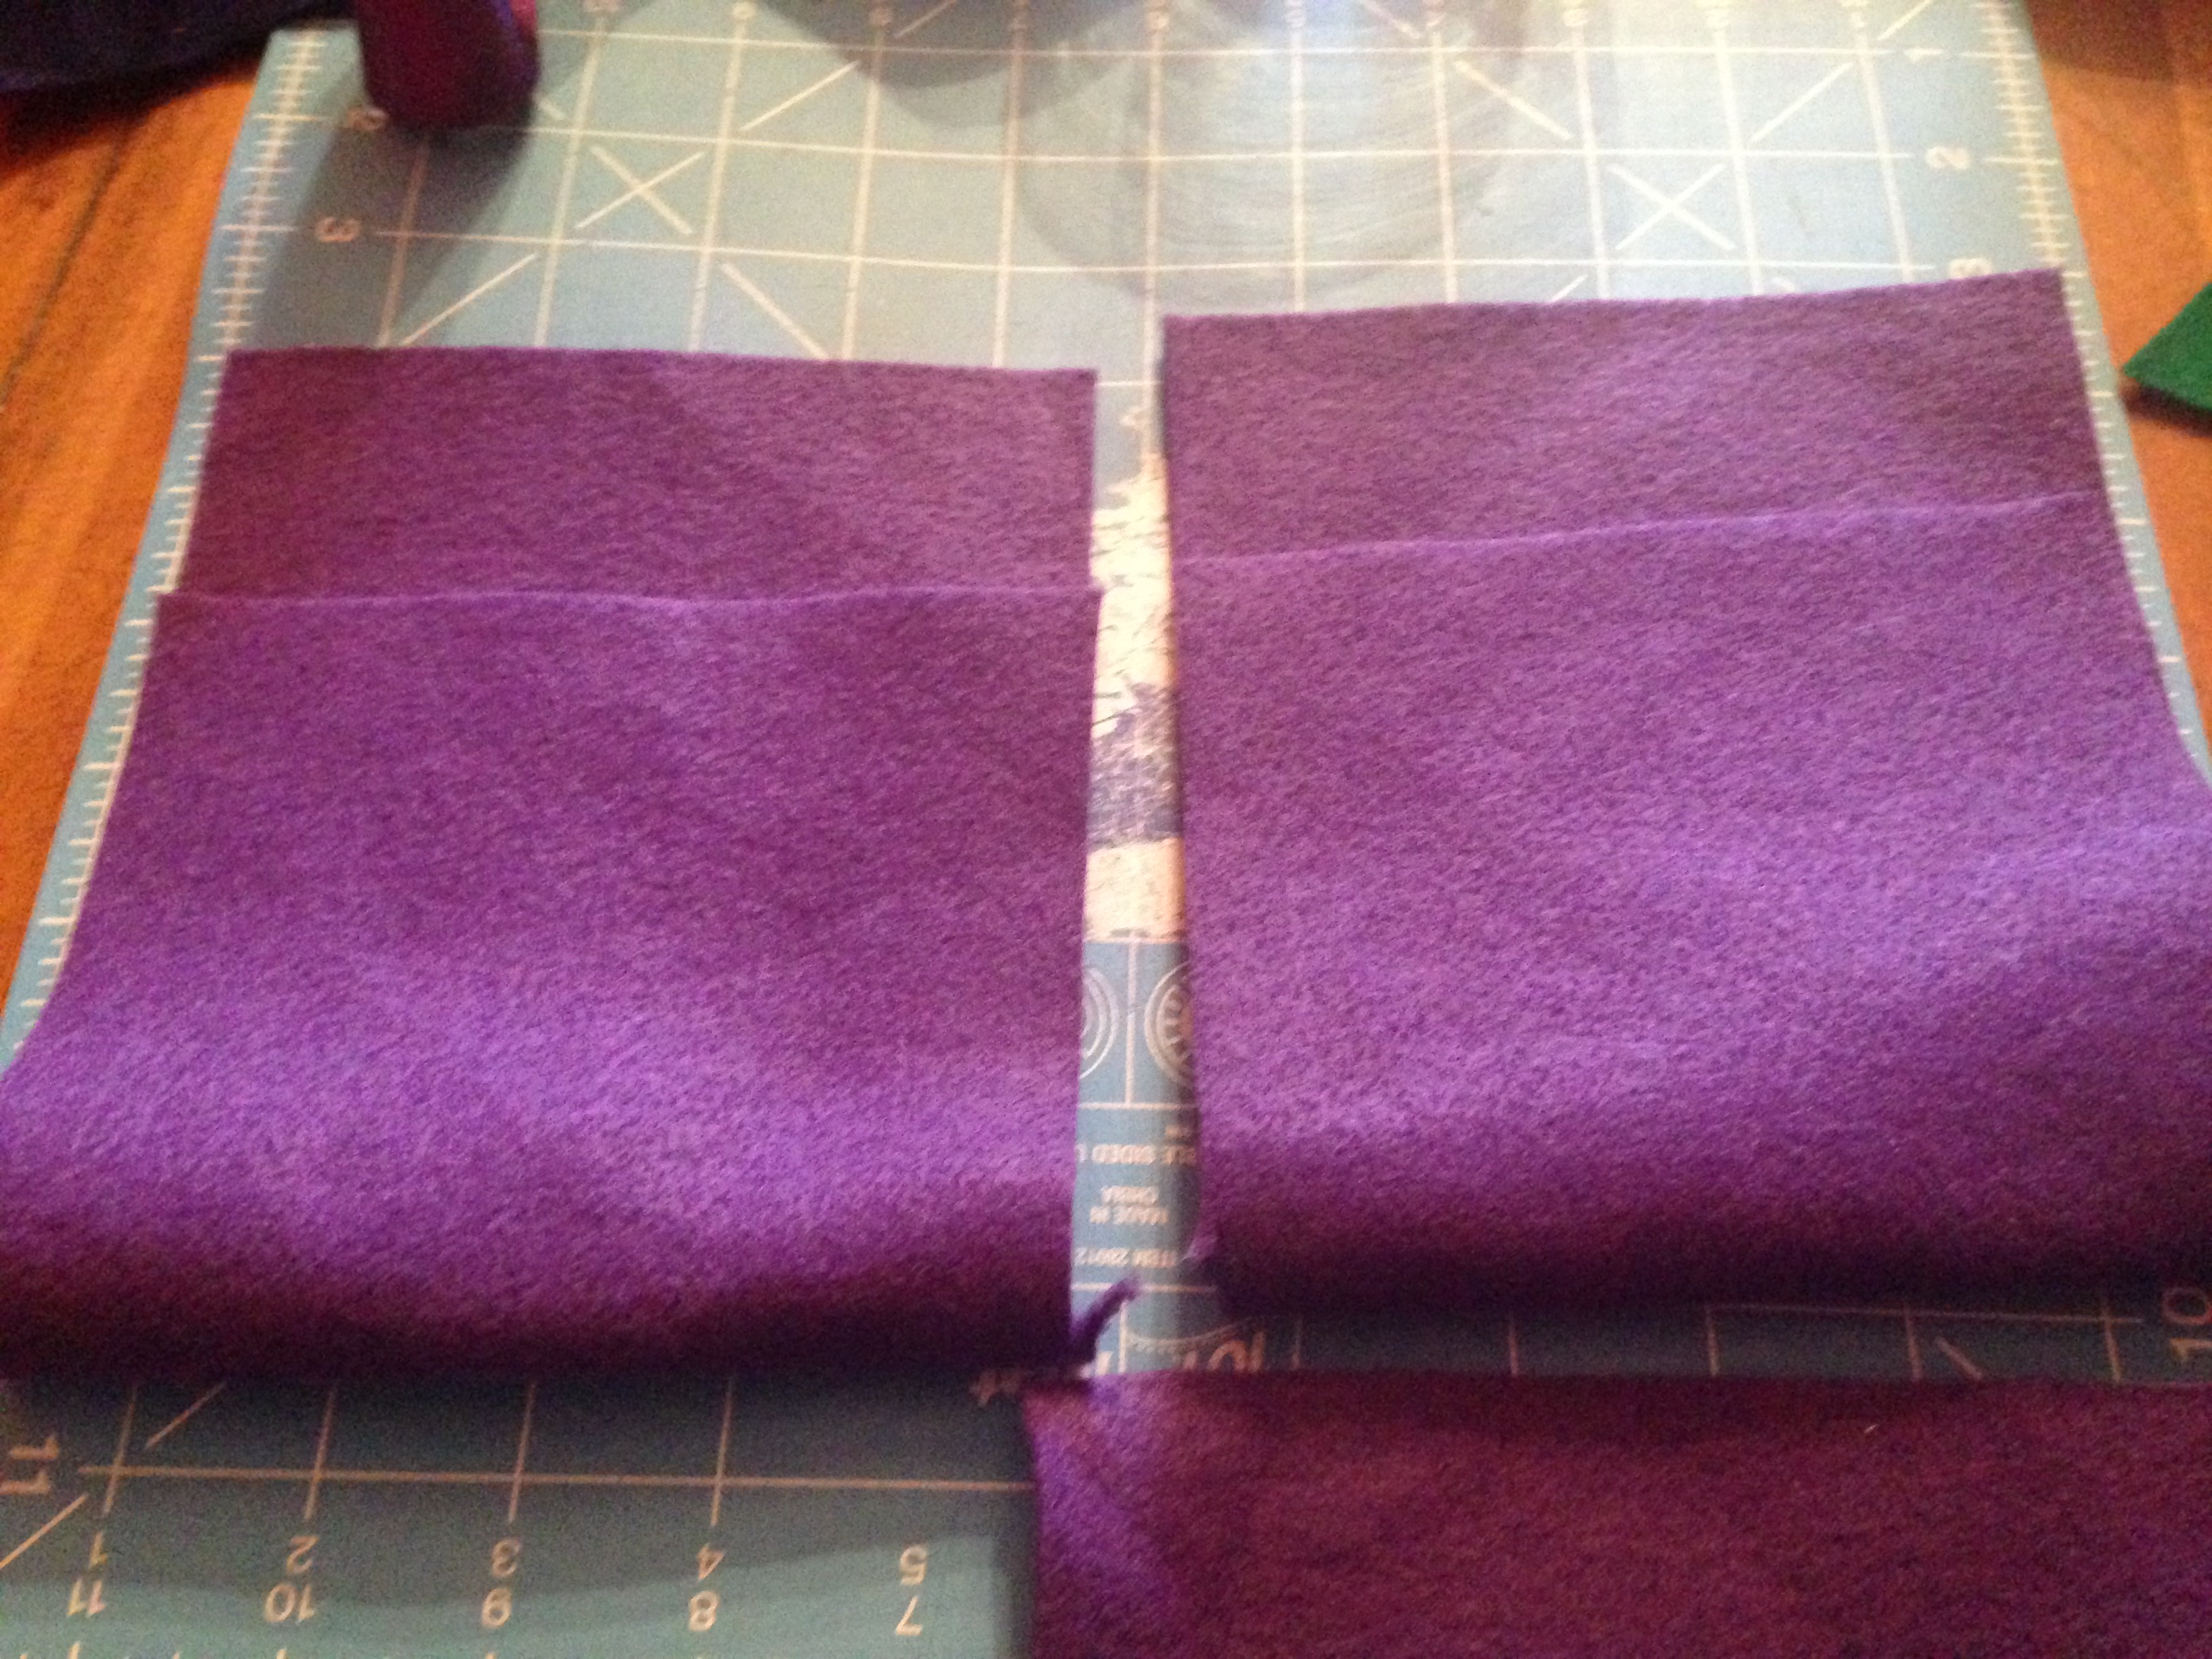
*Green felt fabric (I used 1.5
yards for three trees)
*velcro
*Brown felt fabric (stump)
*Felt fabrics of various colors for
ornaments of your choice and design
*optional: buttons, ribbons,
and other accessories
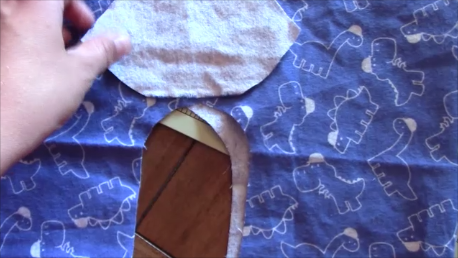
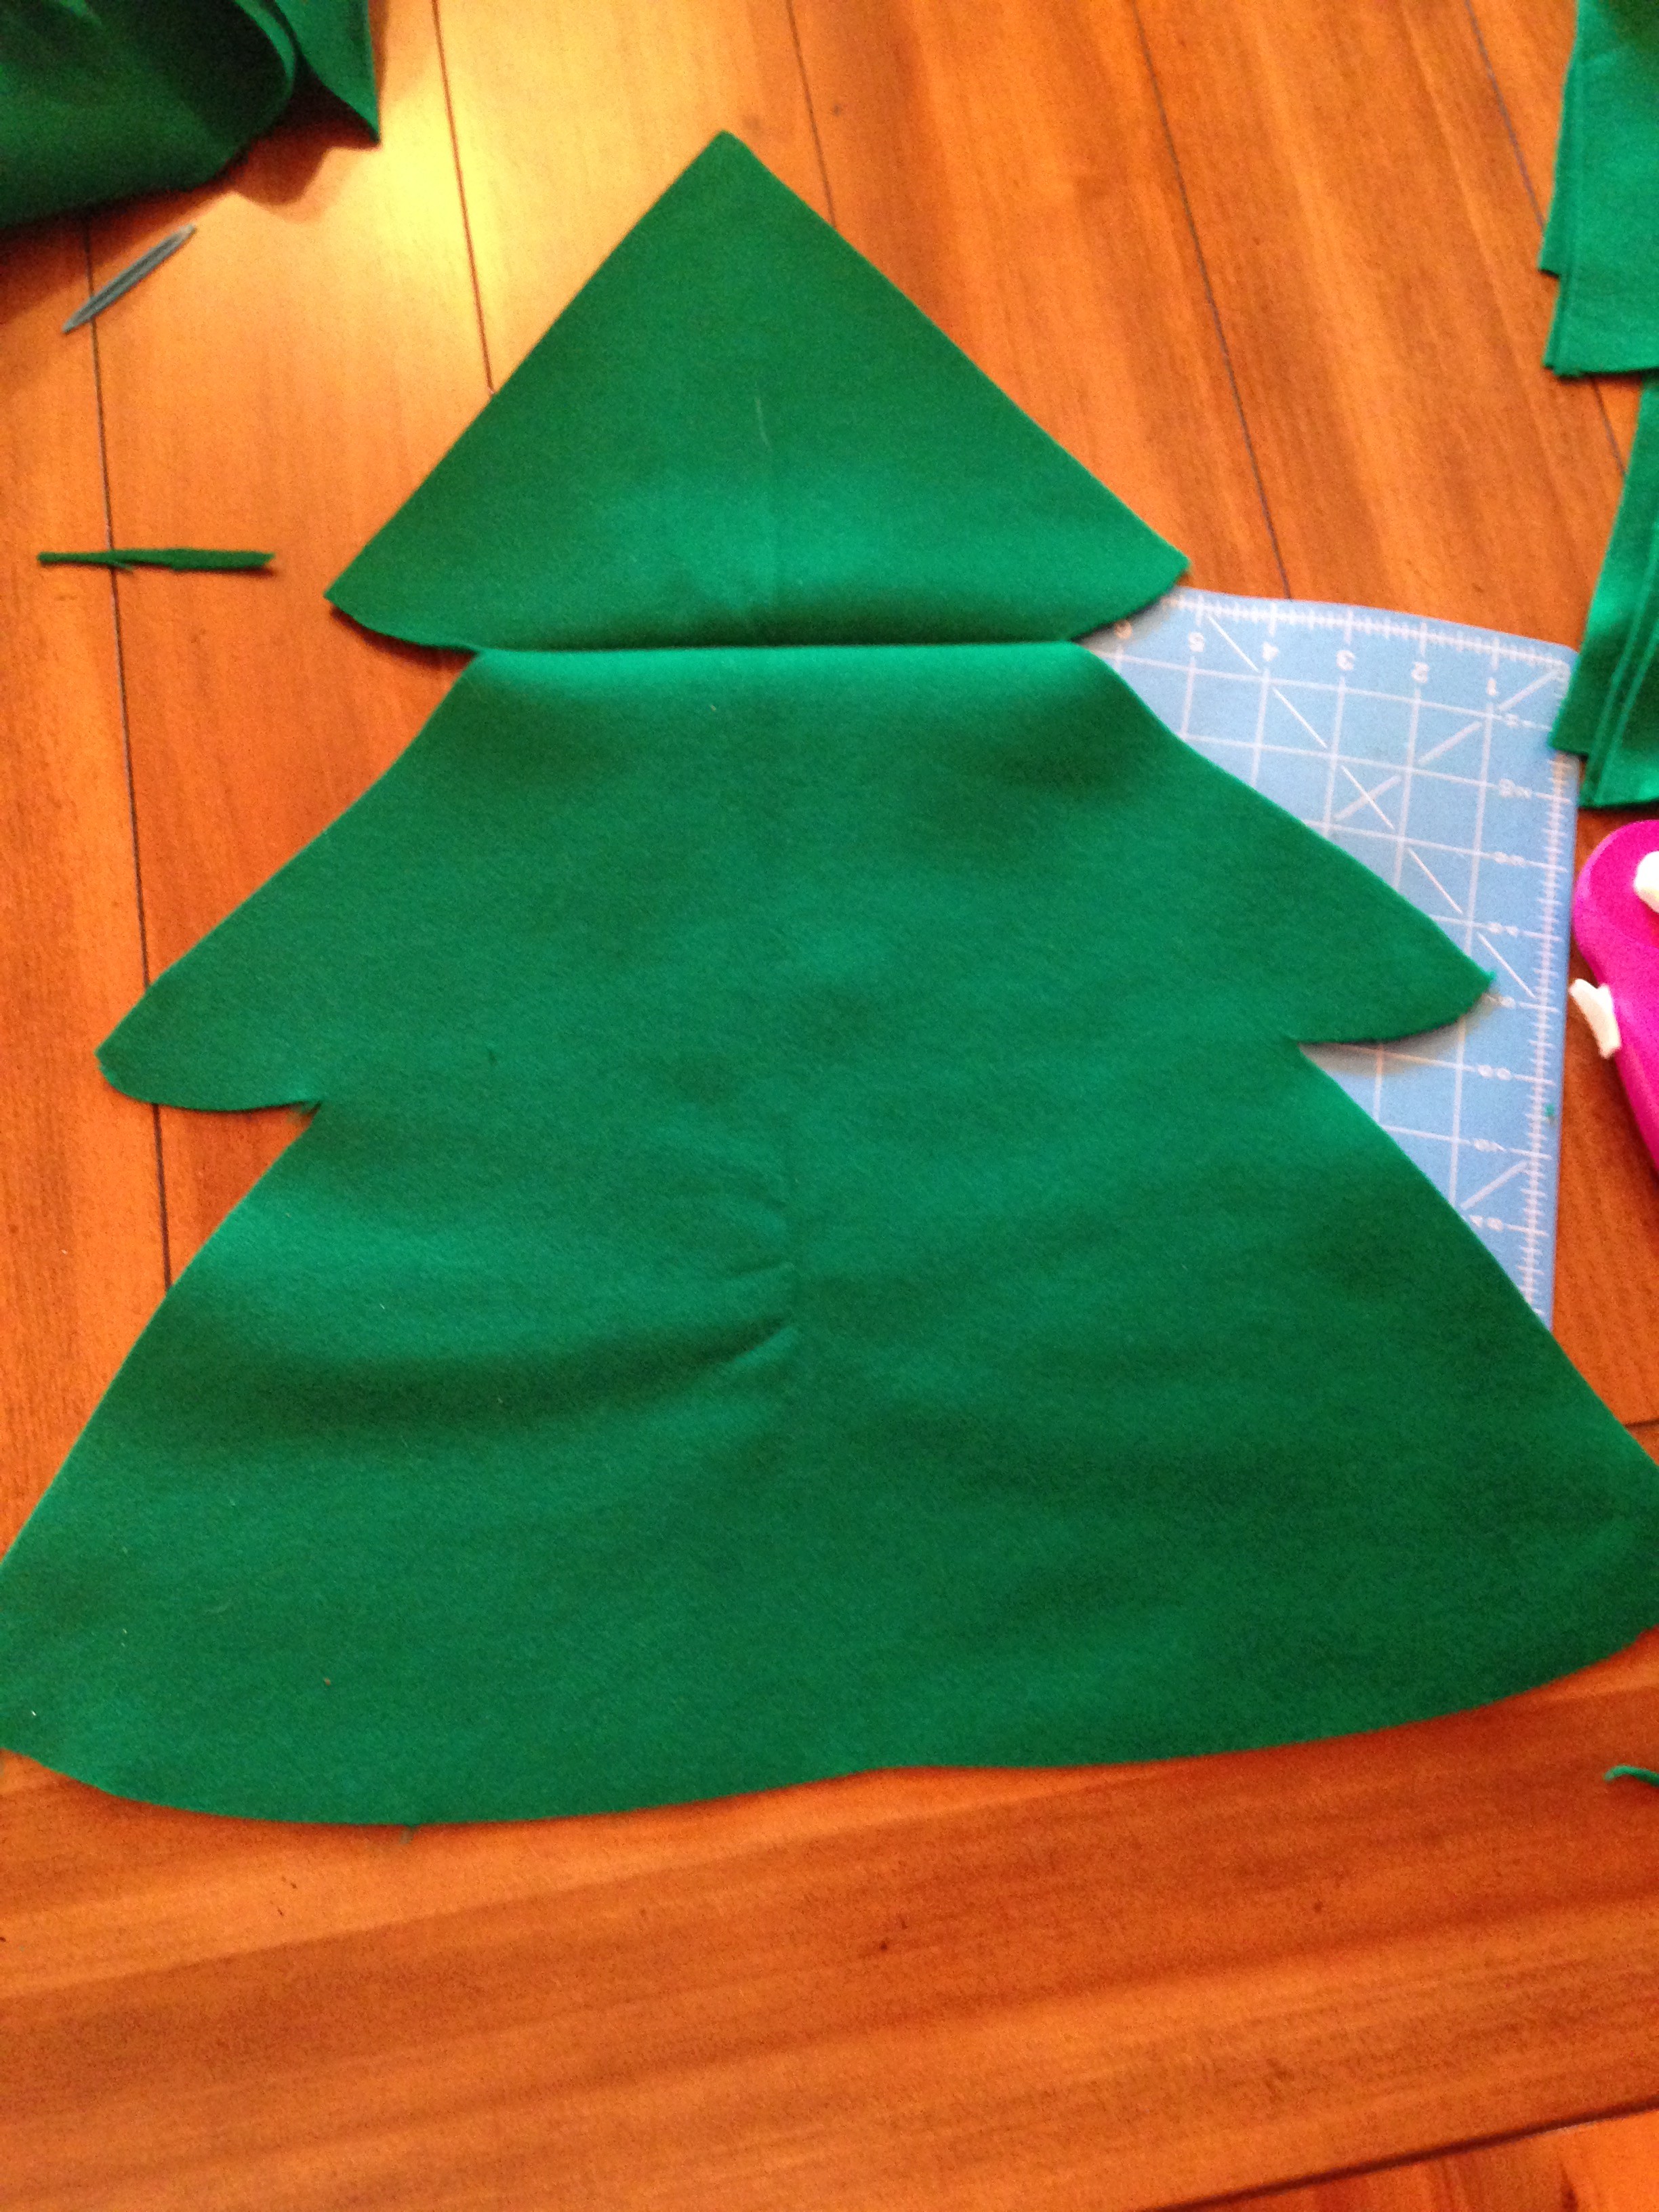
1) Fold your green felt and make a tree outline on the fold (so half of it traced on). Then cut your tree out!
2) Next, if you want a stump, use brown fabric to cut one out! Once again you can trace it out. You can either sew it on the bottom or hot glue gun.
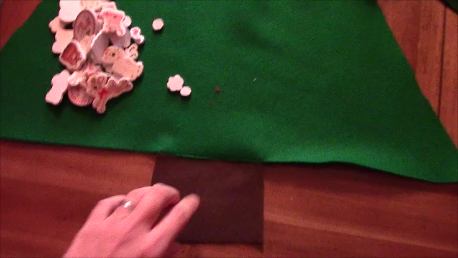
3) I wanted to make something to hold the ornaments besides just having them stick to the tree. So I decided a present with the child’s name on it would be perfect! So next I chose a color of felt I had and cut about 11x 7 inches.
4) Next, for one of the presents I made I wanted the bow long ways down so I sewed a piece of ribbon straight down the piece. (the other two I made have it across the box which you can sew on now or later)
5) The next step would be to turn it right sides facing inwards and sew to the length you want so you have the top of the present flap long enough. Check out the picture to see what I mean. Then turn right side out.
6) As you can see, I decided to iron on letters for the name of the child. These two presents are different sizes. Also, if you want to put a piece of iron on or sew on or glue gun on Velcro to the top of the present to have it stick now is the time.
7) Then decorate the present at will. I added some adhesive Rudolph stickers. I did hot glue them so they would be more secure.
8) Follow that, I sewed the present onto the tree. This is optional, you can have it separate or not have a present at all. I opened the top flap and sewed right along the fold to the tree. You can also hot glue gun it.
8) Now, back to the tree. Now is the time to get even more creative! Use ribbons, garland, buttons, or whatever you want on the tree! You can sew or hot glue gun them on. If you have an older child and want to have hanging ornaments on buttons then align your buttons!
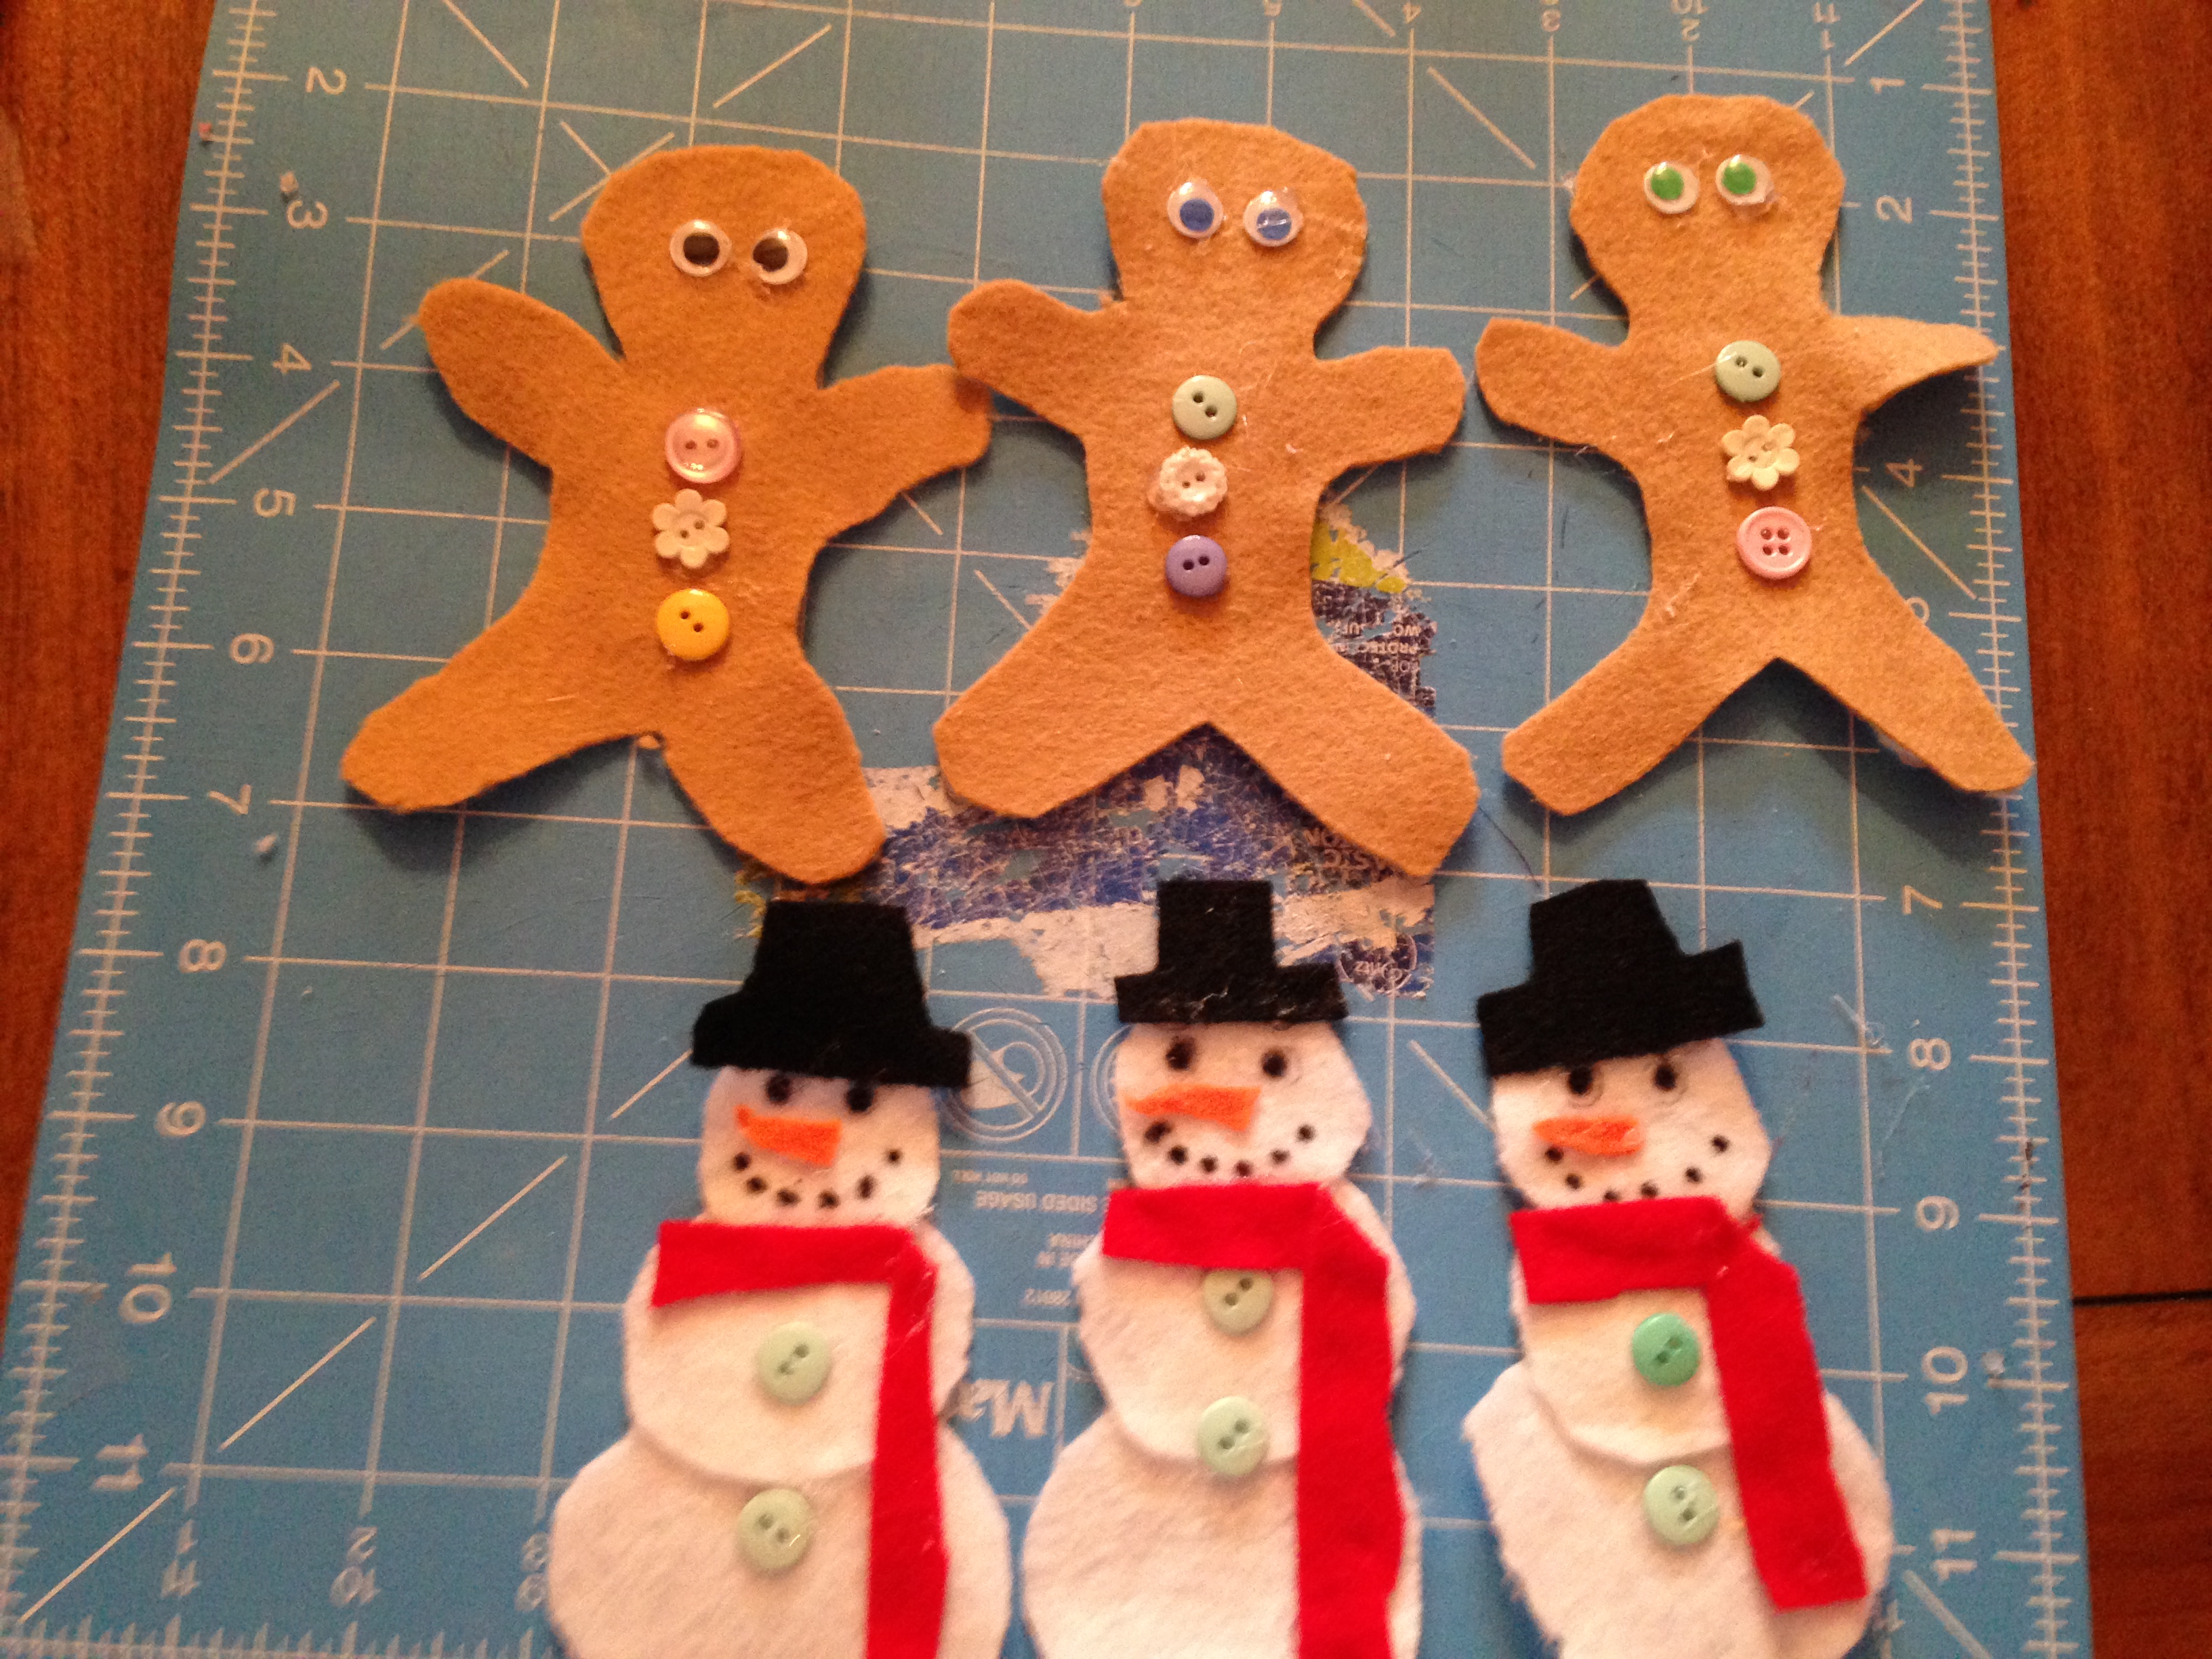
9) Next, it is time to make ornaments. If your child is older they can help decorate and make ornaments. I chose actually Christmas items and one ornament and one light bulb. I used whatever felt scraps I had to make them. I also made a star at the end. Remember to Velcro your ornaments on the back using the hard side of the Velcro. You want to iron them on before you decorate the front! Otherwise you might melt or damage your decorations.
To hang the tree, I used 3m adhesive strips, but I have heard that the blue paint tape works well on walls. You can also use suction cups if its on the window or door. Ok enjoy! Feel free to post your tree below!
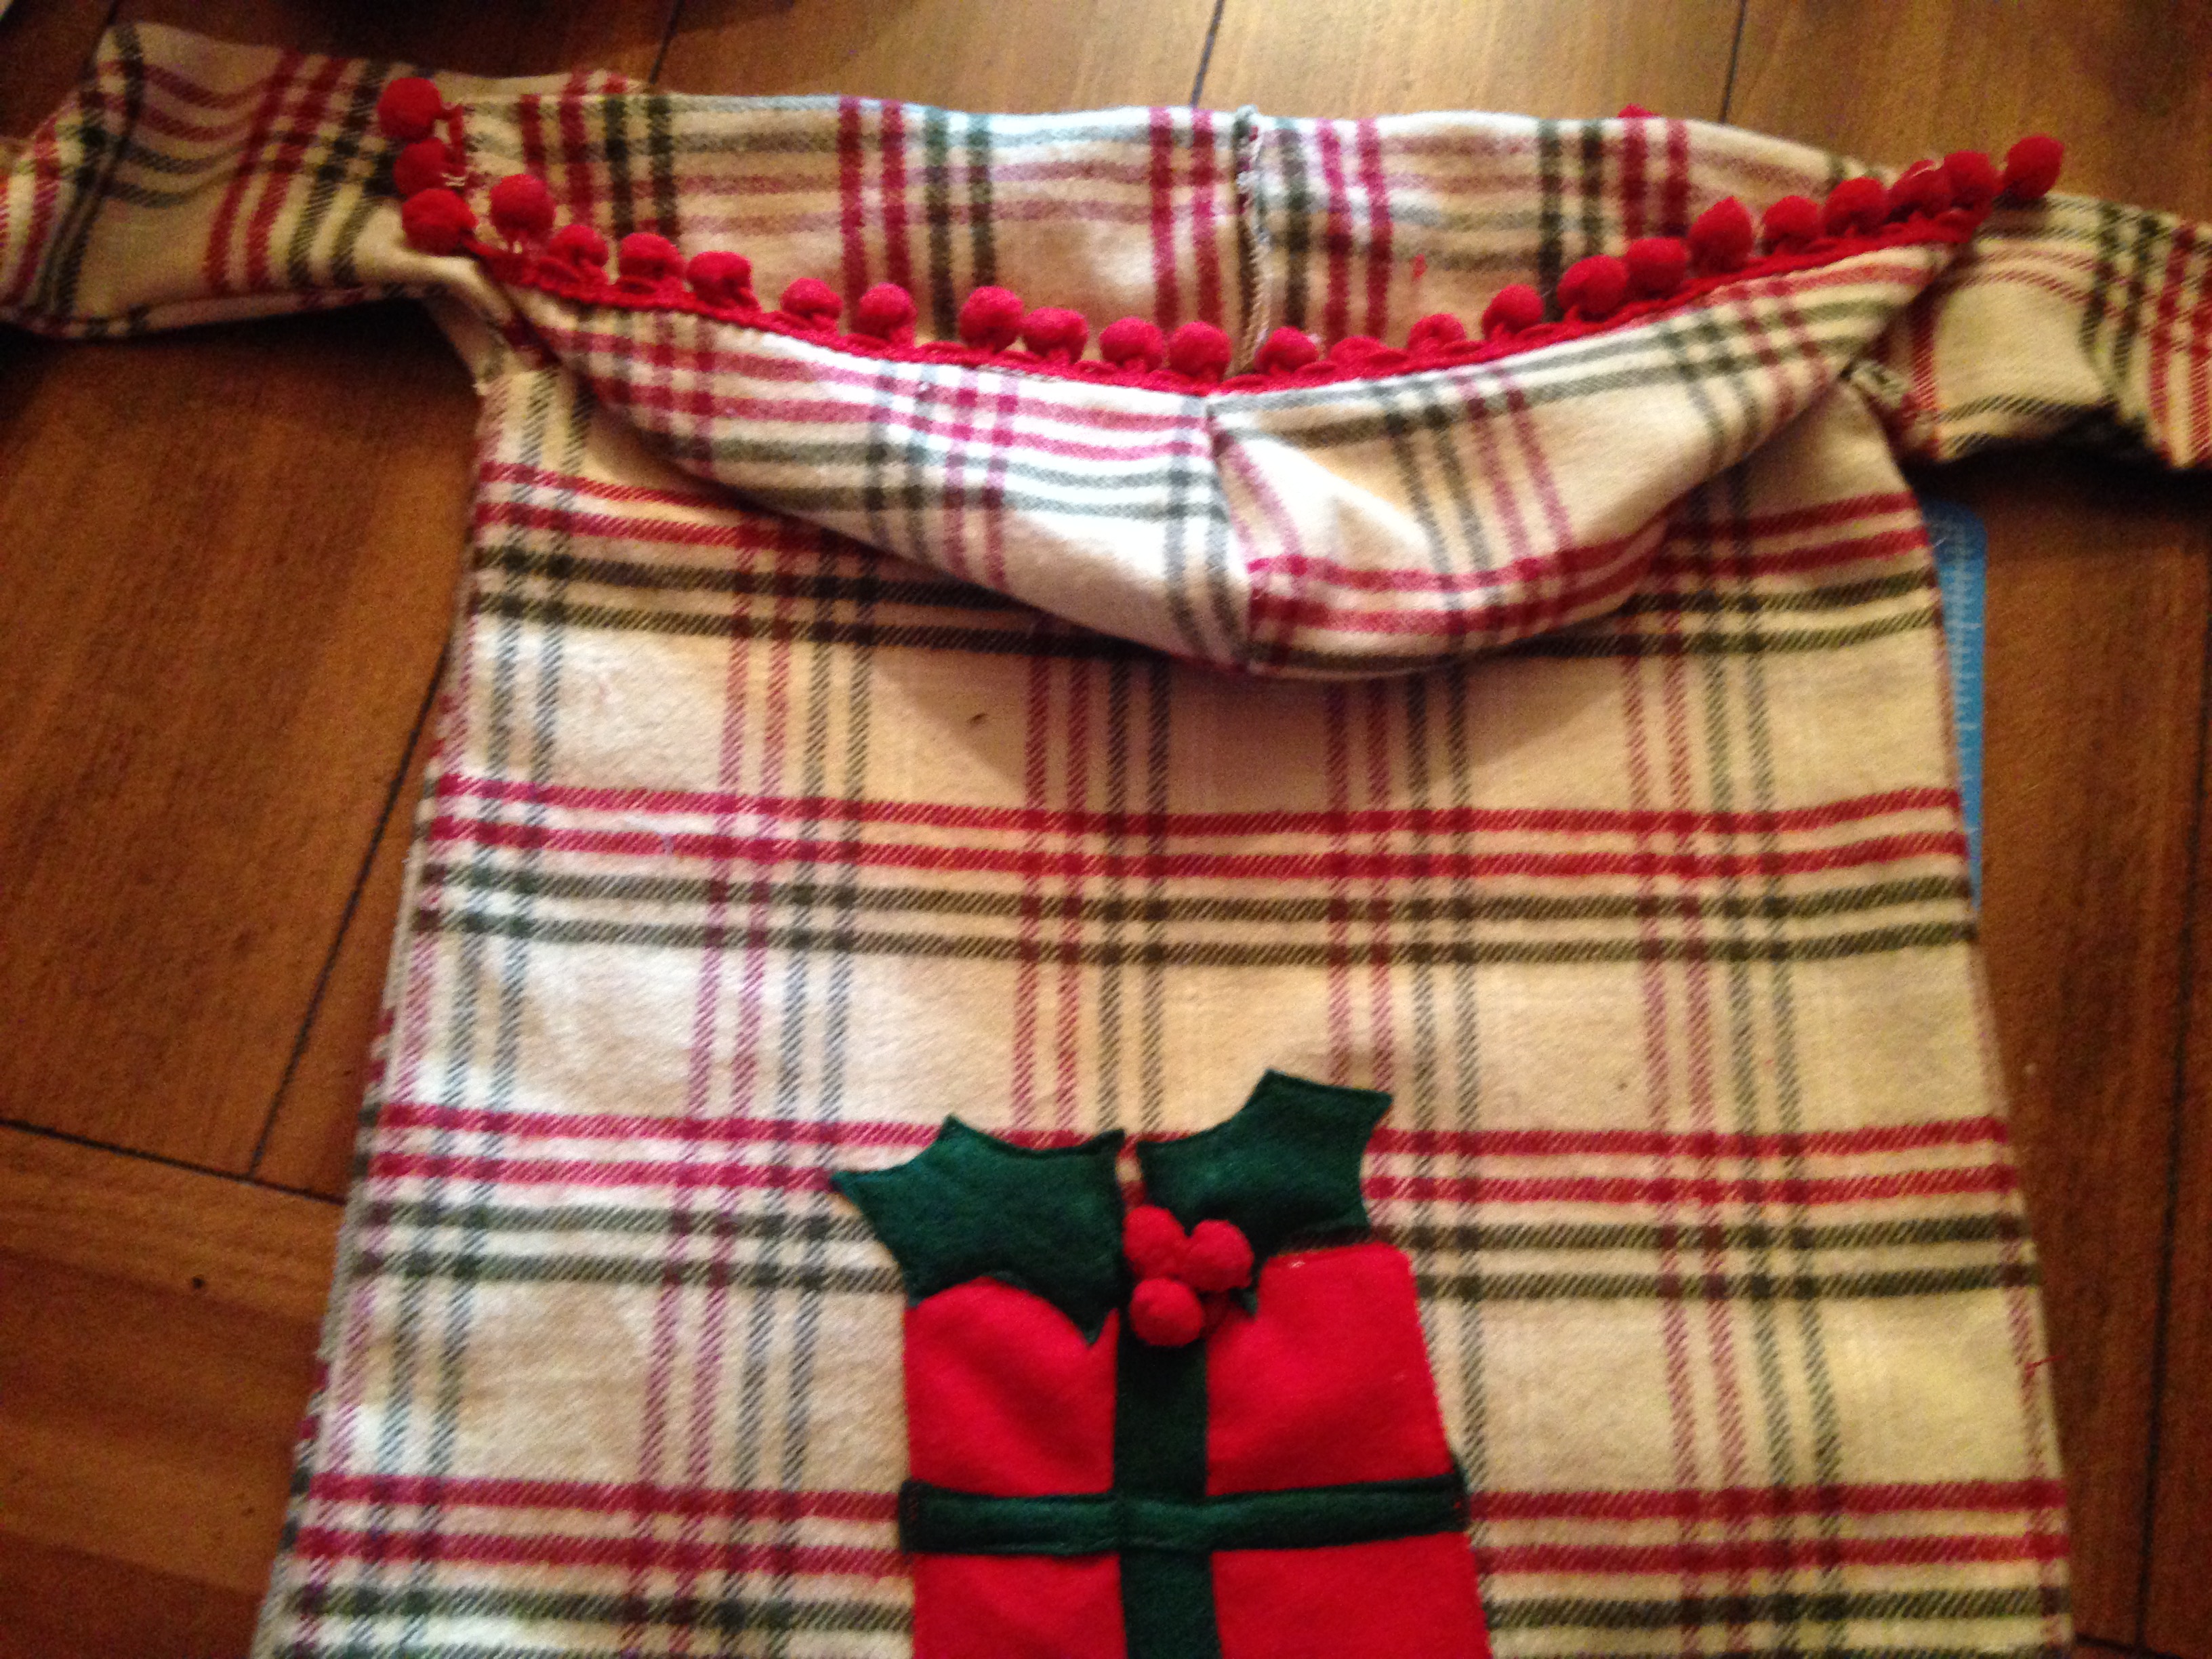
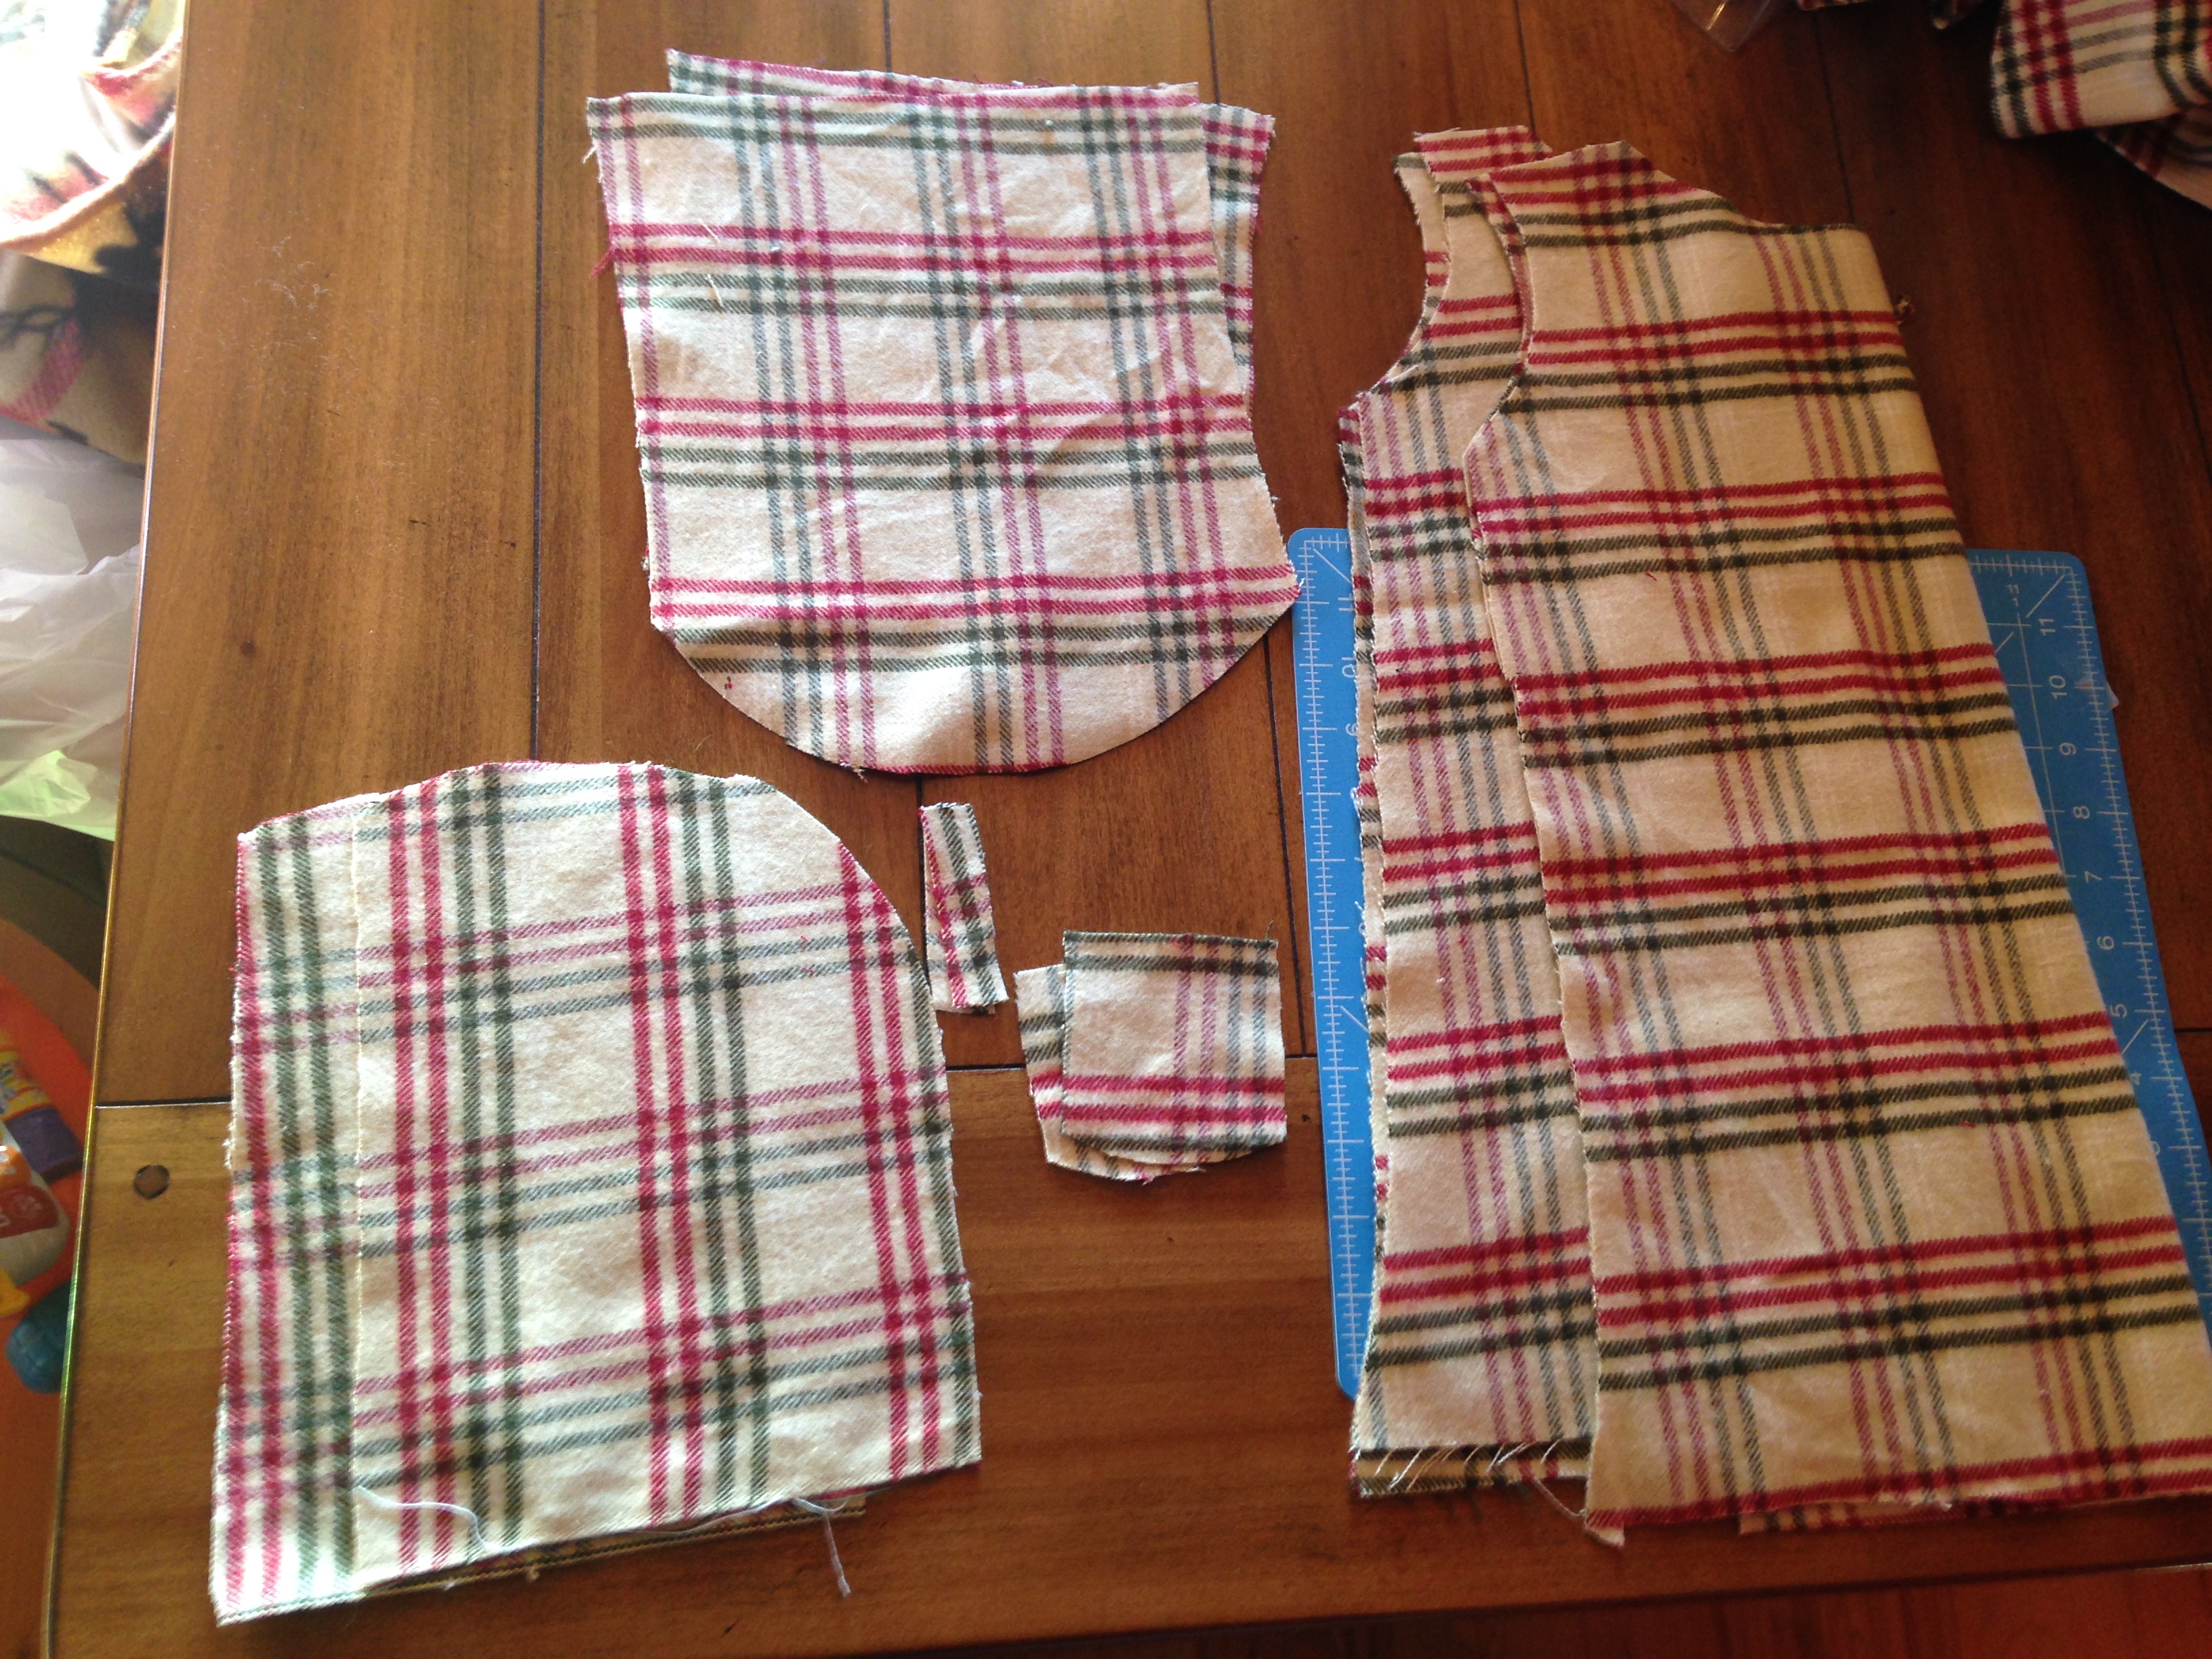
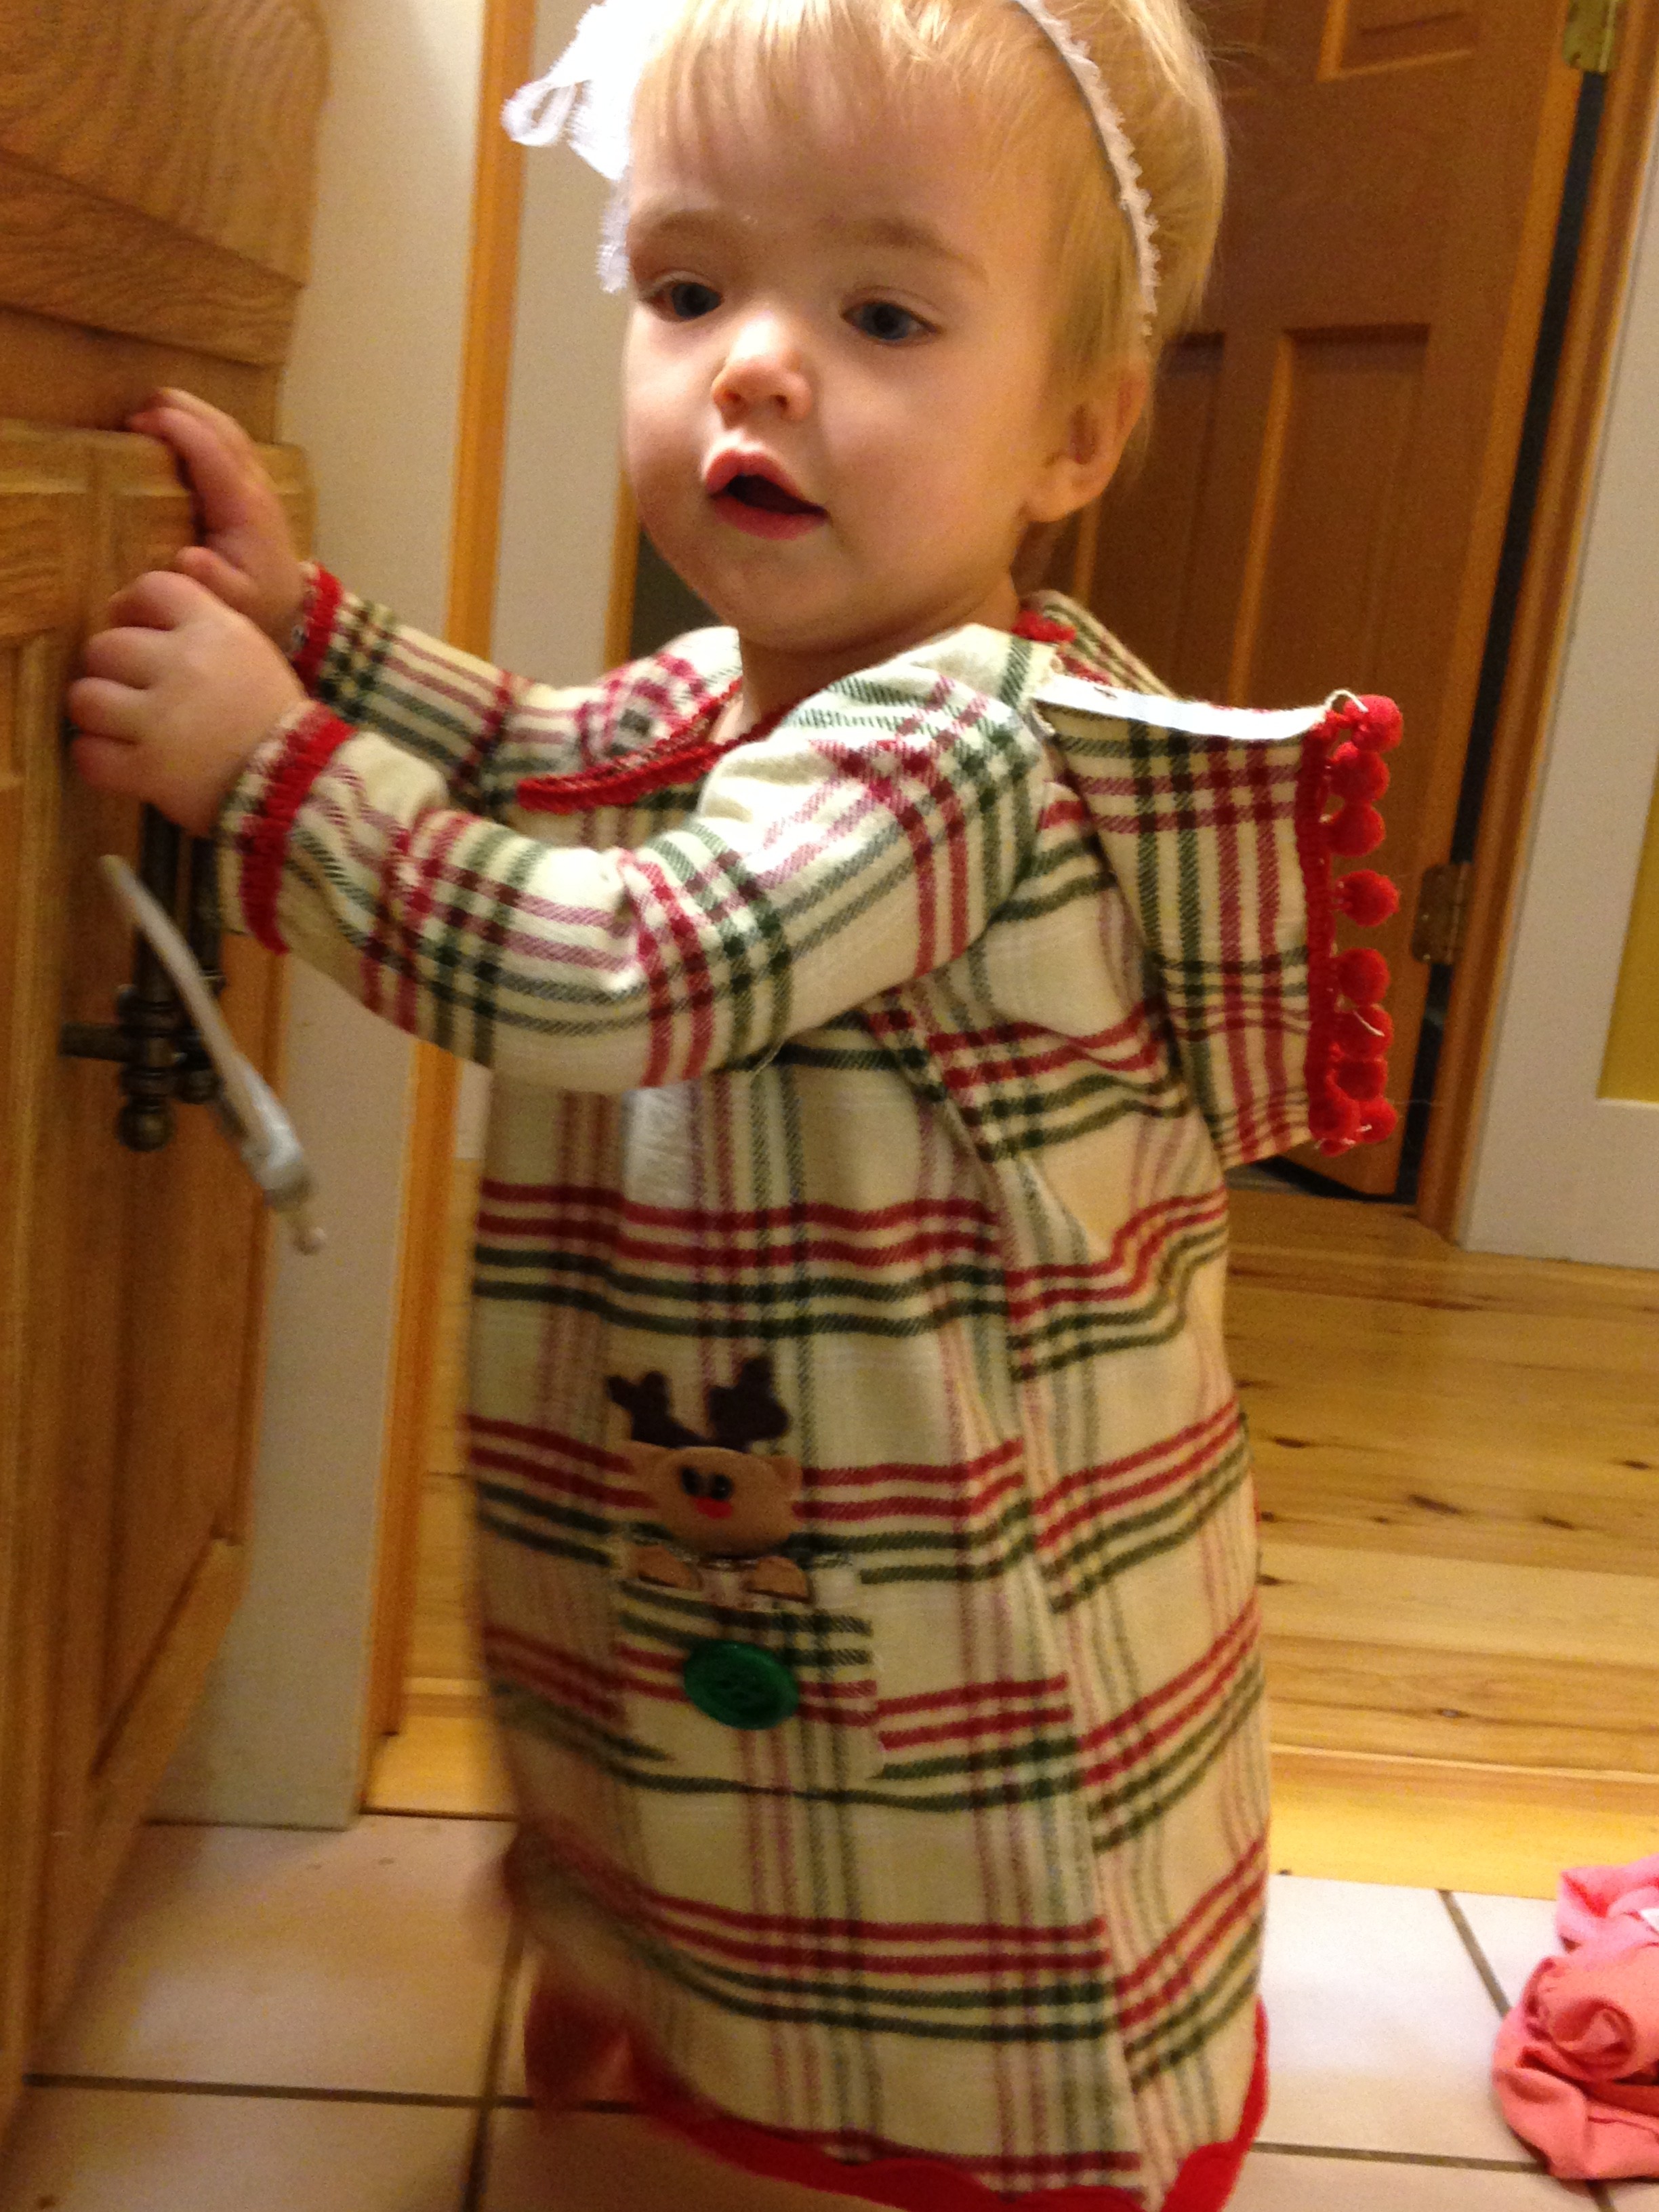
So I didn’t want the same old fancy dresses for Christmas that take FOREVER to make and are uncomfortable. Therefore, I strolled around the fabric store looking for inspiration. A tan plaid red and green pattern caught my eye. For some time I have wanted to make a plaid dress for my little one, but haven’t found the right fit. However, today, I thought to myself, “How about a comfy hooded dress in plaid?” And so, the Christmas Plaid dress was born!!!
I designed the dress myself, so be patient with the video since sometimes I change my mind after completing part of the dress. Oh, you’ll see what I mean when you watch it! As always, there is a youtube video tutorial and a written and picture form. The dress pattern is listed below and is a sketch I made of it. There are several sizes on there, but you can always adjust it by measuring your little one or making it bigger or smaller by moving the lines.
Optional: ribbon, bias tape, buttons, felt, any other decorations, Velcro for hood
Lets get started!
Print the pattern and cut out the right size (note: make sure it is the right size for your little one by measuring)
Cut your fabric patterns out as instructed (decide if you want a hood and if you want it detachable. Also decide if you want long sleeves or no sleeves)
You can serge or zigzag stitch around all the pieces of fabric to prevent fraying.
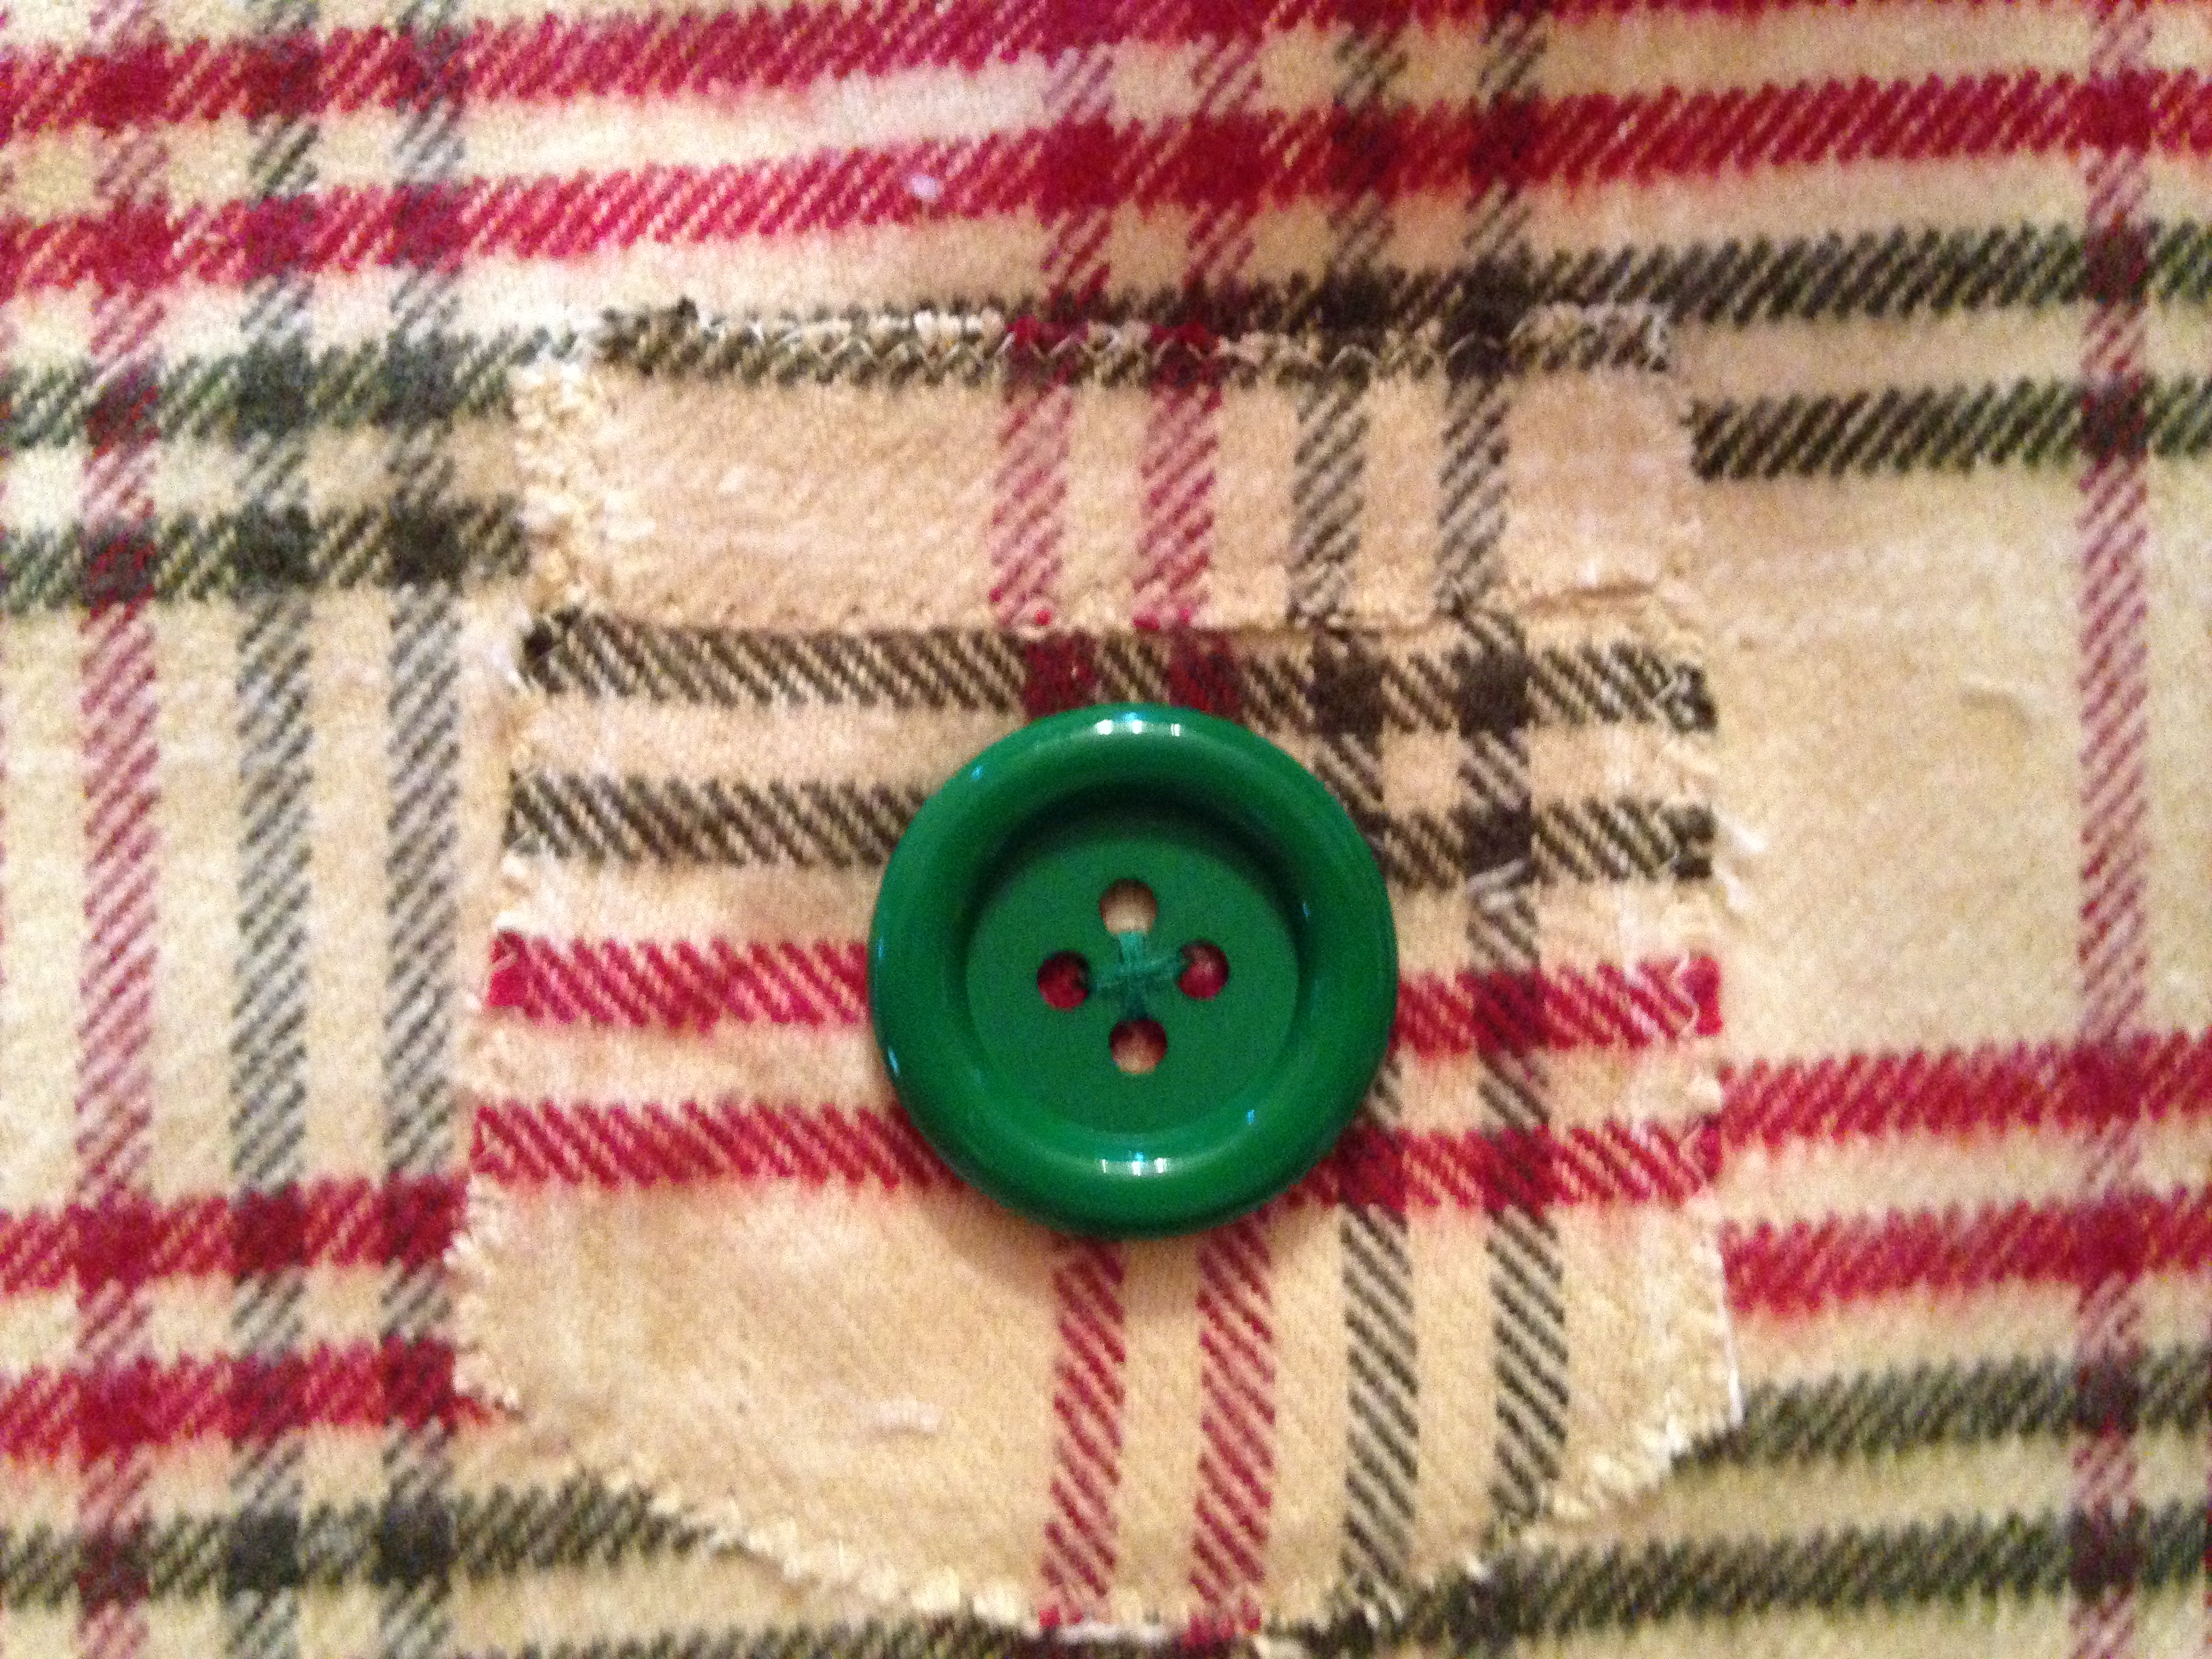
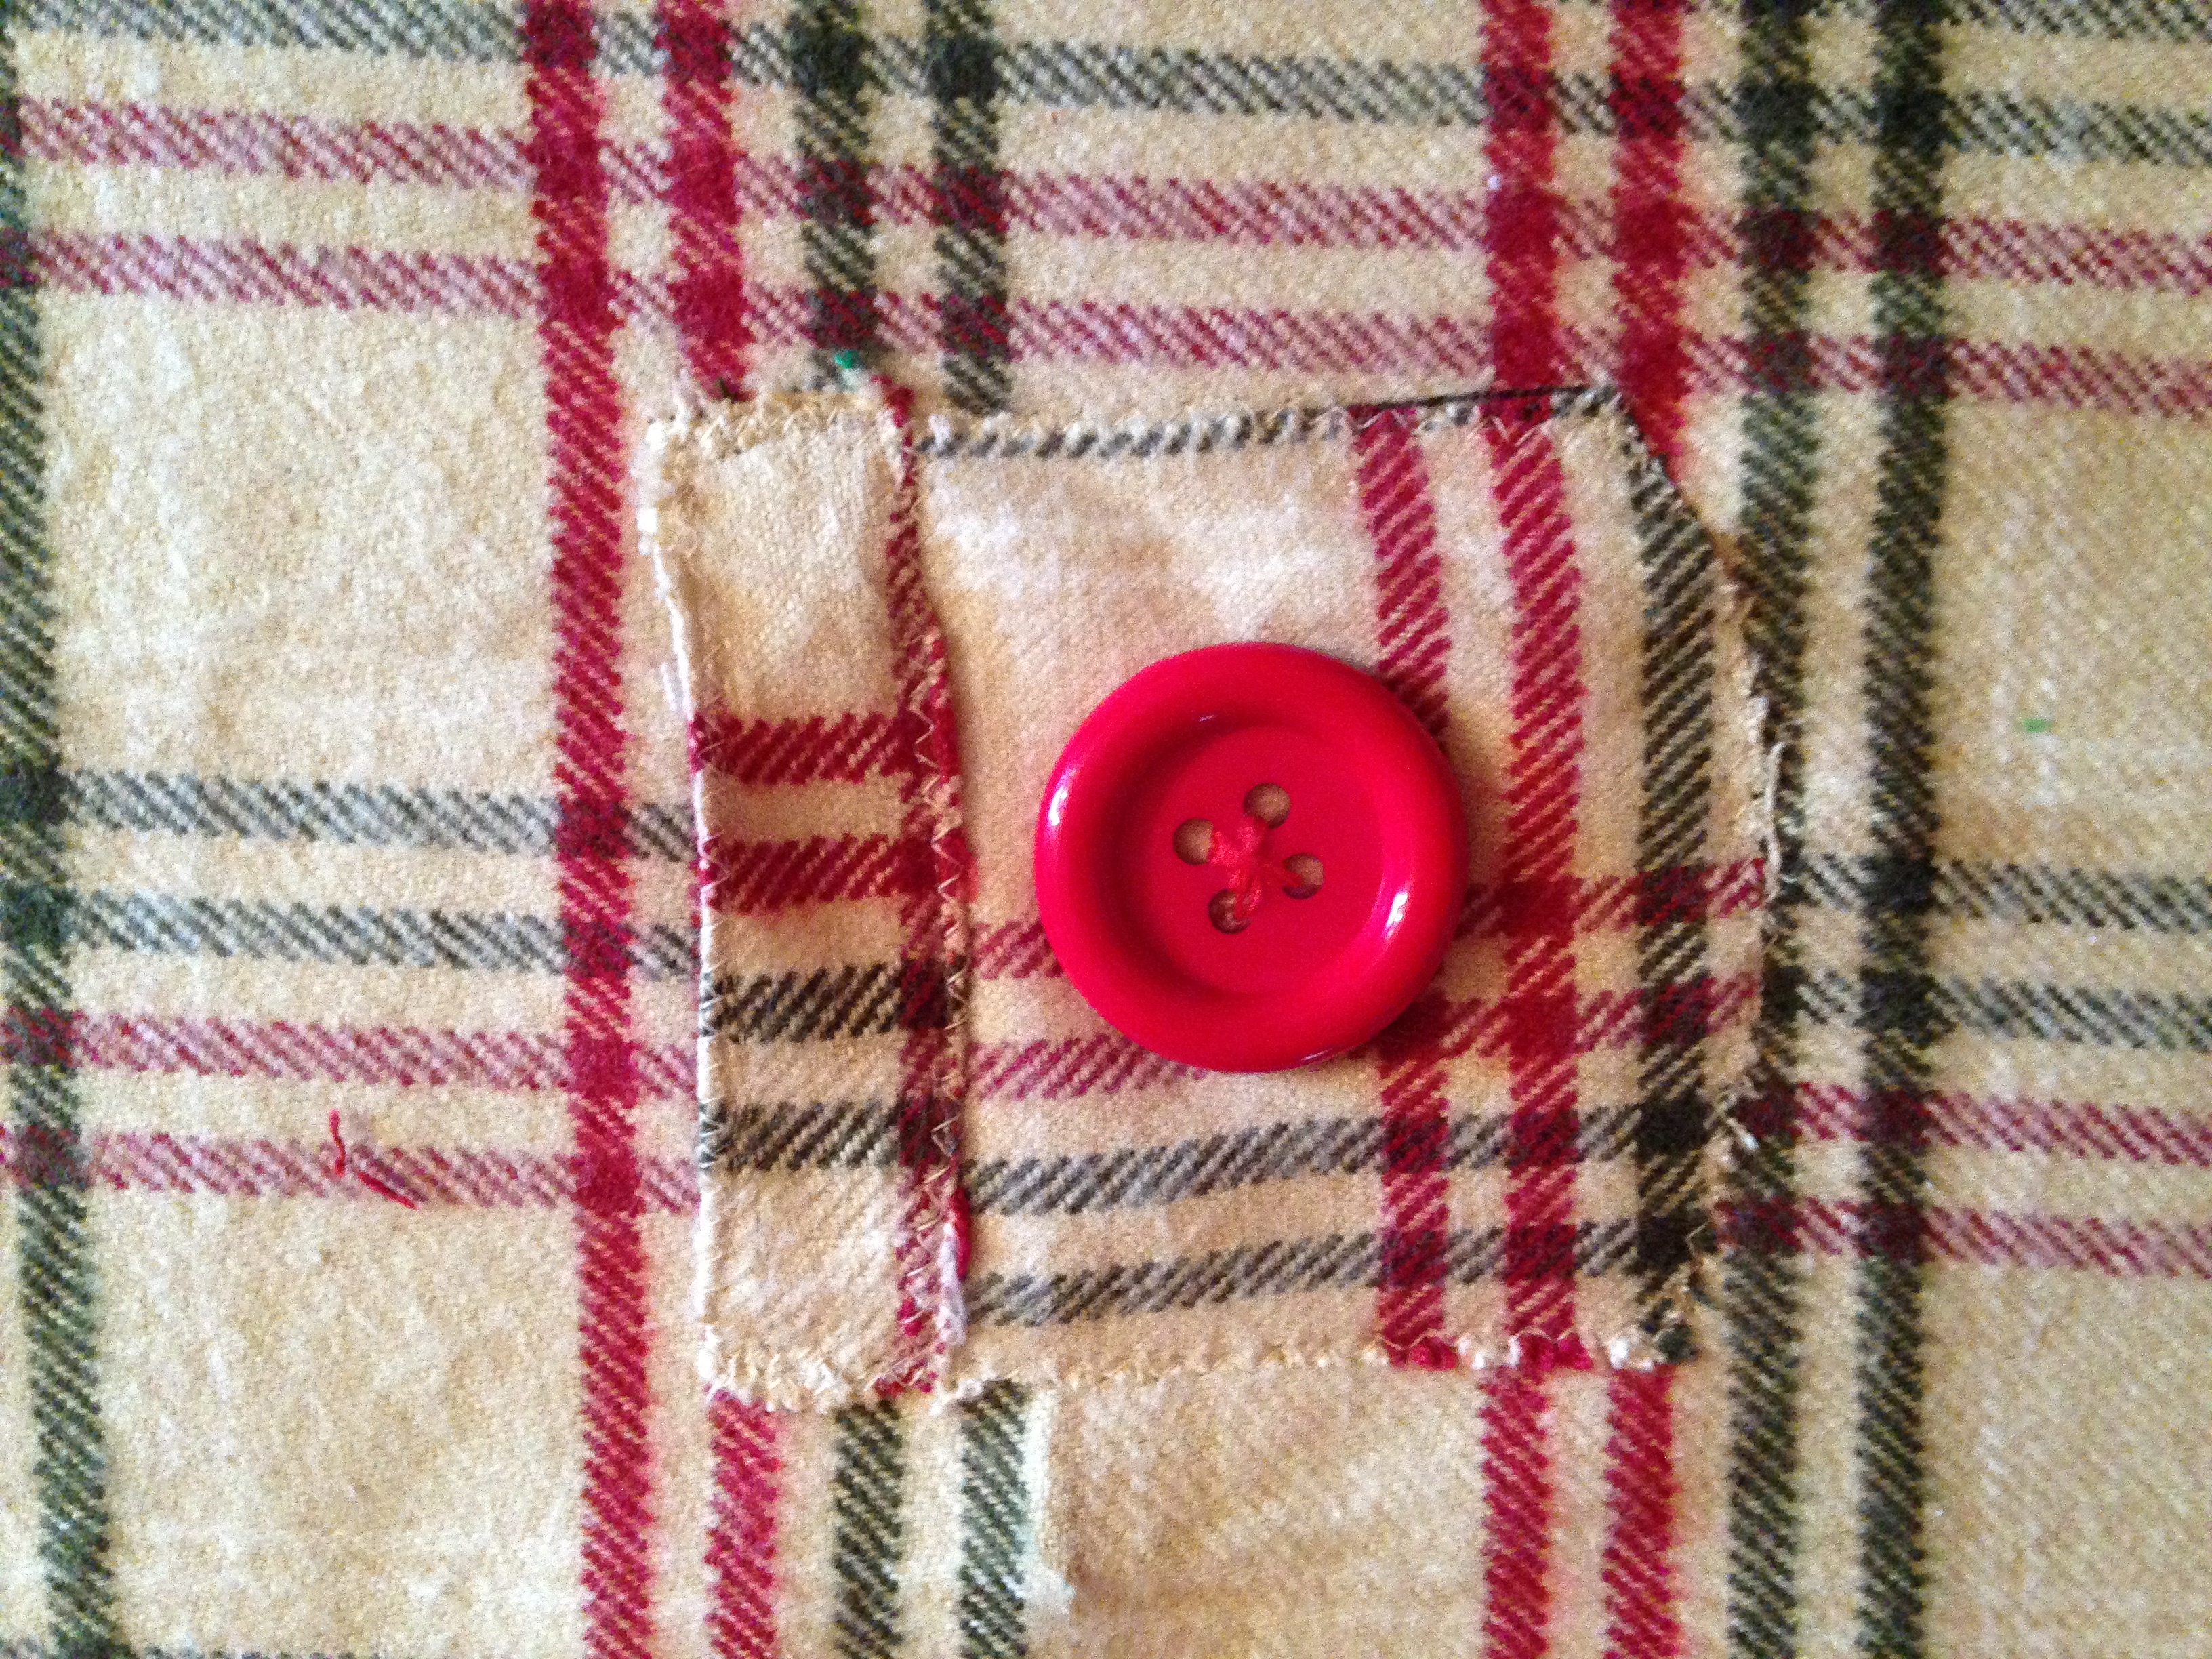
After zigzaging or serging, sew the top part of the pocket on the main pocket
parts
If you want a button on your pocket sew them on now before you attach it
Next, make sure you align your pockets on the dress front by measuring in from the sides and from the top and bottom to get them as even as possible.
You can either fold your pocket edges and sew either a straight or zigzag stitch around the pocket leaving the top open, or you can just stitch around it as I have done since I liked the look for the plaid dress.
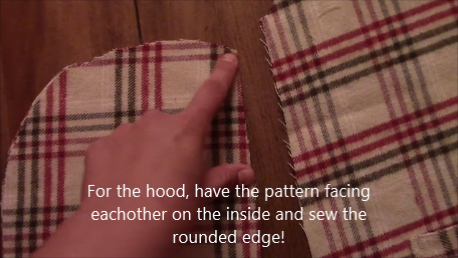
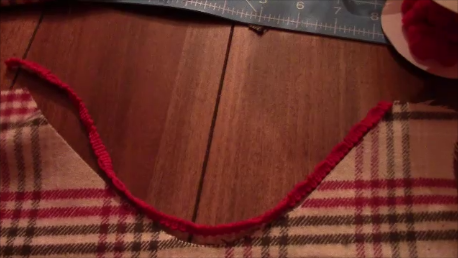
For the hood, have the pattern facing each other on the inside and sew the rounded edge!
Flip right side out and hem or add bias tape to outside
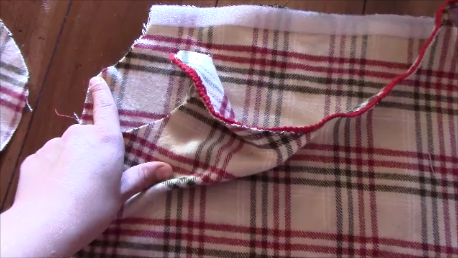
You can sew your hood on fabric pattern facing fabric pattern and sew across and flip right side out, or you can use buttons or velco. You will need to either make button holes or put velcro on the back of the dress to hold the hood. I used iron on velco. Note**If you are sewing it on wait until after you sew the front to back**
The front collar of the dress needs to be hemmed or sew bias tape on it
Next, is to sew the front to back of the dress. If you want the top of the dress to be velcro as well, you can have a jumper (but you wouldn’t have sleeves so skip the sleeve part).
To sew it together, turn patterns facing each other and sew . Also line up sides and pin and sew down underneath the sleeve opening. Then turn right side out.
If you are not doing sleeves, you want to hem or use bias tape on the sleeve holes after sewing down the side. If you are not doing sleeves then hem or use bias tape around the bottom and you are all done!
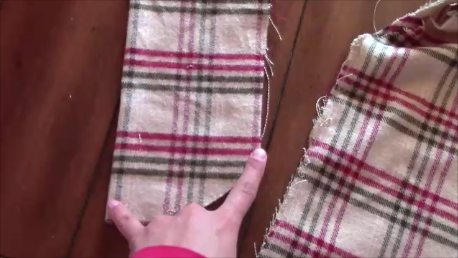
If you are doing sleeves, turn pattern facing pattern and sew. Then turn right side out.
Sew the sleeve sides together by facing pattern side to pattern inside. Do not sew the curved part as pointed to in the picture below. Then turn right side out
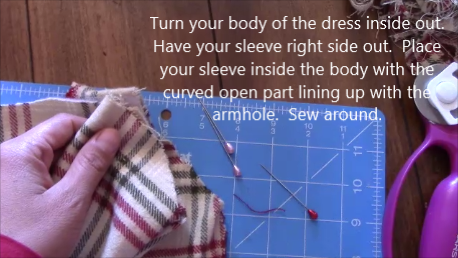
Turn your body of the dress inside out. Have your sleeve right side out. Place your sleeve inside the body with the curved open part lining up with the
armhole. Sew around.
This picture shows that you want the sleeve facing downward inside the body of the dress. the larger end to the hole and the smaller end (where the hand comes out) facing downwards.
You can hem or use bias tape on cuffs of sleeves and bottom of dress. Then add any embellishments you want and wah-la you are done!
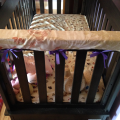
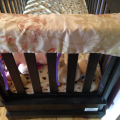
One day I put my little munchkin down to nap and a couple minutes later I go to check on her and she is gnawing the crib side rail! And you know how expensive cribs are, so I was not a happy camper. I was also concerned about the stain getting in her mouth. So, I got right to work making a crib rail cover and protector! So far, she has only gnawed on the one rail, and that is because this rail faces the hallway that she enjoys looking out and crying to see if anyone will come to her rescue!
This is a simple project that should take no more than 15 to 20 minutes. As always, I have a Youtube video and a written and picture explanation.
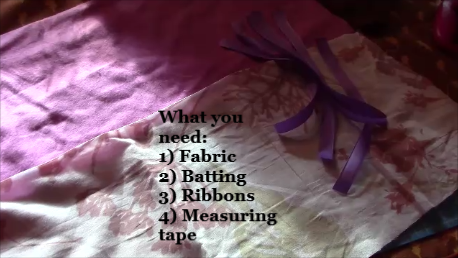
What you need:
Fabric with your chosen pattern
Batting (fleece or any type of padding)
Ribbon
Measuring tape
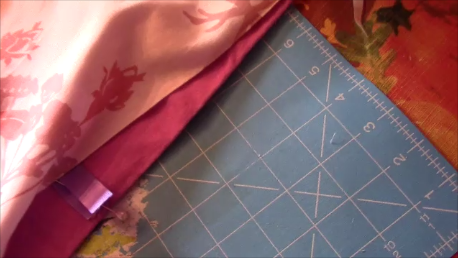
First you want to measure your crib rail that you will be making this for. Measure the inside from side to side for the length and then the width and add 2 inches (or measure downwards for how long you want it to go down).
Also measure where your ties will tie onto your railing. Mark this all down so you remember.
Then cut the length and width of the fabrics and also cut your ribbon. Now you may want to make your ribbon longer for bigger bows but keep in mind your little one may pull at them if they are too long. I recommend about 6-8 inches long. I used 6 pieces of ribbon (so 3 ties) total for the side rail.
Pin your ribbon onto your batting facing inwards. Have the two ribbons across from each other and make sure to measure out the spots. Pin them down with the shiny side or pattern side up.
Line up your other fabric piece with right side down (right sides facing eachother).
Now you want to sew all the way around the edges leaving a 2 to 3 inch opening. Make sure you backstitch!
Pull the inside out and make sure the corners are popped out. Then sew this area shut.
You are done congrats! Go put it on and save your crib!
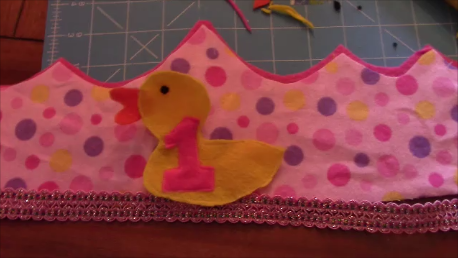
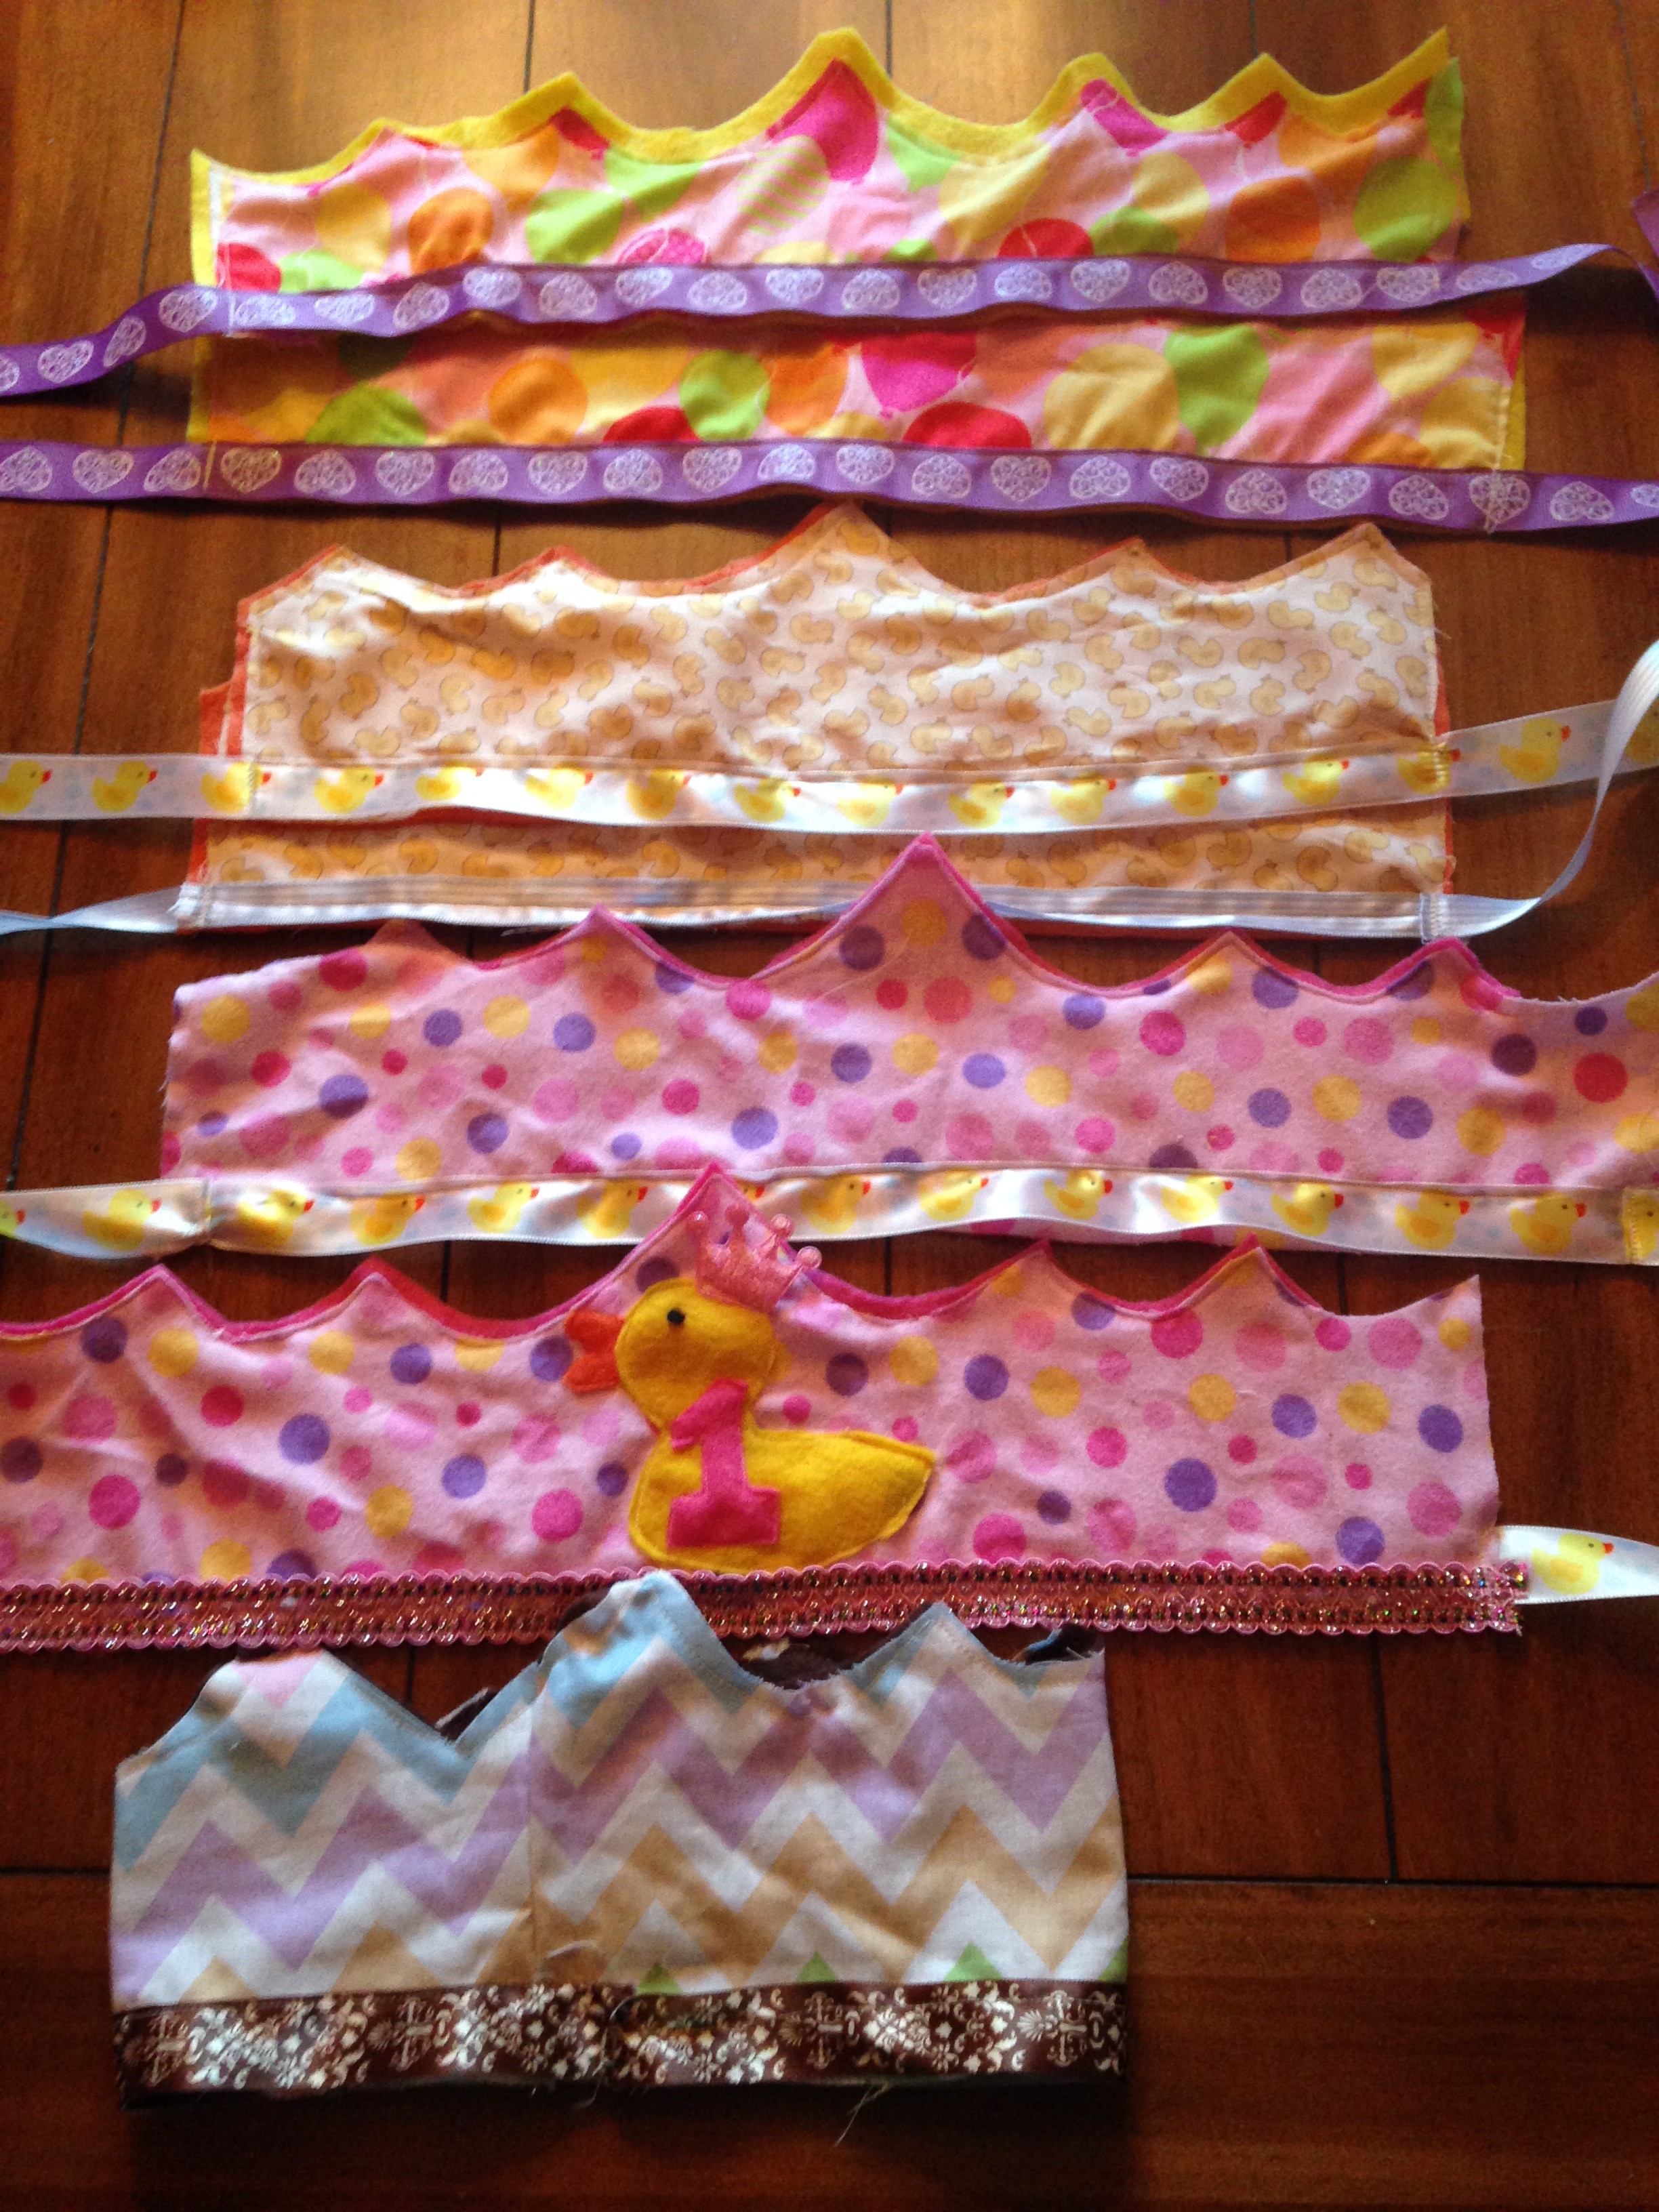
Want to sew quick and easy crowns for a party or get together? Then you’ve come to the right place! I made a last minute decision days before my daughters’ first birthday party that we needed crowns! The theme was rubber ducky, so I decided to make birthday crowns instead of hats! Young kids and babies don’t enjoy hard hats on their head and also shouldn’t have a rubber band or elastic around their neck.
As you can see they are very cute for photo shoots as well! She didn’t particularly like keeping it on, but I got a couple good shots!
As usual, there is a YouTube video and also a written explanation below. I didn’t have a lot of time to embellish the other crowns but you can always spice things up with some ribbons, bows, glitter, rhinestones, or buttons!
To get started you need:
1) Choice of fabric and design
2) Scisscors
3)Thread
4) Closure for crown (velcro, button, ribbon) or you can sew all the way around if you know the exact size
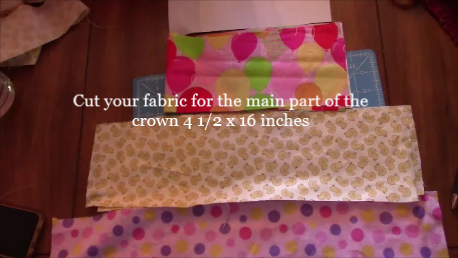
Cut your fabric for the main part of the crown 4 1/2 x 18 inches
Make your own crown pattern by drawing the top on a piece of paper and cutting it out!
Cut your design onto your fabric to make the shape of your crown! If you want a felt backing with another color cut that out as well.
Next, pick out your ribbon if you are using one, if you want any other embellishments get them ready! I made a felt duck that I sewed onto
the crown.
Line up your crown pieces and sew all the way around! Then you are done! If you want to add button loops and buttons you can sew them on as well.
Congrats and enjoy the party! Check back often for new crafts or subscribe below!
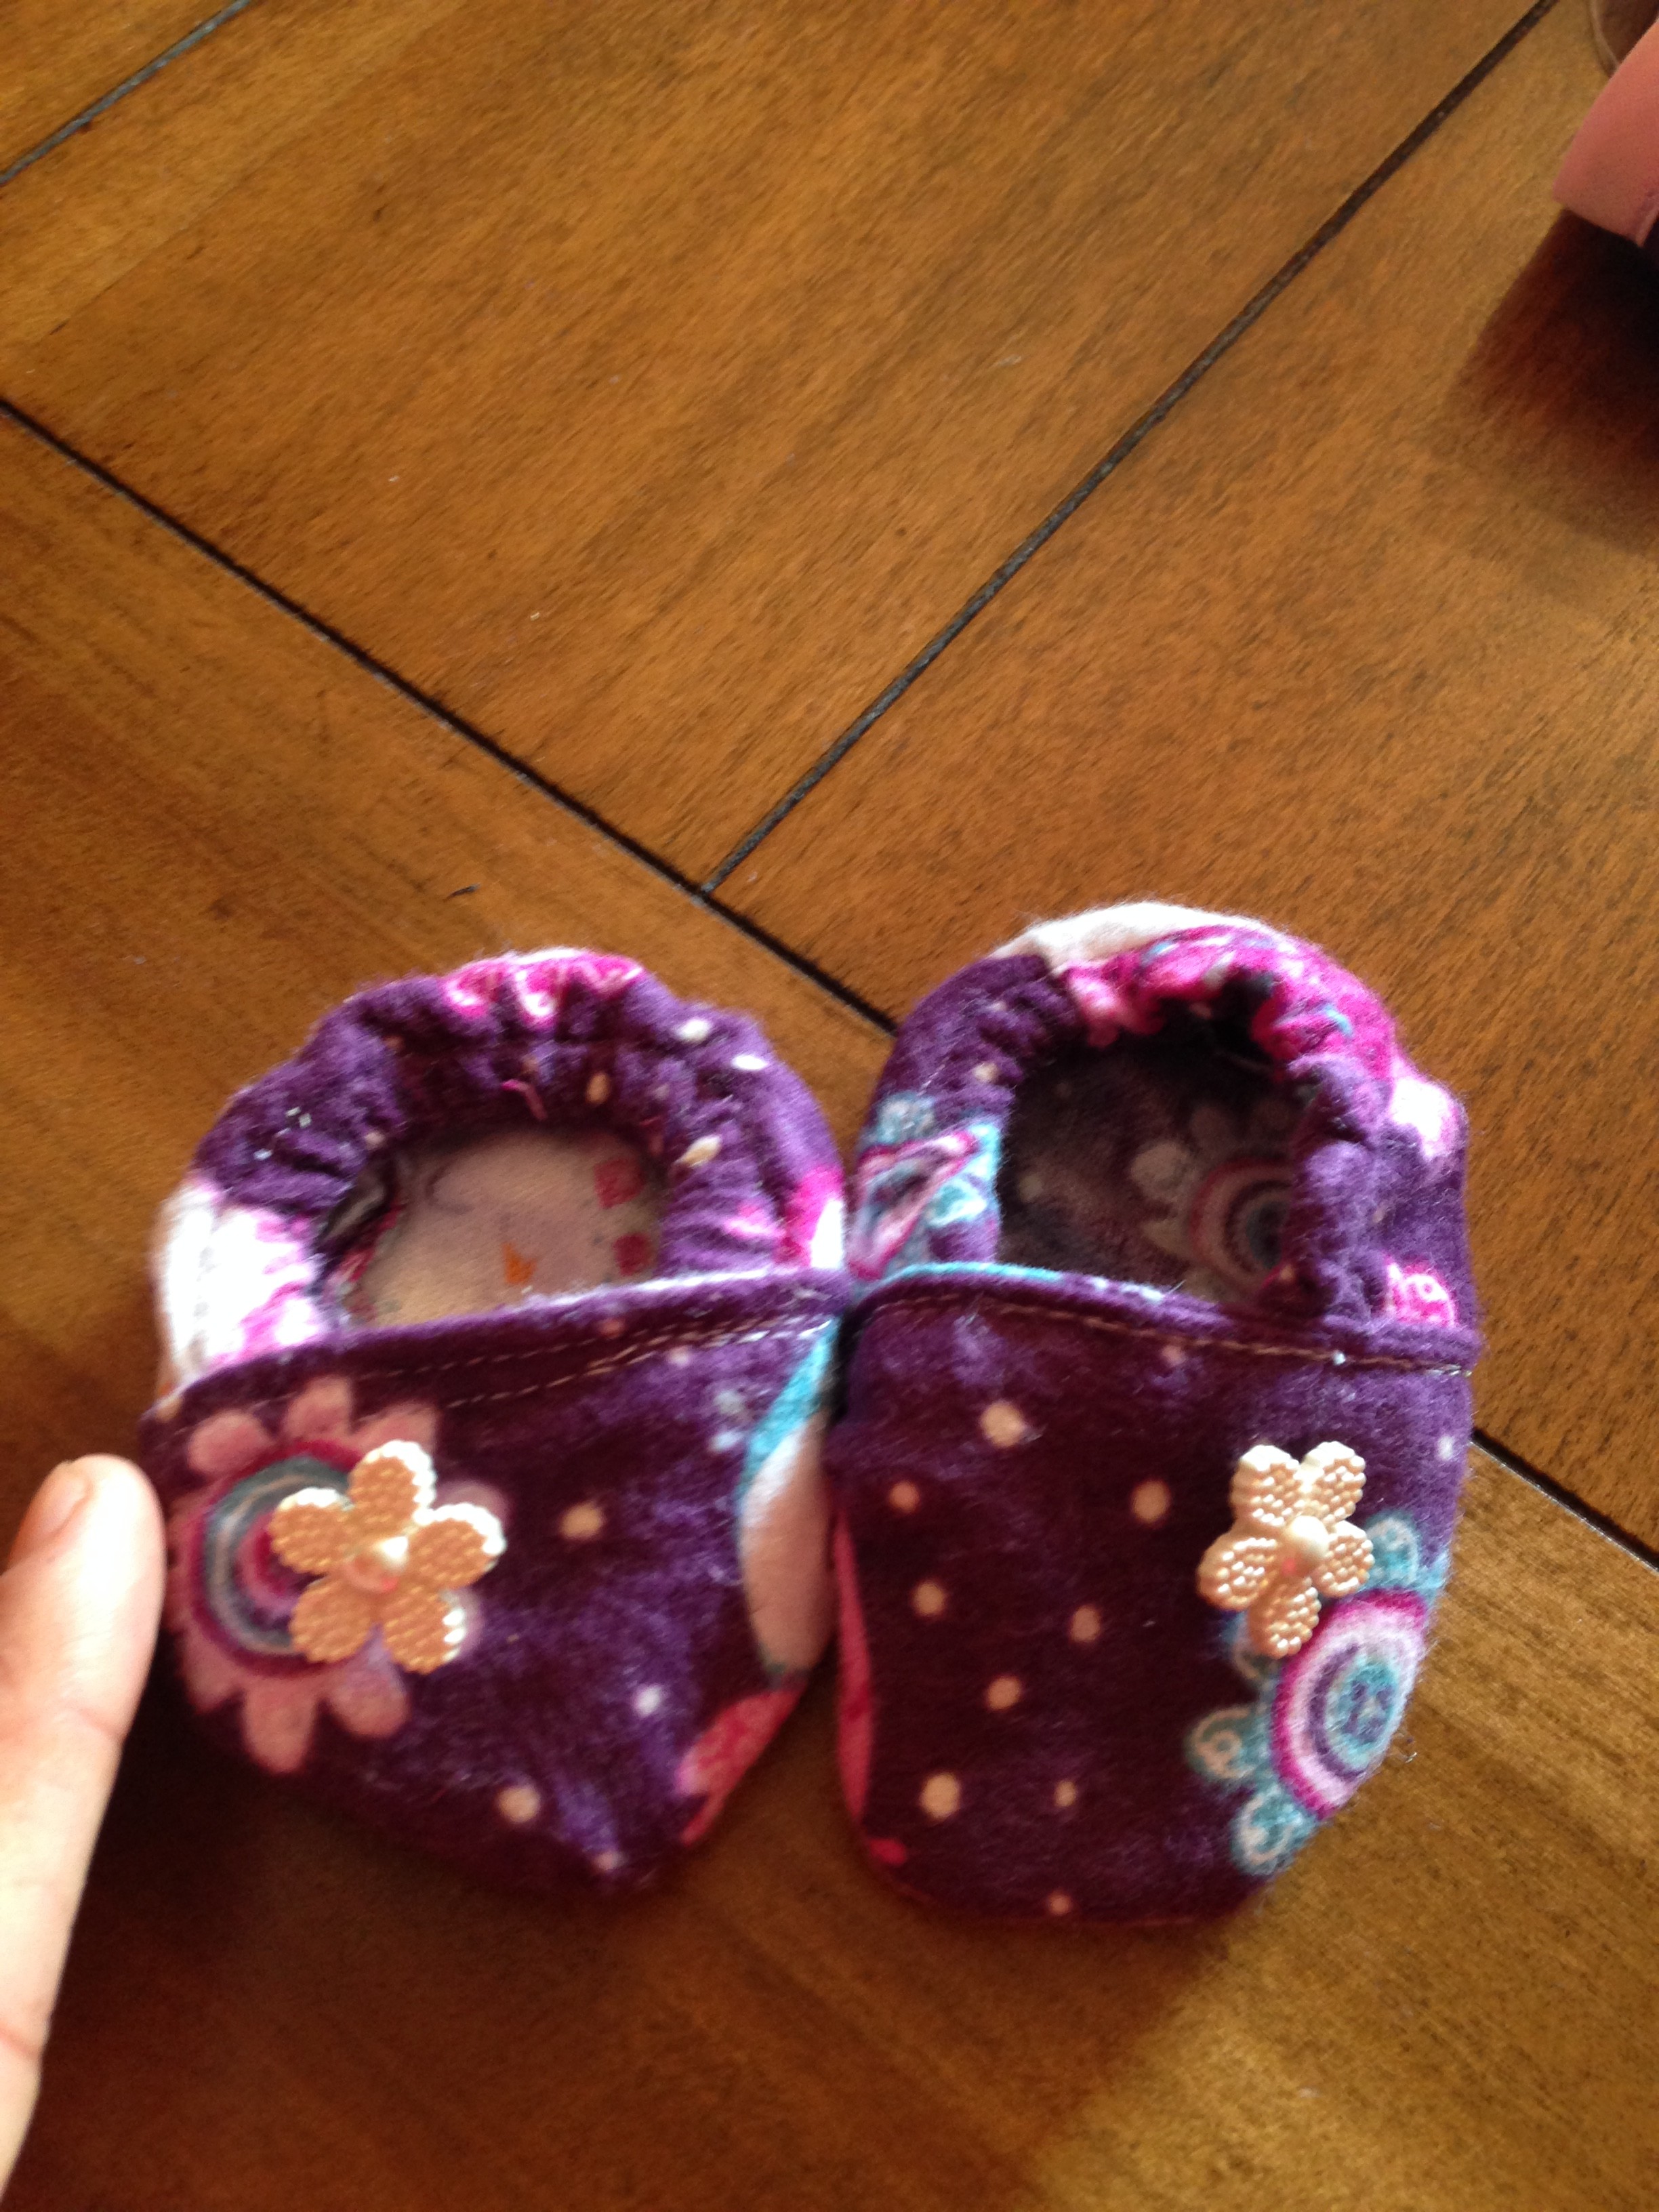
In one of my last tutorials, I showed you how to make a super cute sleeper. Now, here are the matching slipper shoes!
What you will need:
Fabric of choice
1/4 or 1/8 inch elastic
Thread color of choice
Optional: buttons or bows
I used a free pattern from marked crafts- > shoepattern
So lets get started! here is the video tutorial and below that is the written and picture format.
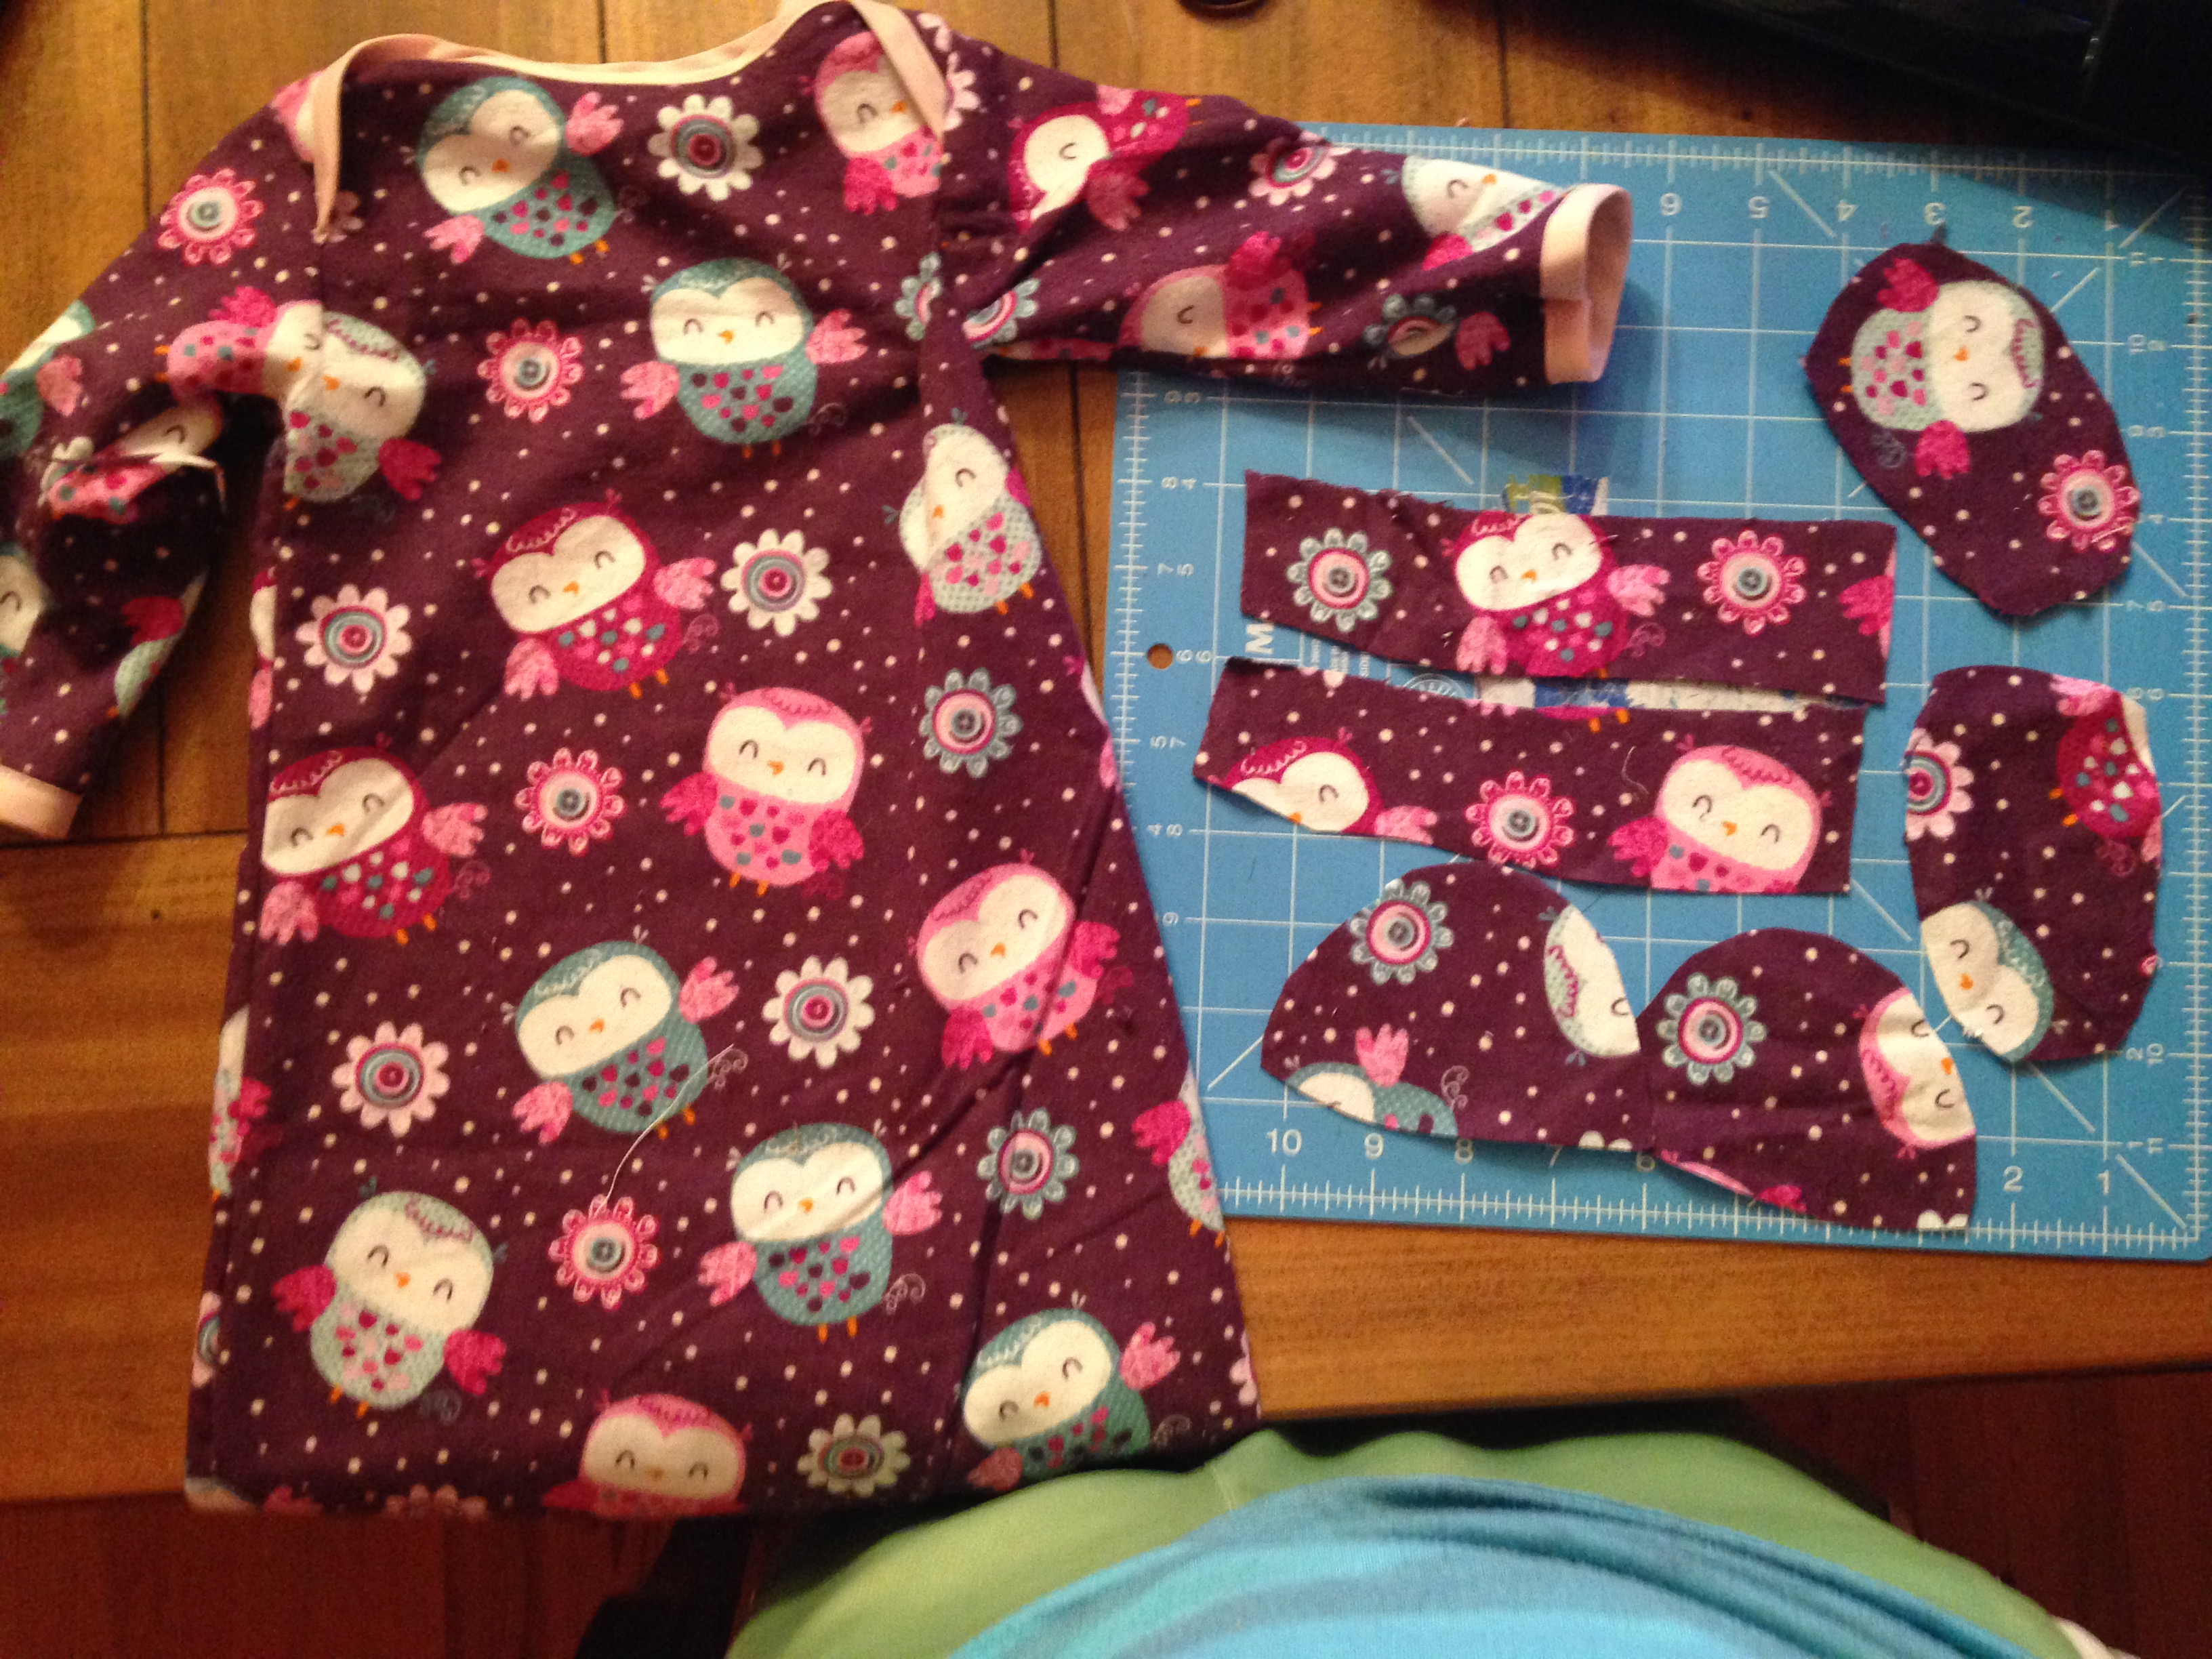
Cut your pattern out and decide on your color/colors you want to use (you can use two colors!
Cut out your pieces- there should be 4 of each piece
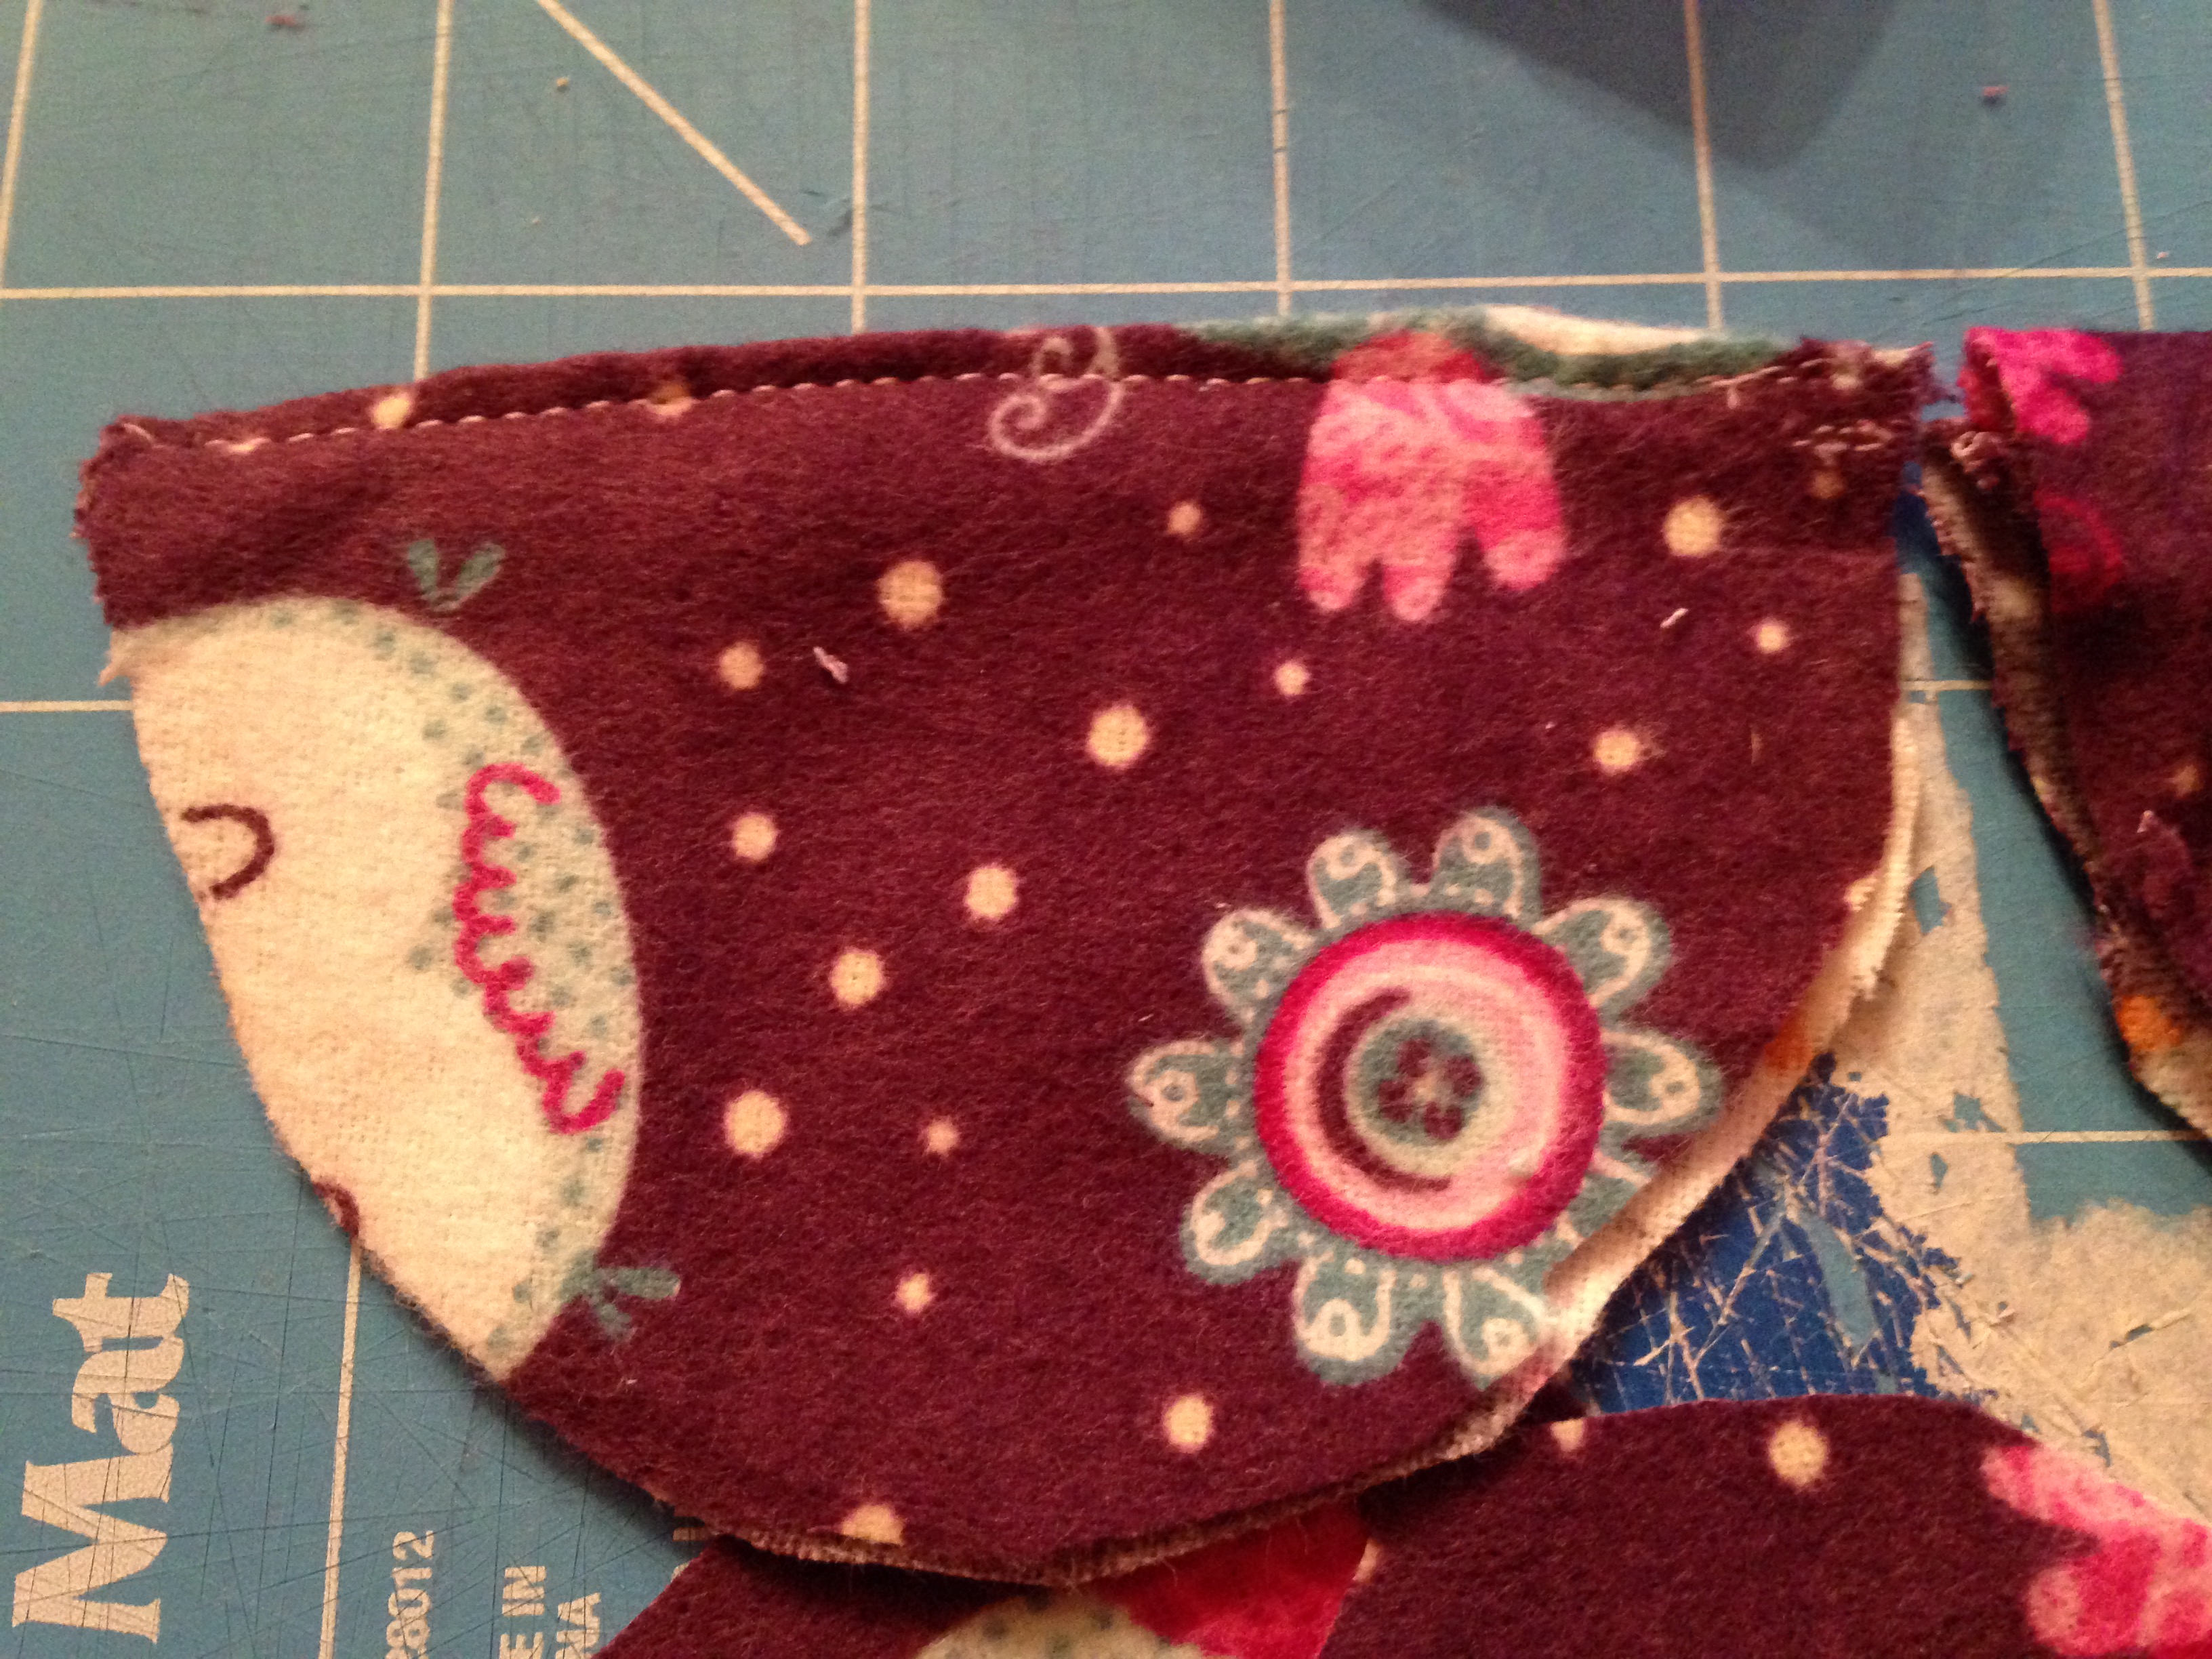
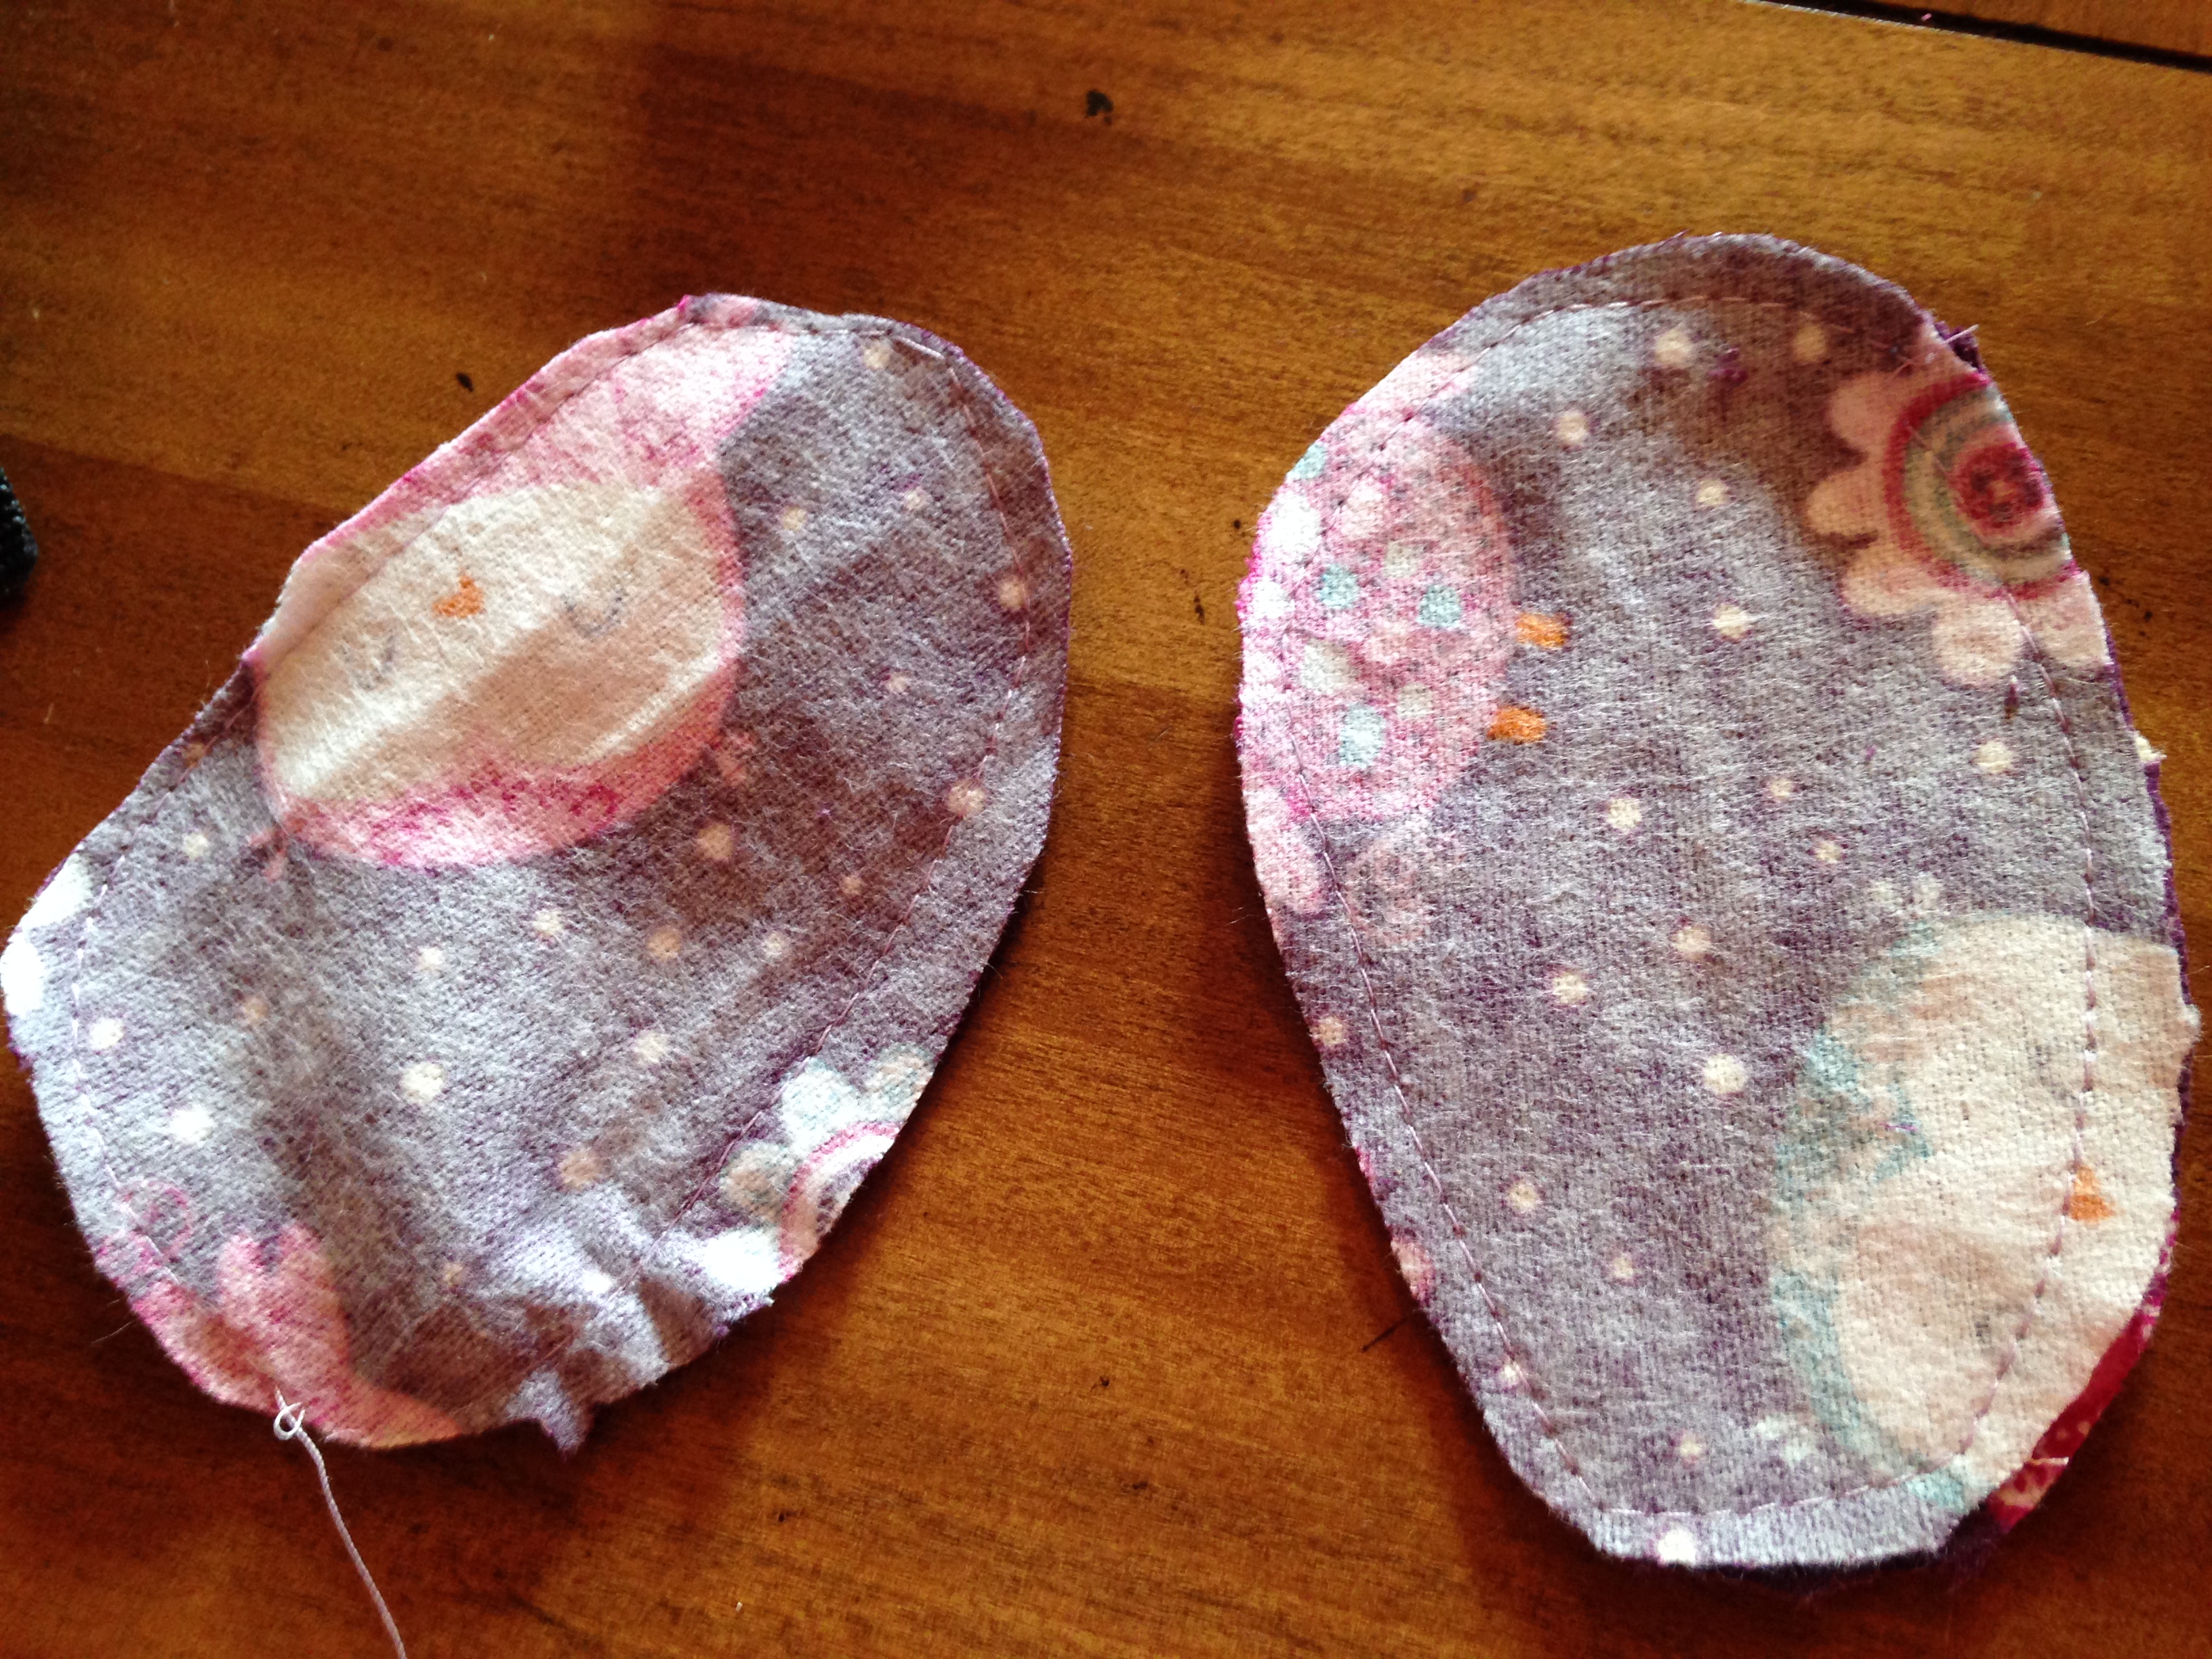
Take your upper pieces (the two sided rounded pieces) and place them pattern facing pattern as usual.
Then sew the non-rounded part only (the bottom of it)
Turn right side out, then iron you piece down with the right sides out and sew a nice little line across the outside where it is sewn together.
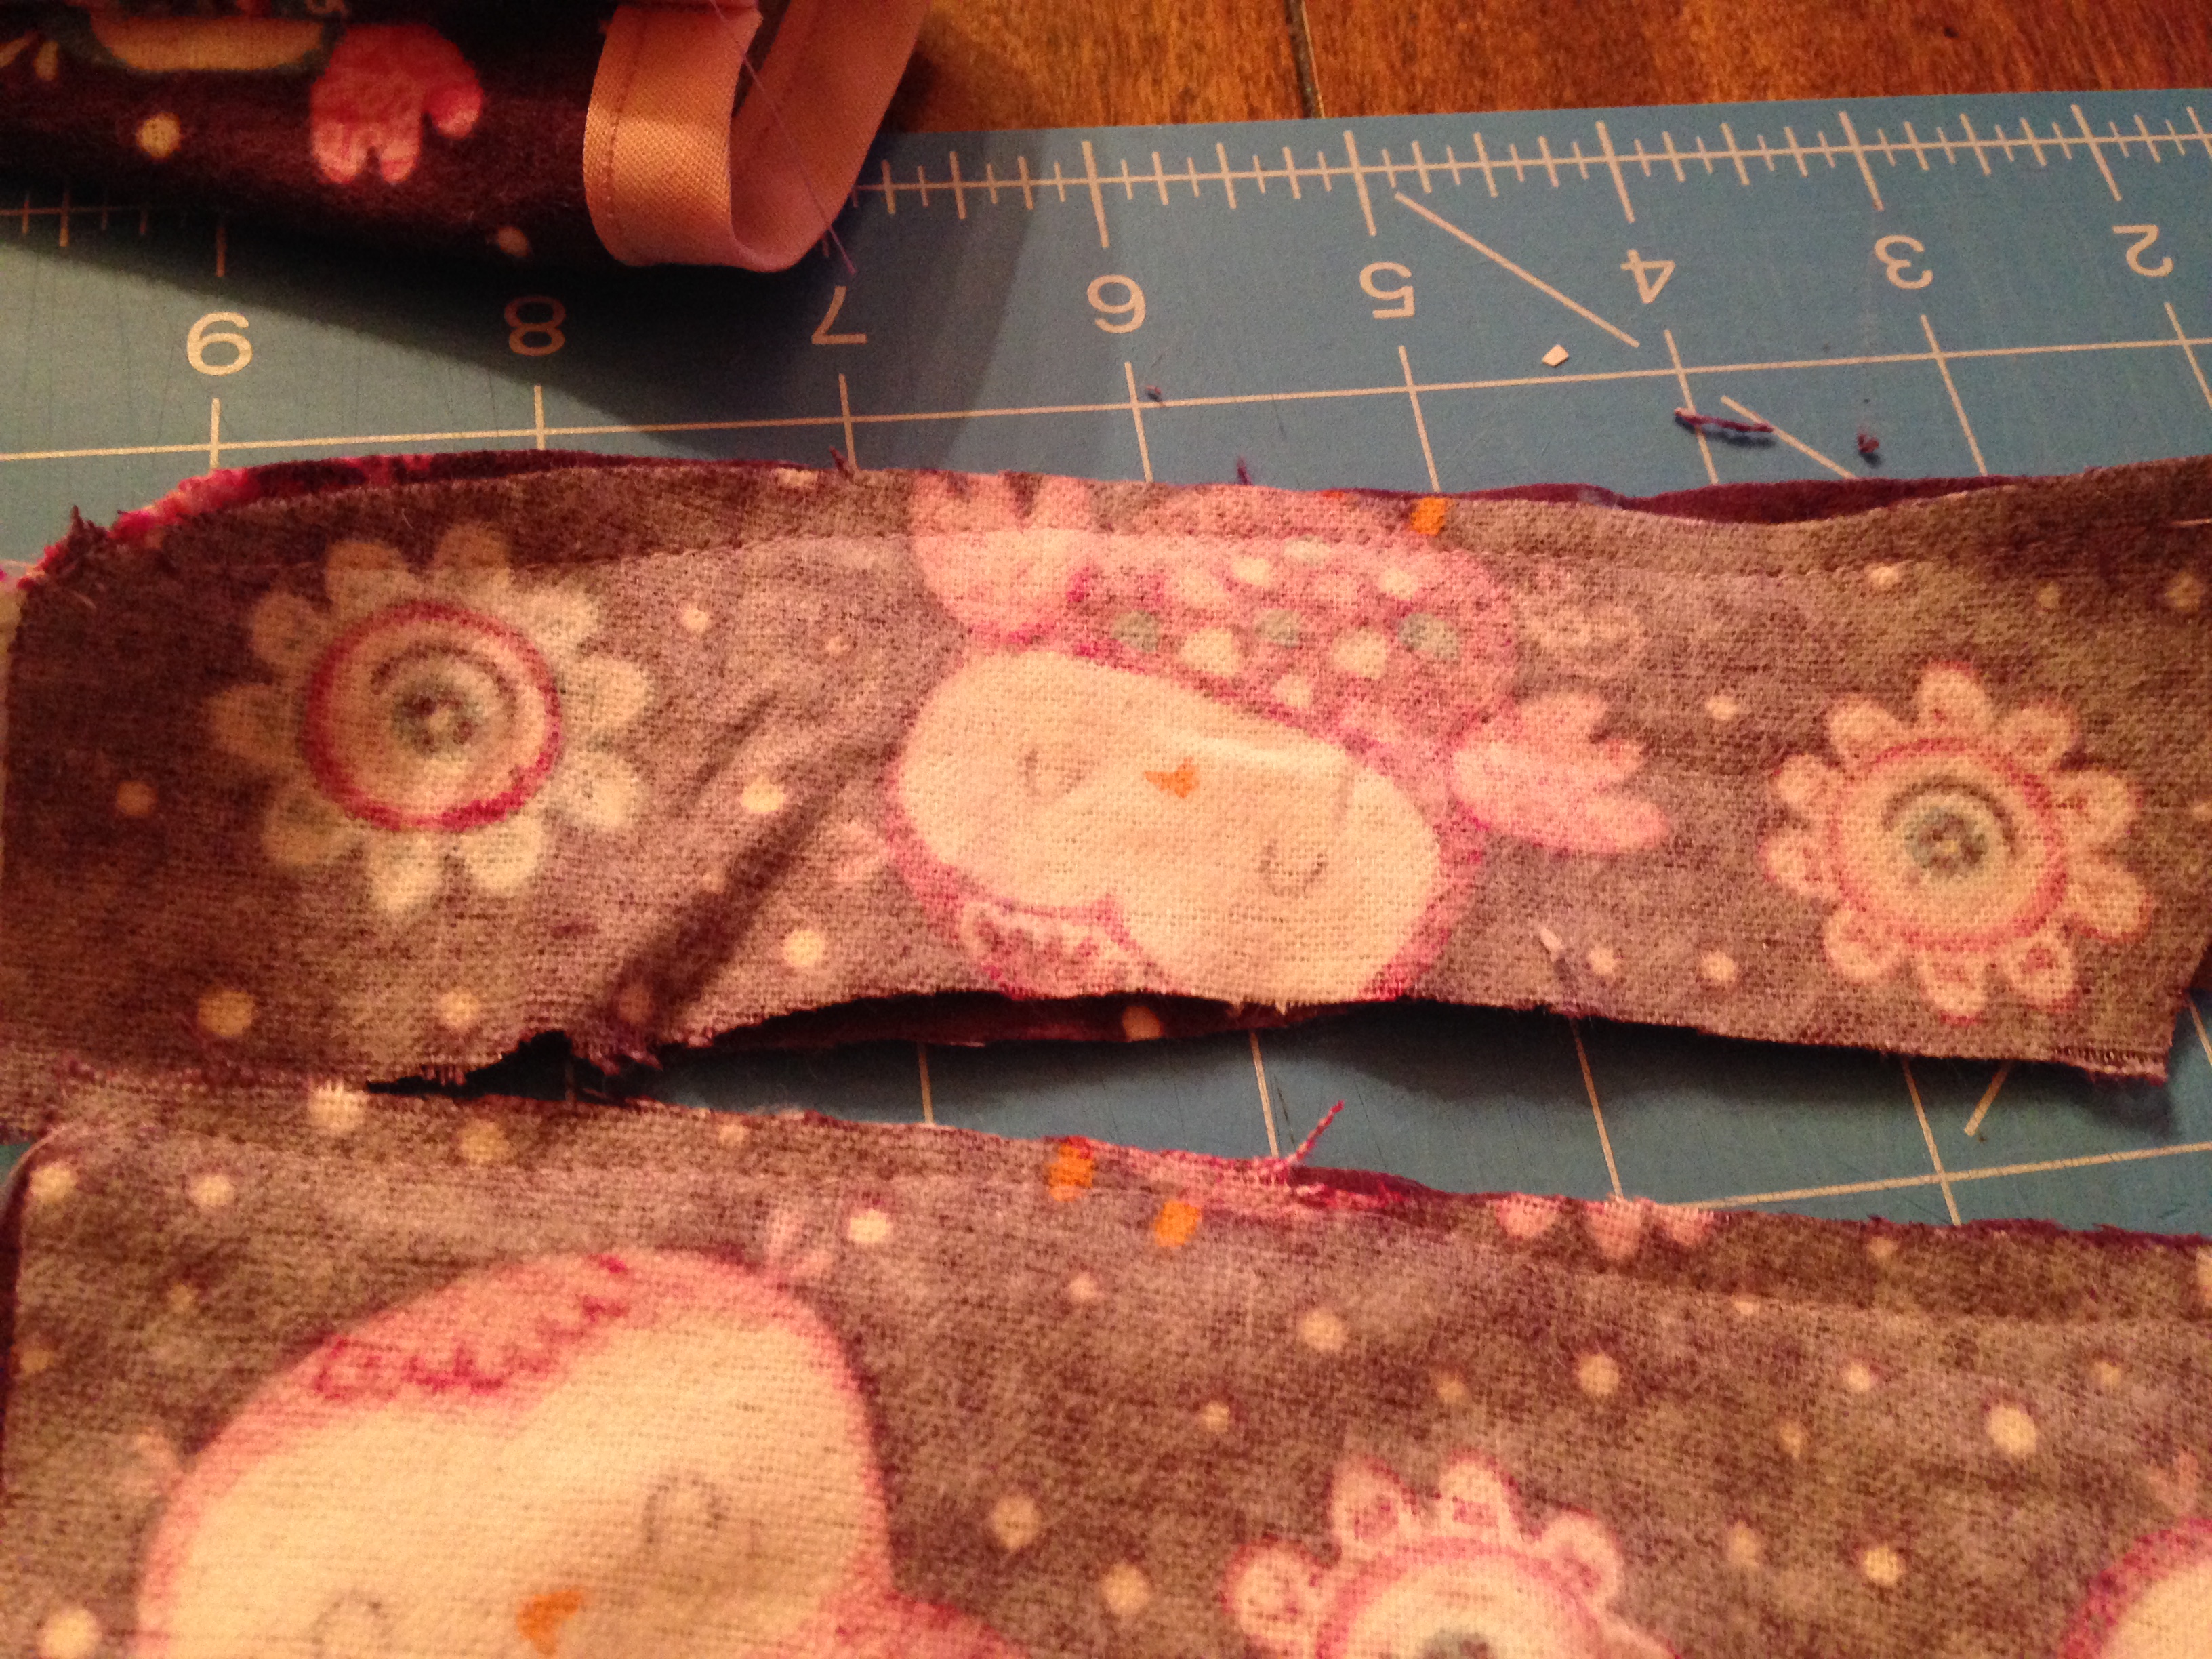
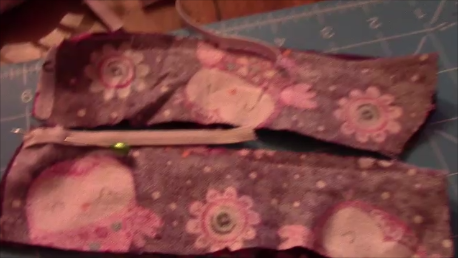
7. Take your heel pieces (the long rectangles), and place the pieces facing eachother (as usual) and sew just down one long side
8. Cut your elastic to 4 inches long (2 pieces). Pin it to one end of the sewn heel piece.
9. While sewing stretch the elastic and sew using your zigzag stitch across the length of the fabric
10. It will be curled up as shown above. Turn right side out. Pin and sew below the elastic and all the way around the whole piece to make it look nice and then trim as needed.
11. Place sole pieces together with patterns facing eachother, use a basting stitch (set your stitch to longest number and do not backstitch).
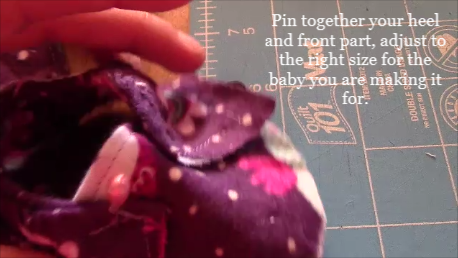
12. Pin together the heel and the front piece, adjust it to be the appropriate size for the baby/infant you are making it for.
13. Sew straight across where you already have the previous sewn line from the front piece. Then trim the rest off. This makes a nice neat line when you are finished.
14. Find the middle of the sole and the middle of the top part. You can do this easily by folding in half. Line them up together and pin. (the back of the sole is the smaller part). Have the top part the wrong side still out to pin.
15. Now sew all the way around! Almost done! Doesn’t it look so cute?
16. Trim the excess fabric being careful not to cut too close to your thread line.
17. Now turn right side out! And WA-LA you are done! You can add a button, ribbon, or any other accessory you want! Great JOB! Lets see those pictures


