12 Spooktacular Treats:part1


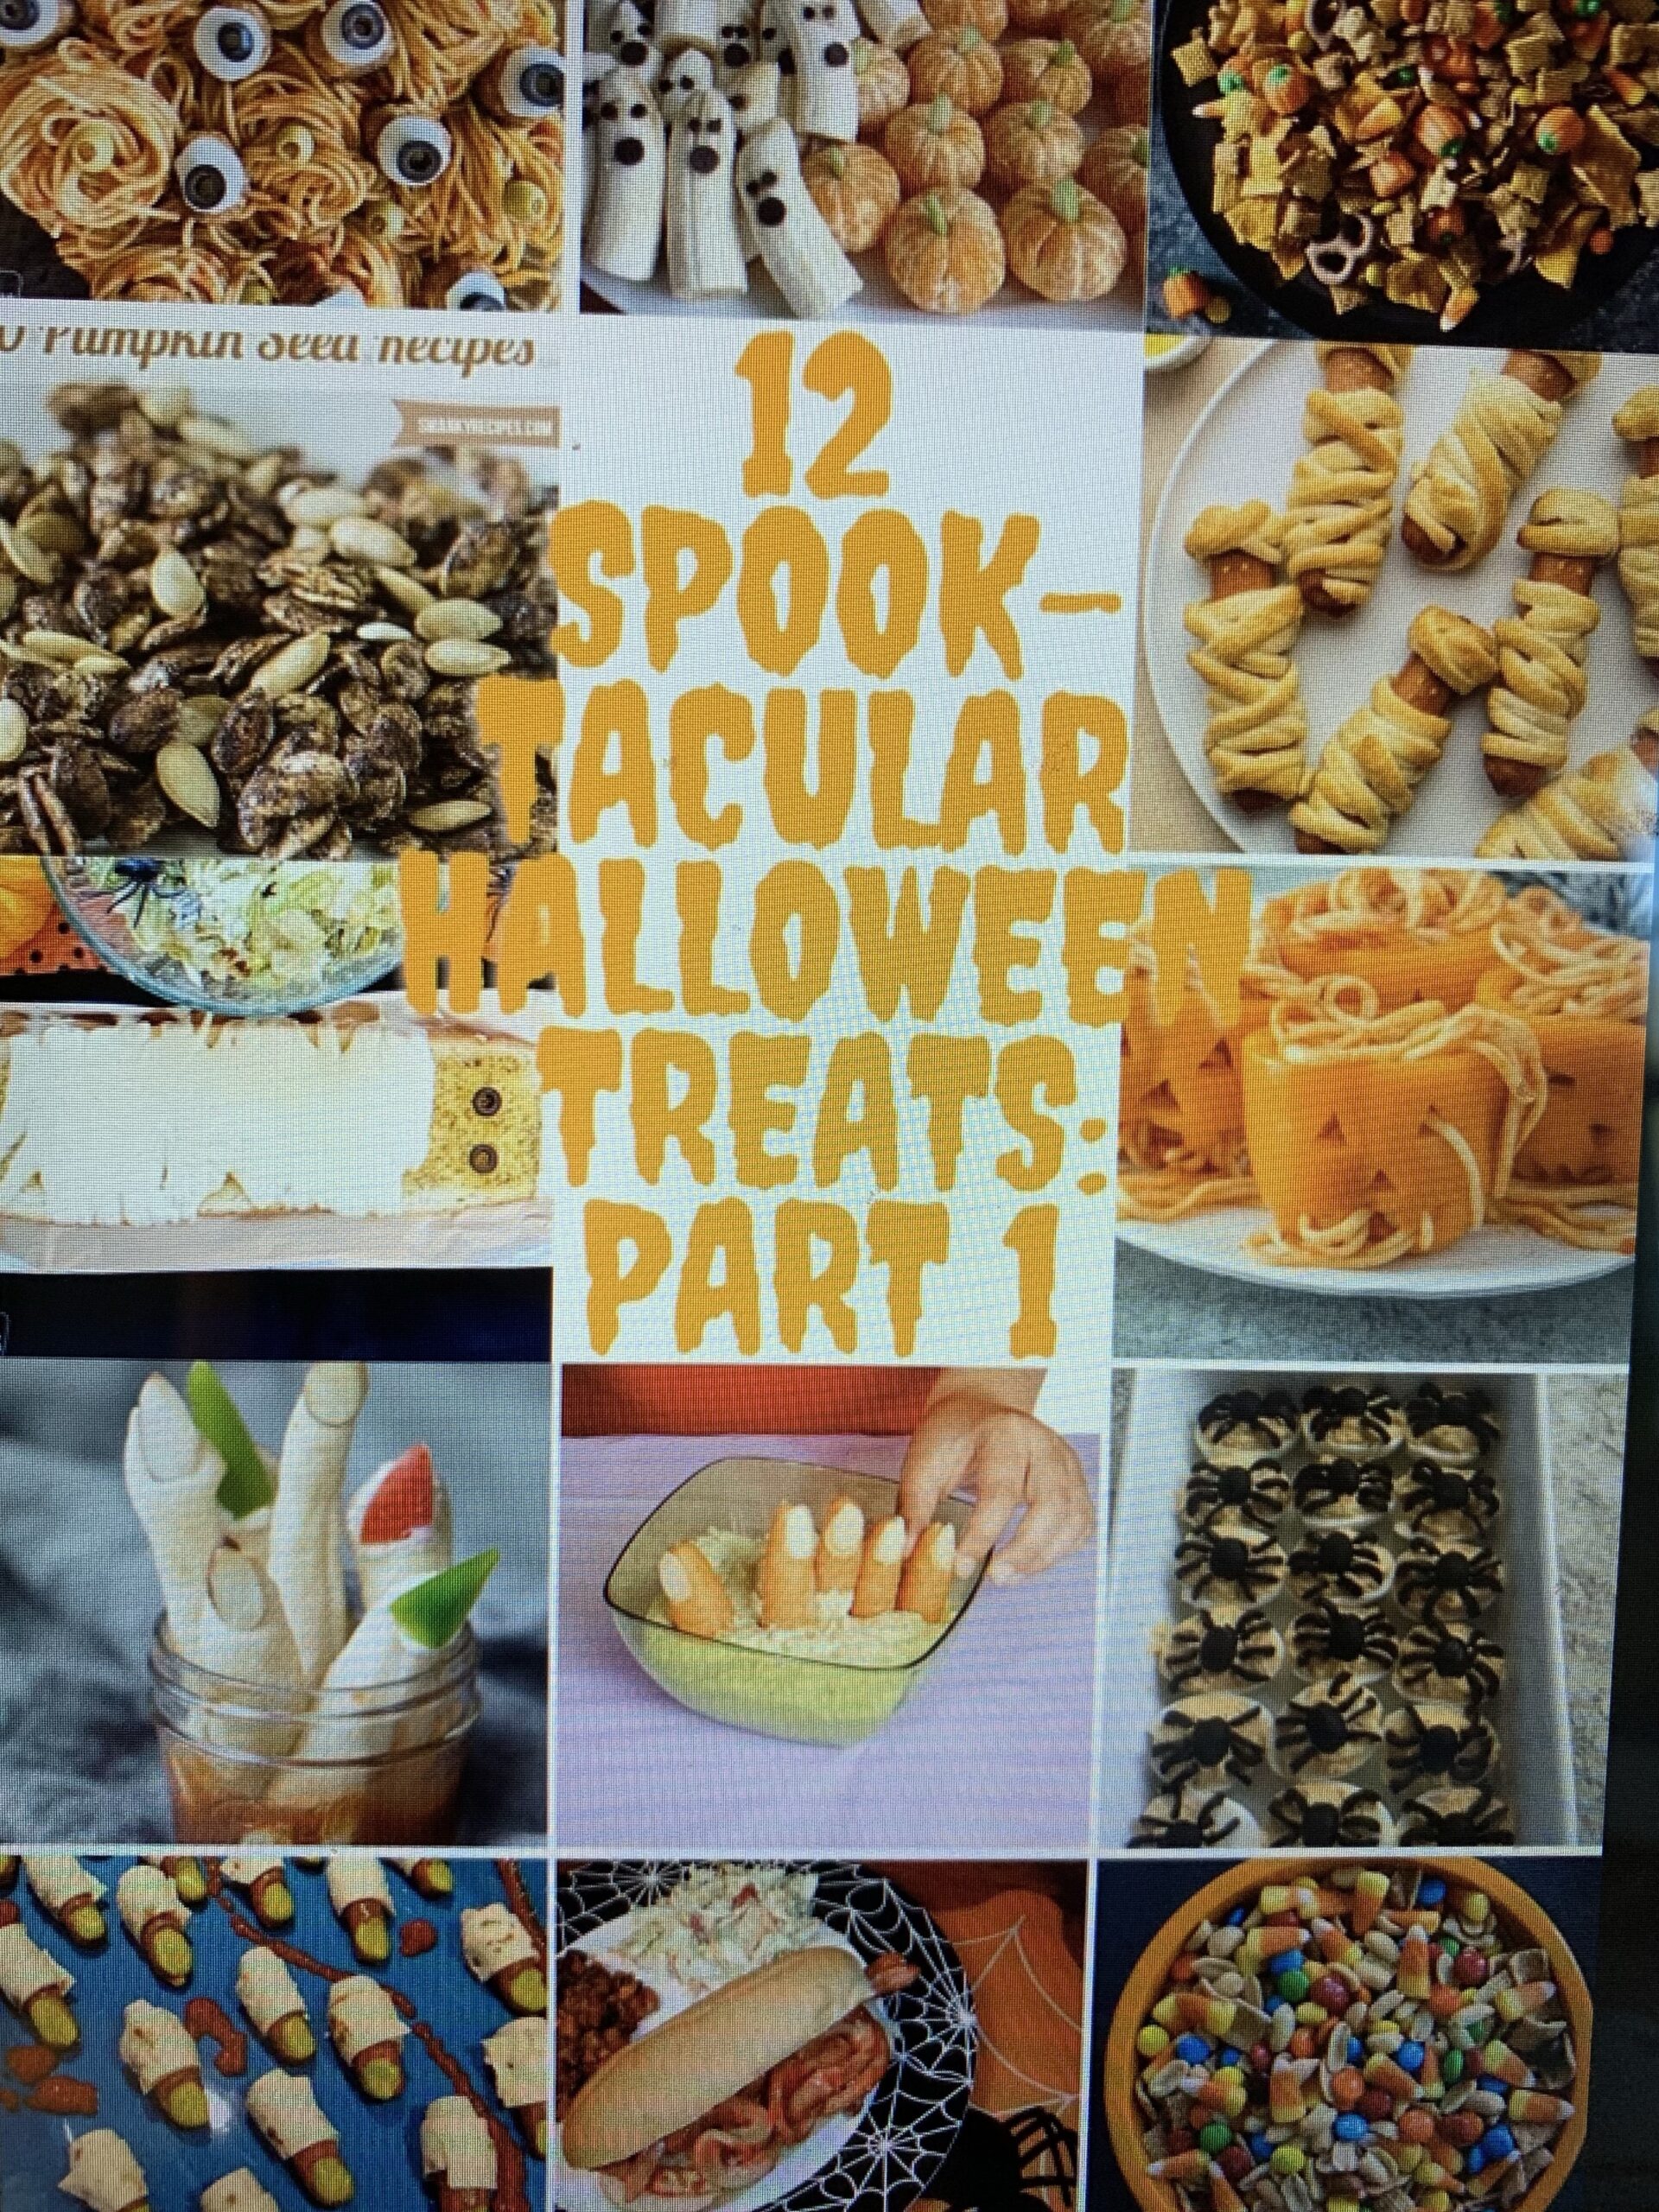
Halloween is a great time to get creative with spooktacular foods! Some foods take more effort than others. I will start by listing the treats that are easier to make with their recipe link. On another post I will put more extravagant recipes that take longer to concoct.

Add a little candy corn to your chex mix treat! You can easily add candy corn and pumpkins, gummies, or any other Halloween treats. The one below also has honey bears- yum!
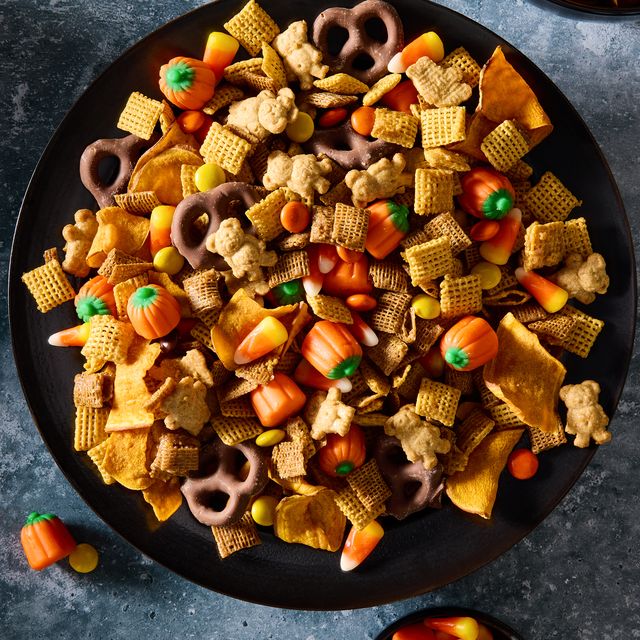
a bowl of halloween themed chex mix with chex cereal, chocolate pretzels, reese's pieces, candy corn, and sweet potato chips

Ingredients:

  • 4 cups Corn Chex and 4 cups wheat chex
  • 2 Cups of cinnamon Teddy Grahams
  • 1/2 cup of unsalted butter (melted)
  • 6 tablespoons of brown sugar
  • 1 tablespoon of cinnamon
  • 1 tsp of salt
  • 1 tsp of vanilla extract
  • 2 cups of candy corn/pumpkins or whatever amount you like!
  • 2 cups of chocolate covered pretzels (or regular)
  • 2 cups sweet potato chips (or whatever type you prefer)
  • 1 cups of reese’s pieces or m&ms

Directions

    1. Preheat oven to 250°. In a large bowl, combine Corn Chex, Wheat Chex, and Teddy Grahams. In a small bowl, mix butter, brown sugar, cinnamon, salt, and vanilla.
    2. Drizzle about one-third of butter mixture over Chex mixture. Toss to coat, then repeat with remaining butter mixture until every component is coated.
    3. Divide Chex mixture between 2 unlined rimmed baking sheets; spread in an even layer.
    4. Bake Chex Mix, tossing every 15 minutes, until toasted and crisp, 30 to 45 minutes.
    5. Let cool, then mix in candy corn, pretzels, sweet potato chips, and Reese’s pieces.
    6. Make Ahead: Chex Mix can be made 2 weeks ahead. Store in an airtight container at room temperature.

photo by Robin and Sue

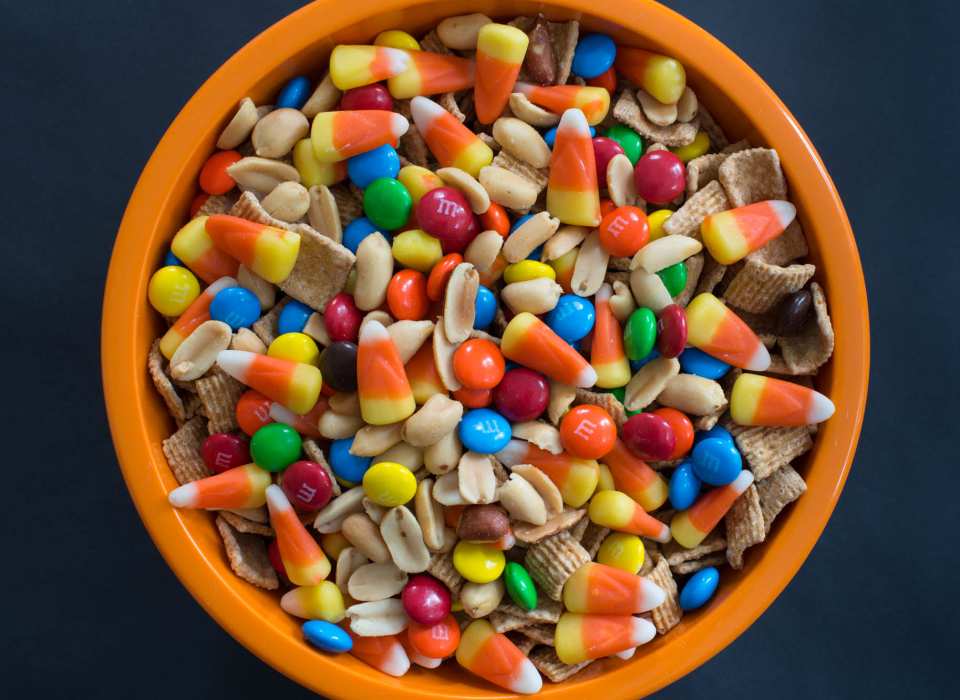
If you prefer nuts and cinnamon toast cereal- then this bowl is for you!

Spaghetti with meatballs that look like eyes

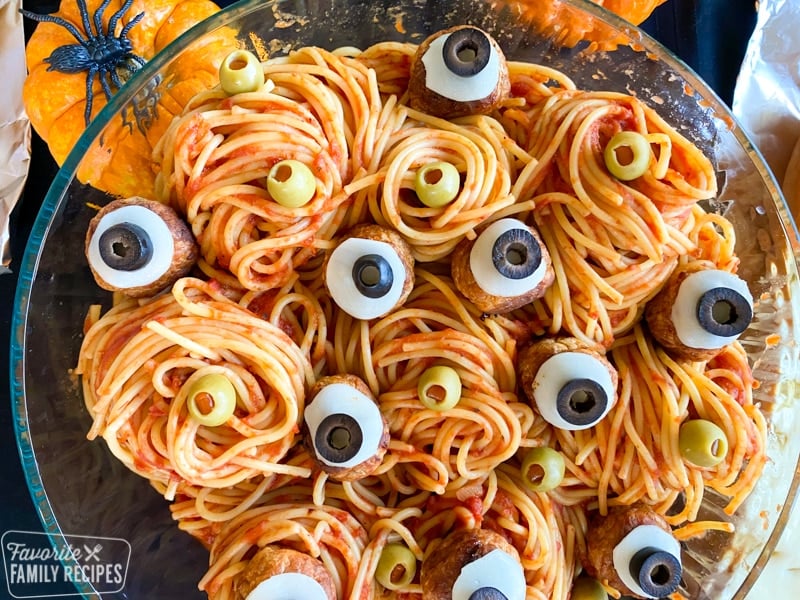
Spaghetti with eyes! AHHH

  • Make your spaghetti and meatballs and sauce as usual.
  • To give the spaghetti the twirled “nest” look, just twist big scoops spaghetti with a fork in a ladle
  • Use olives and canned black cut up olives on top of mozzarella slices.
  • Serve with a side of parmesan cheese for sprinkling.

photo by anniesnomsblog

Pasta pumpkins! Cut the top of the pepper off and carve in the features! Then cook the pasta and sauce and scoop it all into the pepper.
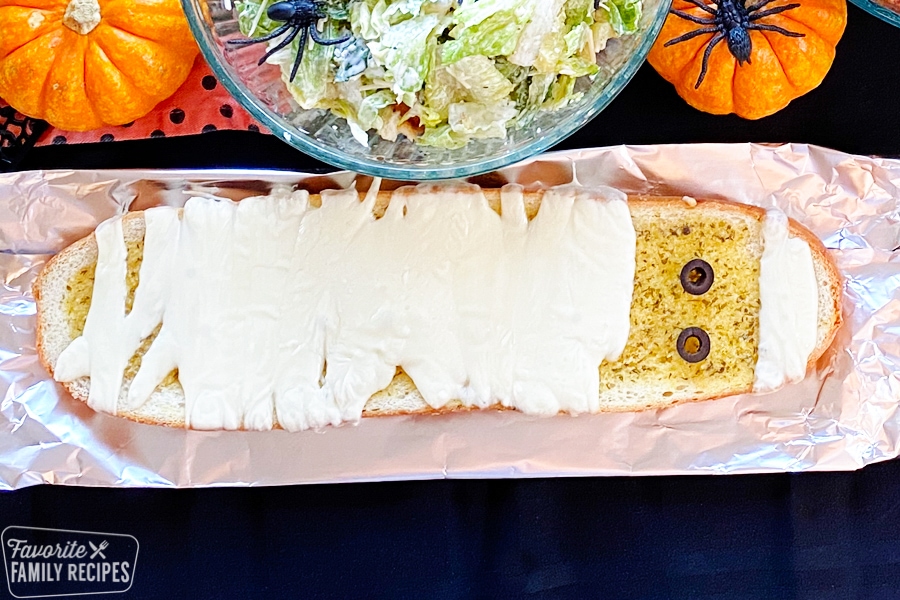
Garlic bread with cheese that looks like a mummy

Mummy Garlic Bread!

  • Pre-heat oven to 375 degrees
  • Use italian bread cut in half long way (of buy premade garlic bread). If making own you can smother it in butter and place garlic powder/garlic precut on the bread.
  • cut up some strips of mozzarella cheese (strips of string cheese work well too).
  • Place them on a bakery garlic bread or home made
  • Heat the bread in the oven at 375 degrees for about 5 minutes.
  • Finally, add a couple olive slices for “eyes”.

May be an image of fruitGhost Bananas and clementine pumpkins!

  • All you need to do is use celery of the clementine and mini chocolate chips for the eyes of the ghost and a regular sized chocolate chip for the mouth! Kids love them!

photo by Rebekah W.
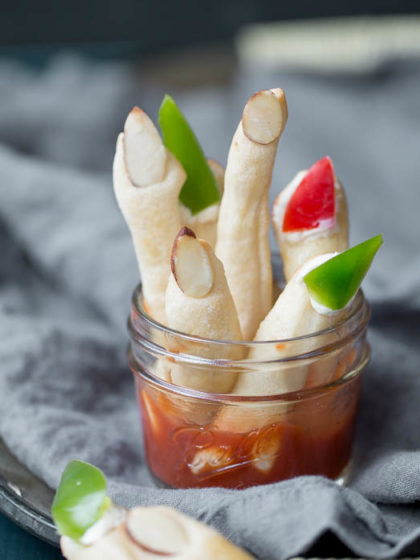
Toes! Just use hot dogs- either cut up regular size or mini hot dogs. Cook them up and wrap them with cut up tortillas! You can also cook them in the oven with crescent rolls like the next recipe of mummy hot dogs!  Then place mustard on strategically to make nails!

Mummy Hot Dogs

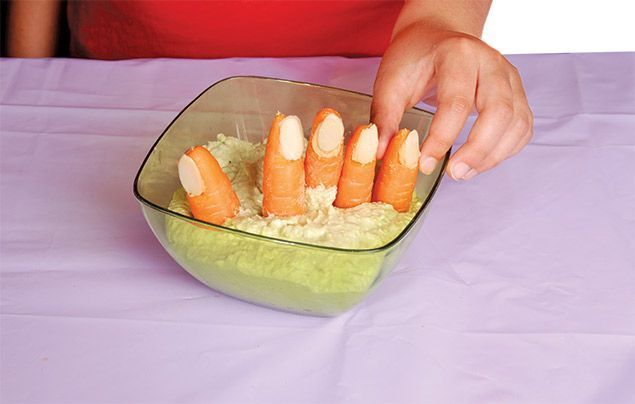
If you prefer to go healthier, you can make fingers or toes from carrots with cutting s small area on the top or bottom of the carrot and using hummus and putting on a sliced almond! You can also use cream cheese and cut up peppers!

photo by Ms B.

Another hot dog recipe! This time it is for a worm sandwich! This time you slice the hot dogs into long strips and boil them until they curl- then add ketchup!


Spooky witches' fingers Halloween recipe | National ...Easiest Halloween Witch Finger Breadsticks


photo by Anonymous
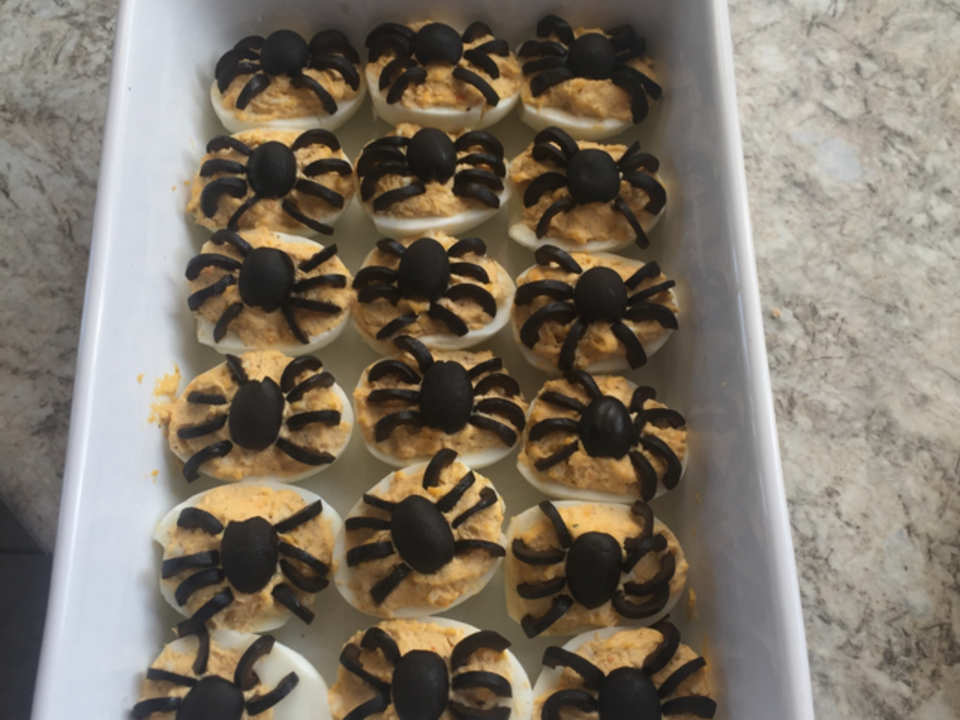
Spider Deviled eggs!

  • Make your deviled eggs as you usually do, then add olives to make the spiders- such a cute and easy idea!

Pumpkin seeds take a little more work as you dig them out of your pumpkin, clean them and let them dry- but well worth it! This website has 10 great seasonings and ways to roast them- try it this year- you won’t regret it!


More recipes coming in the next post!

FollowFacebookpinterestrssyoutube
ShareFacebookpinterest

Alternative Trick or Treating 2020

We all love trick or treating! I can remember trick or treating in high school with a group of my soccer friends! I personally think trick or treating is great for older children as well (as long as they behave and aren’t too scary for the little ones!). There were neighbors who said, “How old are you?” or “Don’t you think you’re too old for trick or treating?” NO is the answer. If a teenager is responsible and behaving, then by all means go trick or treating instead of the many other negative things that could be done.

I remember running home and spreading the treats all over the floor with my brother and sister. We would compare our stockpile and trade our treats! Oh what fun trick or treating was! However, 2020 is different. With the COVID virus going around (rate dependent in your state/county), we are minimizing this high risk activity by avoiding the traditional trick or treating. As disappointing as this is, there are some other super fun alternatives (and hopefully next year we can do the old school trick or treating)!

This image has an empty alt attribute; its file name is img_4586-1024x821.jpg
  1. Mini Party!!!!!! Mini party essential means a small party, usually under ten people, with trusted low risk covid people. This can encompass many activities such as
    1. A Piñata
    2. Movie night
    3. Campfire night with smores
    4. Fun Halloween snacks and food
    5. Carving/painting pumpkins
    6. Halloween crafts/face painting
    7. Board games
    8. Crafts
    9. How many candy corns are in the container
    10. And any of the other activities on the list!
  2. Scavenger hunt time! Who doesn’t love a good scavenger hunt? Well, maybe your kids if they don’t want to work for their candy! There are many scavenger Halloween hunts, I made one for kids who aren’t quite reading yet so they can look at the pictures and words and understand. The one below you can download. If you need another type you can find many online!
This image has an empty alt attribute; its file name is scav.png

3. Halloween Egg Hunt: You can easily use marker and draw faces on eggs, or you can use puffy paint! Another option is glow in the dark eggs and a night egg hunt…SPOOKY! You can also paint eggs with glow in the dark paint. Put your favorite candies, stickers, tattoos, rings, or whatever you child enjoys in the eggs! Use your pumpkin or usual trick or treat bags to collect them.

Halloween party games for kids - Upcycle plastic Easter Eggs for a Halloween Egg Hunt.

4. Trick or Treat Stations: Setup stations in your yard, or at each of your doors. Each adult is dressed up and has a scene behind them. For example, one adult has spider webs behind them and the kids come up and say trick or treat. The idea is that its safe since it is your mom and dad or family member you live with and its similar to trick or treating. We may do the door idea. So the kids can run from door to door (maybe more than once), and knock for trick or treating.

5. Family trick or treating: this is similar to the one above. However, you can drive to grandparents house or aunt or uncle house and do trick or treat at just a select couple houses to lower the risk.

6. Family Ideas: So besides all the other ideas, there are many other Halloween things that can be done. Family board games, campfires, Halloween movies, pin the spider on the spiderweb, mummy toilet paper roll game (although you may not want to waste the toilet paper!!), painting pumpkins or carving them, Halloween bingo, ring witch hat toss

17+ Halloween Party Games for Kids
Halloween Bingo - Perfect halloween party games for kids

7. Yard Parade: have your little ones dress up and walk around the yard and do a parade! You can walk down the road dressed up as well (not on trick or treat day of course!). Kids love dressing up and having a pretend parade!

8. Zoom party! So have a family/friend zoom party. You can vote on the best costumes, each show off your spooky treats and your pumpkins. Do crafts together or drawing contests

FollowFacebookpinterestrssyoutube
ShareFacebookpinterest

Twinkle Twinkle

Hello! Guest writer here! I am the blog founder’s twin sister, Jessie, and I’m here to share my decorations and ideas from my little girl Madison’s first birthday party. You can use these decoration ideas for anything from baby showers, birthday parties, to graduation parties depending on what your theme is. If your theme involves stars, pink, or gold then you are in luck!

party
The dessert table before the desserts!

Let’s first start with the pink and gold theme. All of the tablecloths, plates, napkins, and containers are from Walmart. I wanted a good deal, but also wanted it to look good and found the best deals there. Michaels was another store I frequented for ideas and supplies. All of the numbers, letters, and banner supplies were purchased there.

Okay, before we dive too deep into how each decoration was made, let’s check out some pictures!

party6
The birthday girl’s chair!

All of the banner pennants in this article were purchased from Michaels. The letters on all of the banners are stick on letters from Michaels too. However, they don’t stay on the thick fabric of the pennants so need to be glued on. I used a hole puncher to make 2 holes at the top of each pennant and put string through them. I purchased some glitter foam sheets from Walmart to make the stars and used a cookie cutter to trace them.

party14
The happy birthday banner hanging above the food table.

Again, I used the materials I purchased to make this banner and it was fairly easy because everything was cut out besides the stars. This banner was definitely worth the time to put it together, it was super cute and personalized to her party. I moved the pictures that were originally above the banner and replaced them with picture frames of Madison.

party10

Balloons were purchased at the dollar store. I used the cork board from the kitchen to put pictures of her from the first year-a simple and affordable decoration. The 12 month banner was also made from the pennants. I simply traced the star cookie cutter and cut out stars instead of using the pennant shape. If you don’t have a cookie cutter you could print out a star from a computer and trace it! I found little pink clothespins at Michaels and hot glued them to the stars so the pictures could be added below the banner. This could also be a cute idea for other types of parties. You could write someone’s name and have pictures of them beneath it or for graduation with pictures from each school year. The options are endless!

party18
Again, I cut out stars and added the stick on letters with glue. These stars were cut from glitter foam paper.
party7
Stars, stars, everywhere!

I made the twinkle banner, the stars hanging from the chandelier and the star wands on the table that I used as party favors and a centerpiece. For the stars hanging from the light, I cut out stars from the foam paper and attached it to felt pink cloth I had. I cut the outline of the pink cloth around the gold star so it looks like an outline for the stars.

As for the wands, I purchased gold straws from Michaels and they were very sturdy made from cardboard and didn’t bend. I decided to use the foam paper to cut out two stars and stick them together around the top of the straw. I also included 2 cut pieces of ribbon on the wand. I put one on each side of the star and pushed the stars together (they have sticky backs, but you could easily glue them). They were a hit!

party4
Yum! I made chocolate covered pretzels with pink chocolate melts and gold sprinkles. I also made the sugar cookies with star and number one cookie cutters!
party9
No, I didn’t make this beautiful cake. However, I thought the stars sticking out of the top were so cute and easy to make! They simply used some wire and cut out stars they hot glued to the wire! 
party11
Pictures, pictures, everywhere! 
party13
Super cheap decoration-pictures on string! I used pink string and taped the pictures. For a twinkle twinkle theme you could also use string lights around the house for decorations!
party17
A giant number one made with pictures!

There are great tutorials online about making the number one with pictures for your baby’s first birthday. Most people recommend using cardboard from a large appliance box. I didn’t have any available, so used regular printer paper. I simply cut pictures and fit them on the paper with glue, then laminated the paper. I am a teacher so I happen to have a small scotch laminator at home that worked perfectly. I lined up all the papers to make the number one and adhered it to the wall with tape!

party16

party20
You might be wondering about her outfit and this wonderful sign. I’m sorry to tell you that I didn’t make them. A local woman made them both for me. 
party2
My sister (aka the blog writer) made her beautiful dress and headband. Hopefully there will be a post on that coming up soon! Yes, Madison wanted the cake.

If you are a very busy person with many kids, making all of these decorations might be too time consuming. However, even making a small amount of them is very rewarding. It not only adds a personal touch, but can be used as a keepsake or for future parties!

party19
Thank you for visiting this blog and YOU can make these decorations too with a little time and effort!
FollowFacebookpinterestrssyoutube
ShareFacebookpinterest

Princess Dress and Party!

My daughter has recently developed an interest in princesses and playing dress up. I decided to take on the challenge of sewing a princess dress. I’ve made many dresses, including the princess-like 1st birthday dress, but I wanted to make something different, so I did some research and then bought fabric I thought she would love, and designed a dress. I made several adjustments during the process and added embellishments.


Since I did this all during the process of making it, I decided to take pictures instead of video like I usually do.


There is no pattern for this since I designed the dress as I went. I used one of her regular party dress to eyeball the correct sizing for a 3t dress. (This is what you can do too!)

So below are pictures and some steps. If you want to design a similar one just use a dress to get an idea of the sizing. I don’t work with a lot of tulle sewing, so it didn’t turn out the best, but I’m proud of the end results, and she loves it too!

So I first made the front and two back pieces. You can copy these shapes from the picture and use a dress for sizing.

I ended up making another three pieces (another front and two back pieces) and using it as the inside of the dress.  So I took pattern facing pattern for the front piece and left a 3 inch space to pull it right side out.  Then I sewed this shut and ironed it all. I also used sparkly elastic and pinned it in between the pattern facing pattern (this is what I should have done but forgot and ended up just sewing it to the top).

I also added a tulle happy birthday and two pieces of silver design on the front. You can add or not add as many embellishments as you want.

Next, I used interfacing ironed on both back pieces and then used white hair ties cut in half.  I pinned the half hair ties facing inwards in between the pattern facing pattern pieces then sewed all the way around except a 3 inch area and pulled it right side out and sewed then ironed it.

Following that, I placed the two back pieces on the front pattern piece and sewed the sides and then folded them back to have the top finished.

I then measured the skirt by measuring from the top down to the right length for my daughter with a measuring tape.  I used the soft fabric of the top for the under-skirt and then cut happy birthday tulle and tulle for the skirt.  i made the white tulle width three times the width length since I will gather it to make the skirt more “poofy.” I then gathered the tulle using the easy method of dental floss, on top of the soft under skirt. With this method, you use a large zigzag over the floss and then at the end you pull the floss out and it is gathered!

Next I decided to use the happy birthday tulle and sewed it on as well.  Then, I put the layers together and I put pattern facing pattern and sewed it all together.

I ended up sewing on a bead embellishments on ribbon in between the top and bottom.


Happy Sewing!

FollowFacebookpinterestrssyoutube
ShareFacebookpinterest