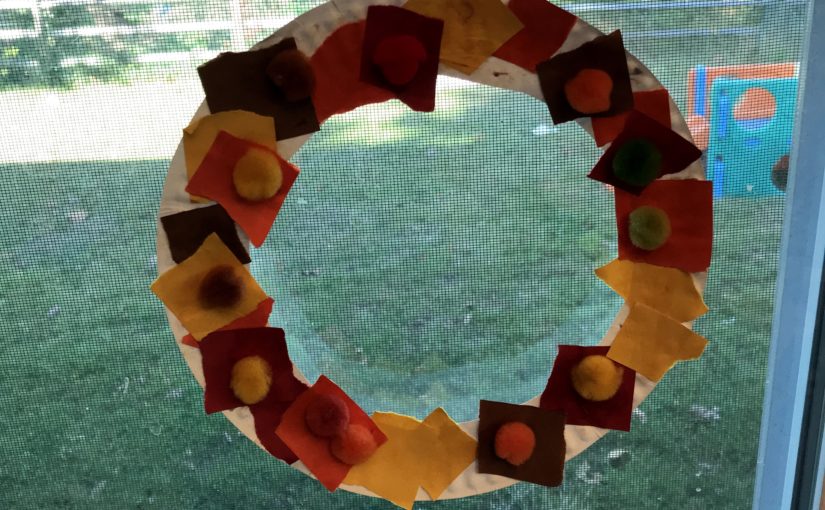
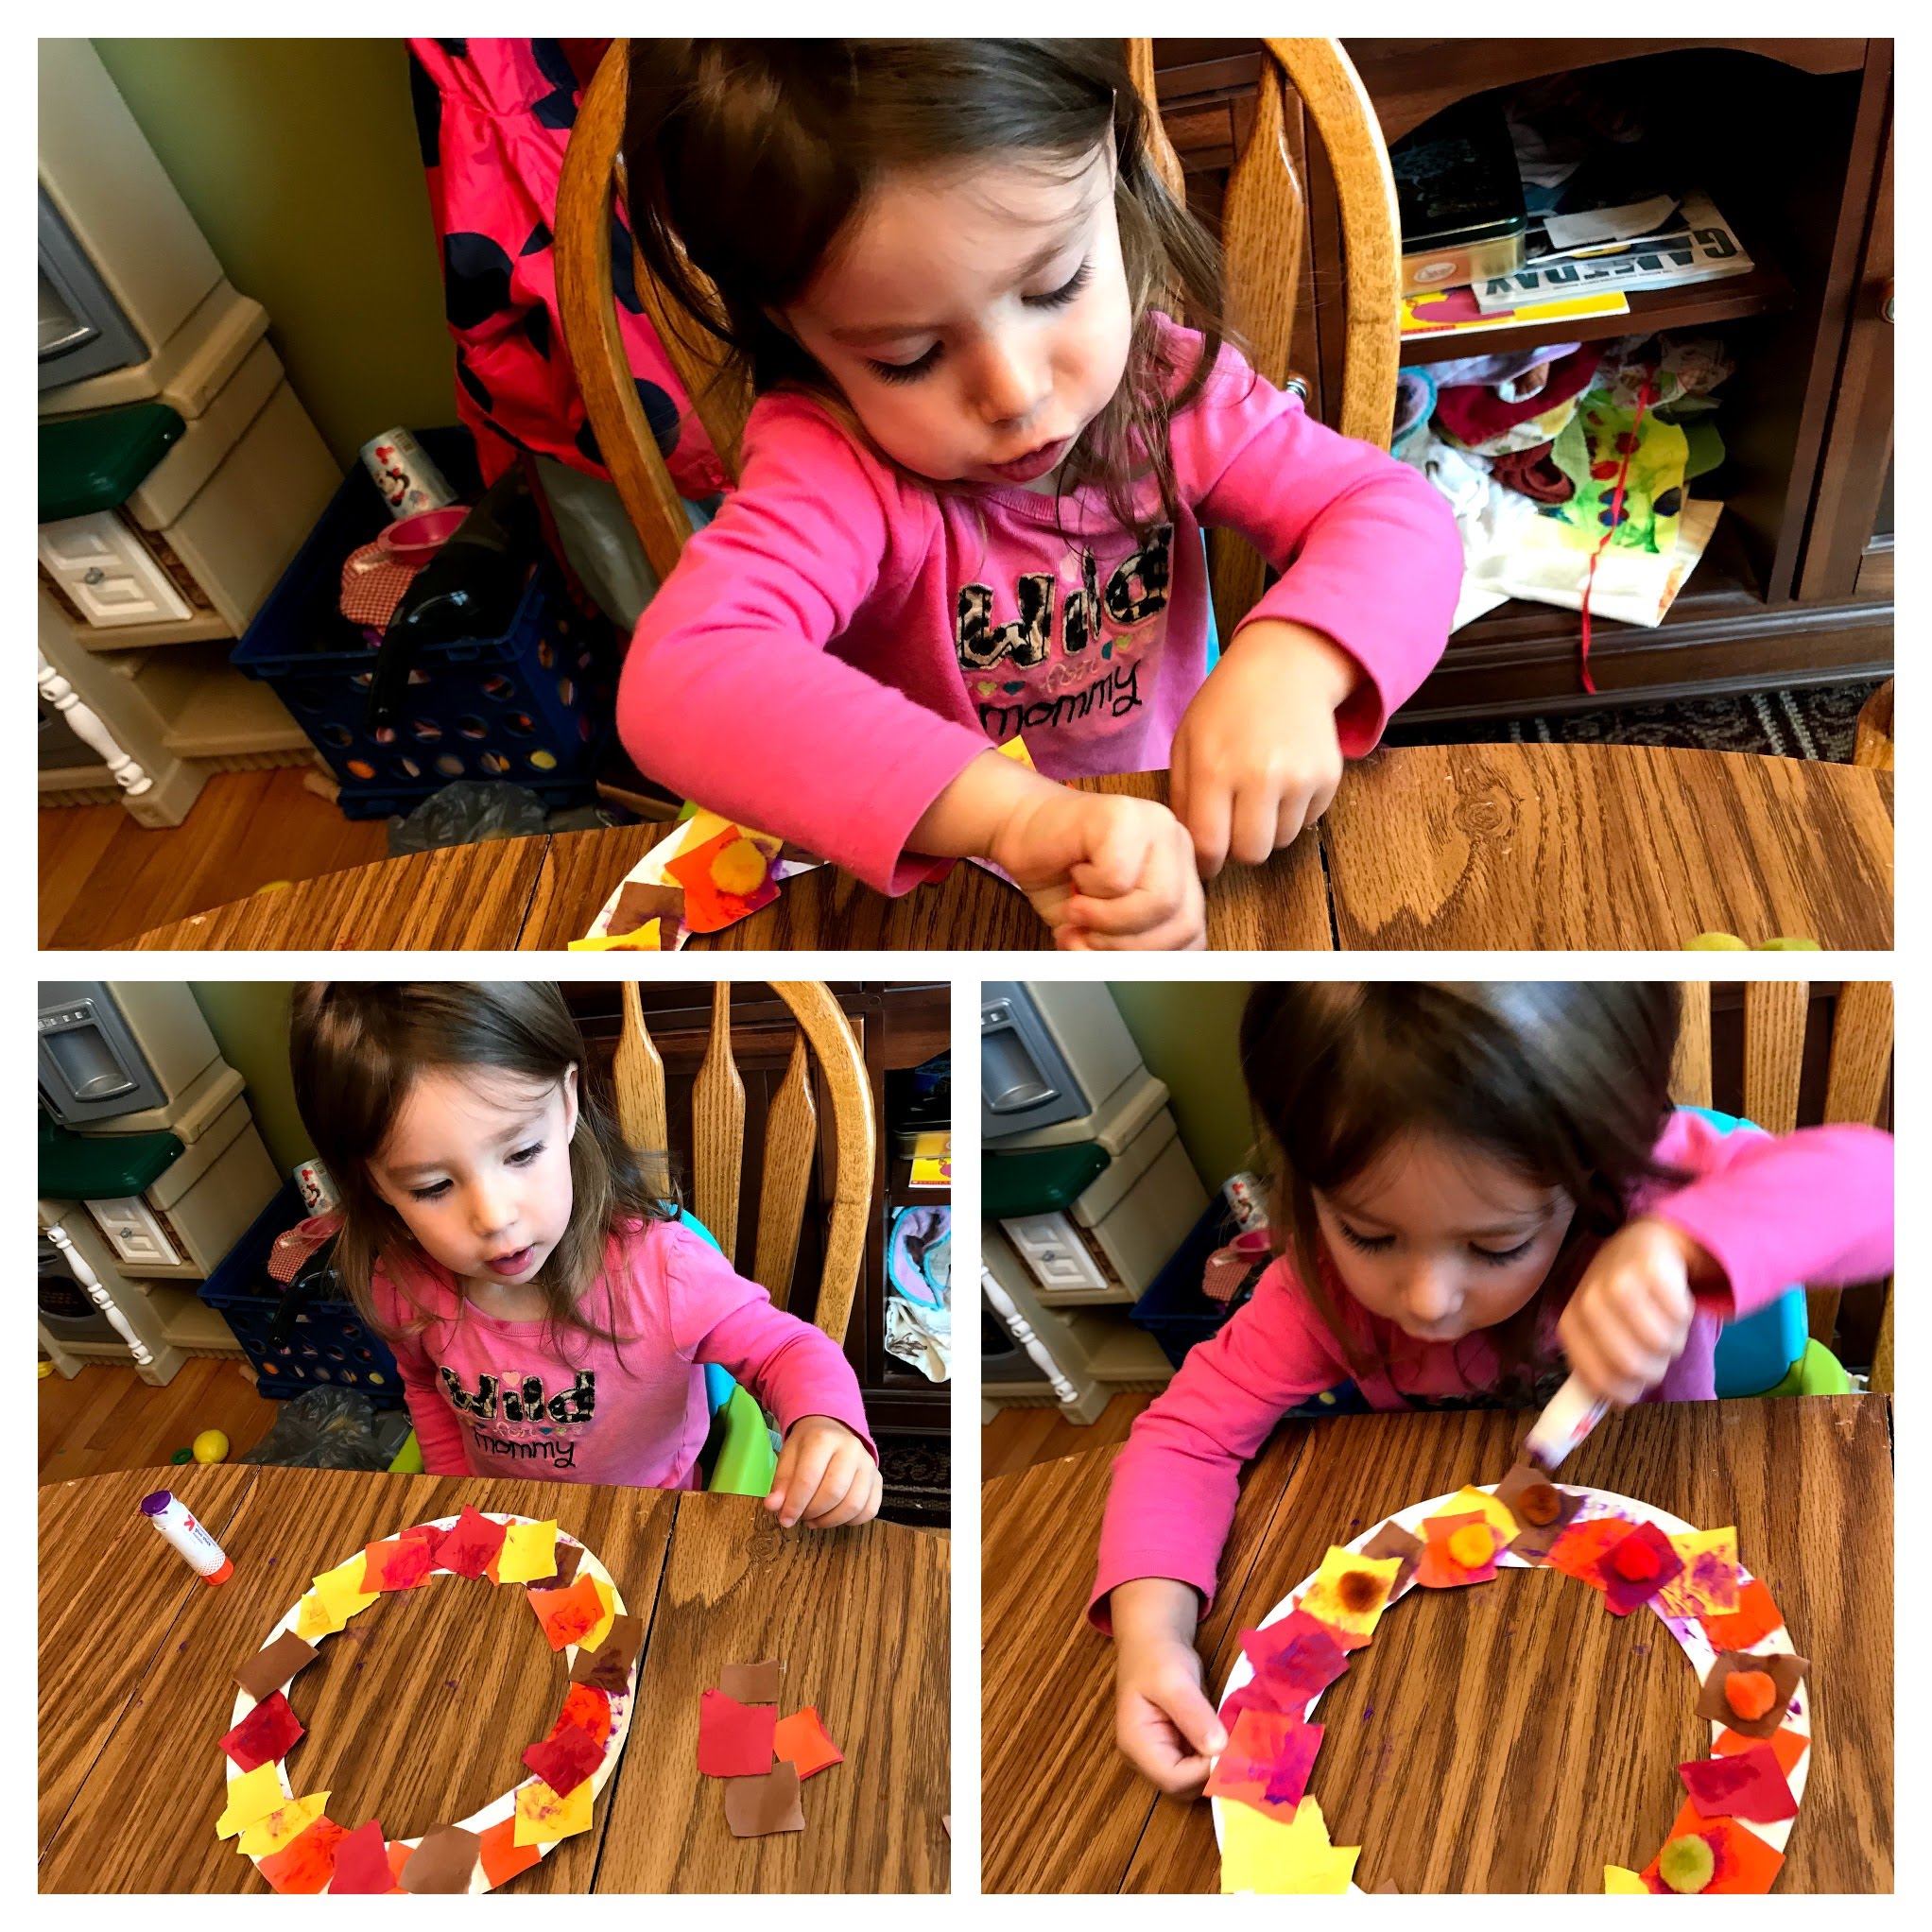
We always hang a wreath on our door for each season or holiday. Madison wanted in on the fun, so we decided to make our own fall wreath! It’s very simple and easy!
Materials:
paper plate
glue
assorted fall construction paper colors
string
pom poms (optional)
You could also add glitter or any other extras!
First, cut out the middle of the paper plate so you have a circle left. Next, I cut the construction paper in strips, then cut it into small squares she could glue onto the “wreath”. We pretended the squares of construction paper were leaves. You can use your scissors for this or if you want more of a messy look you can rip the paper or have your child do it.
Madison had a lot of fun gluing on all of the pieces. She loved using the glue stick. We covered the paper plate then we added fall colored pom poms on top of the “leaves” (construction paper). She LOVED this project and after it dried we hung it up on the window. She points it out proudly every time we go by!
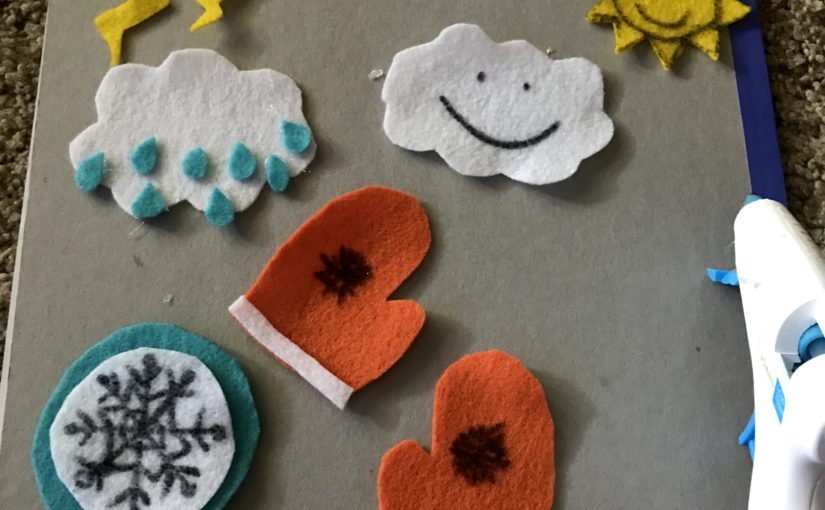
A felt weather board is a great way for a toddler/preschooler to learn the days of the week and the weather! I ended up having a few pieces of felt, some thread, and ribbon left over from other projects so I thought, why not? Weather board time!
The first thing I did was fold a piece of felt in half, horizontally. I decided to make 2 pockets to hold the weather icons. Sew the two sides together, going through both layers of felt, then do the same in the middle.
Next, decide on a background color. Lay the felt pockets on the bottom overlapping the background color. I overlapped 2 inches then hand sewed the sides 2 inches down (only on the inner layer which you can’t see) and along the top.
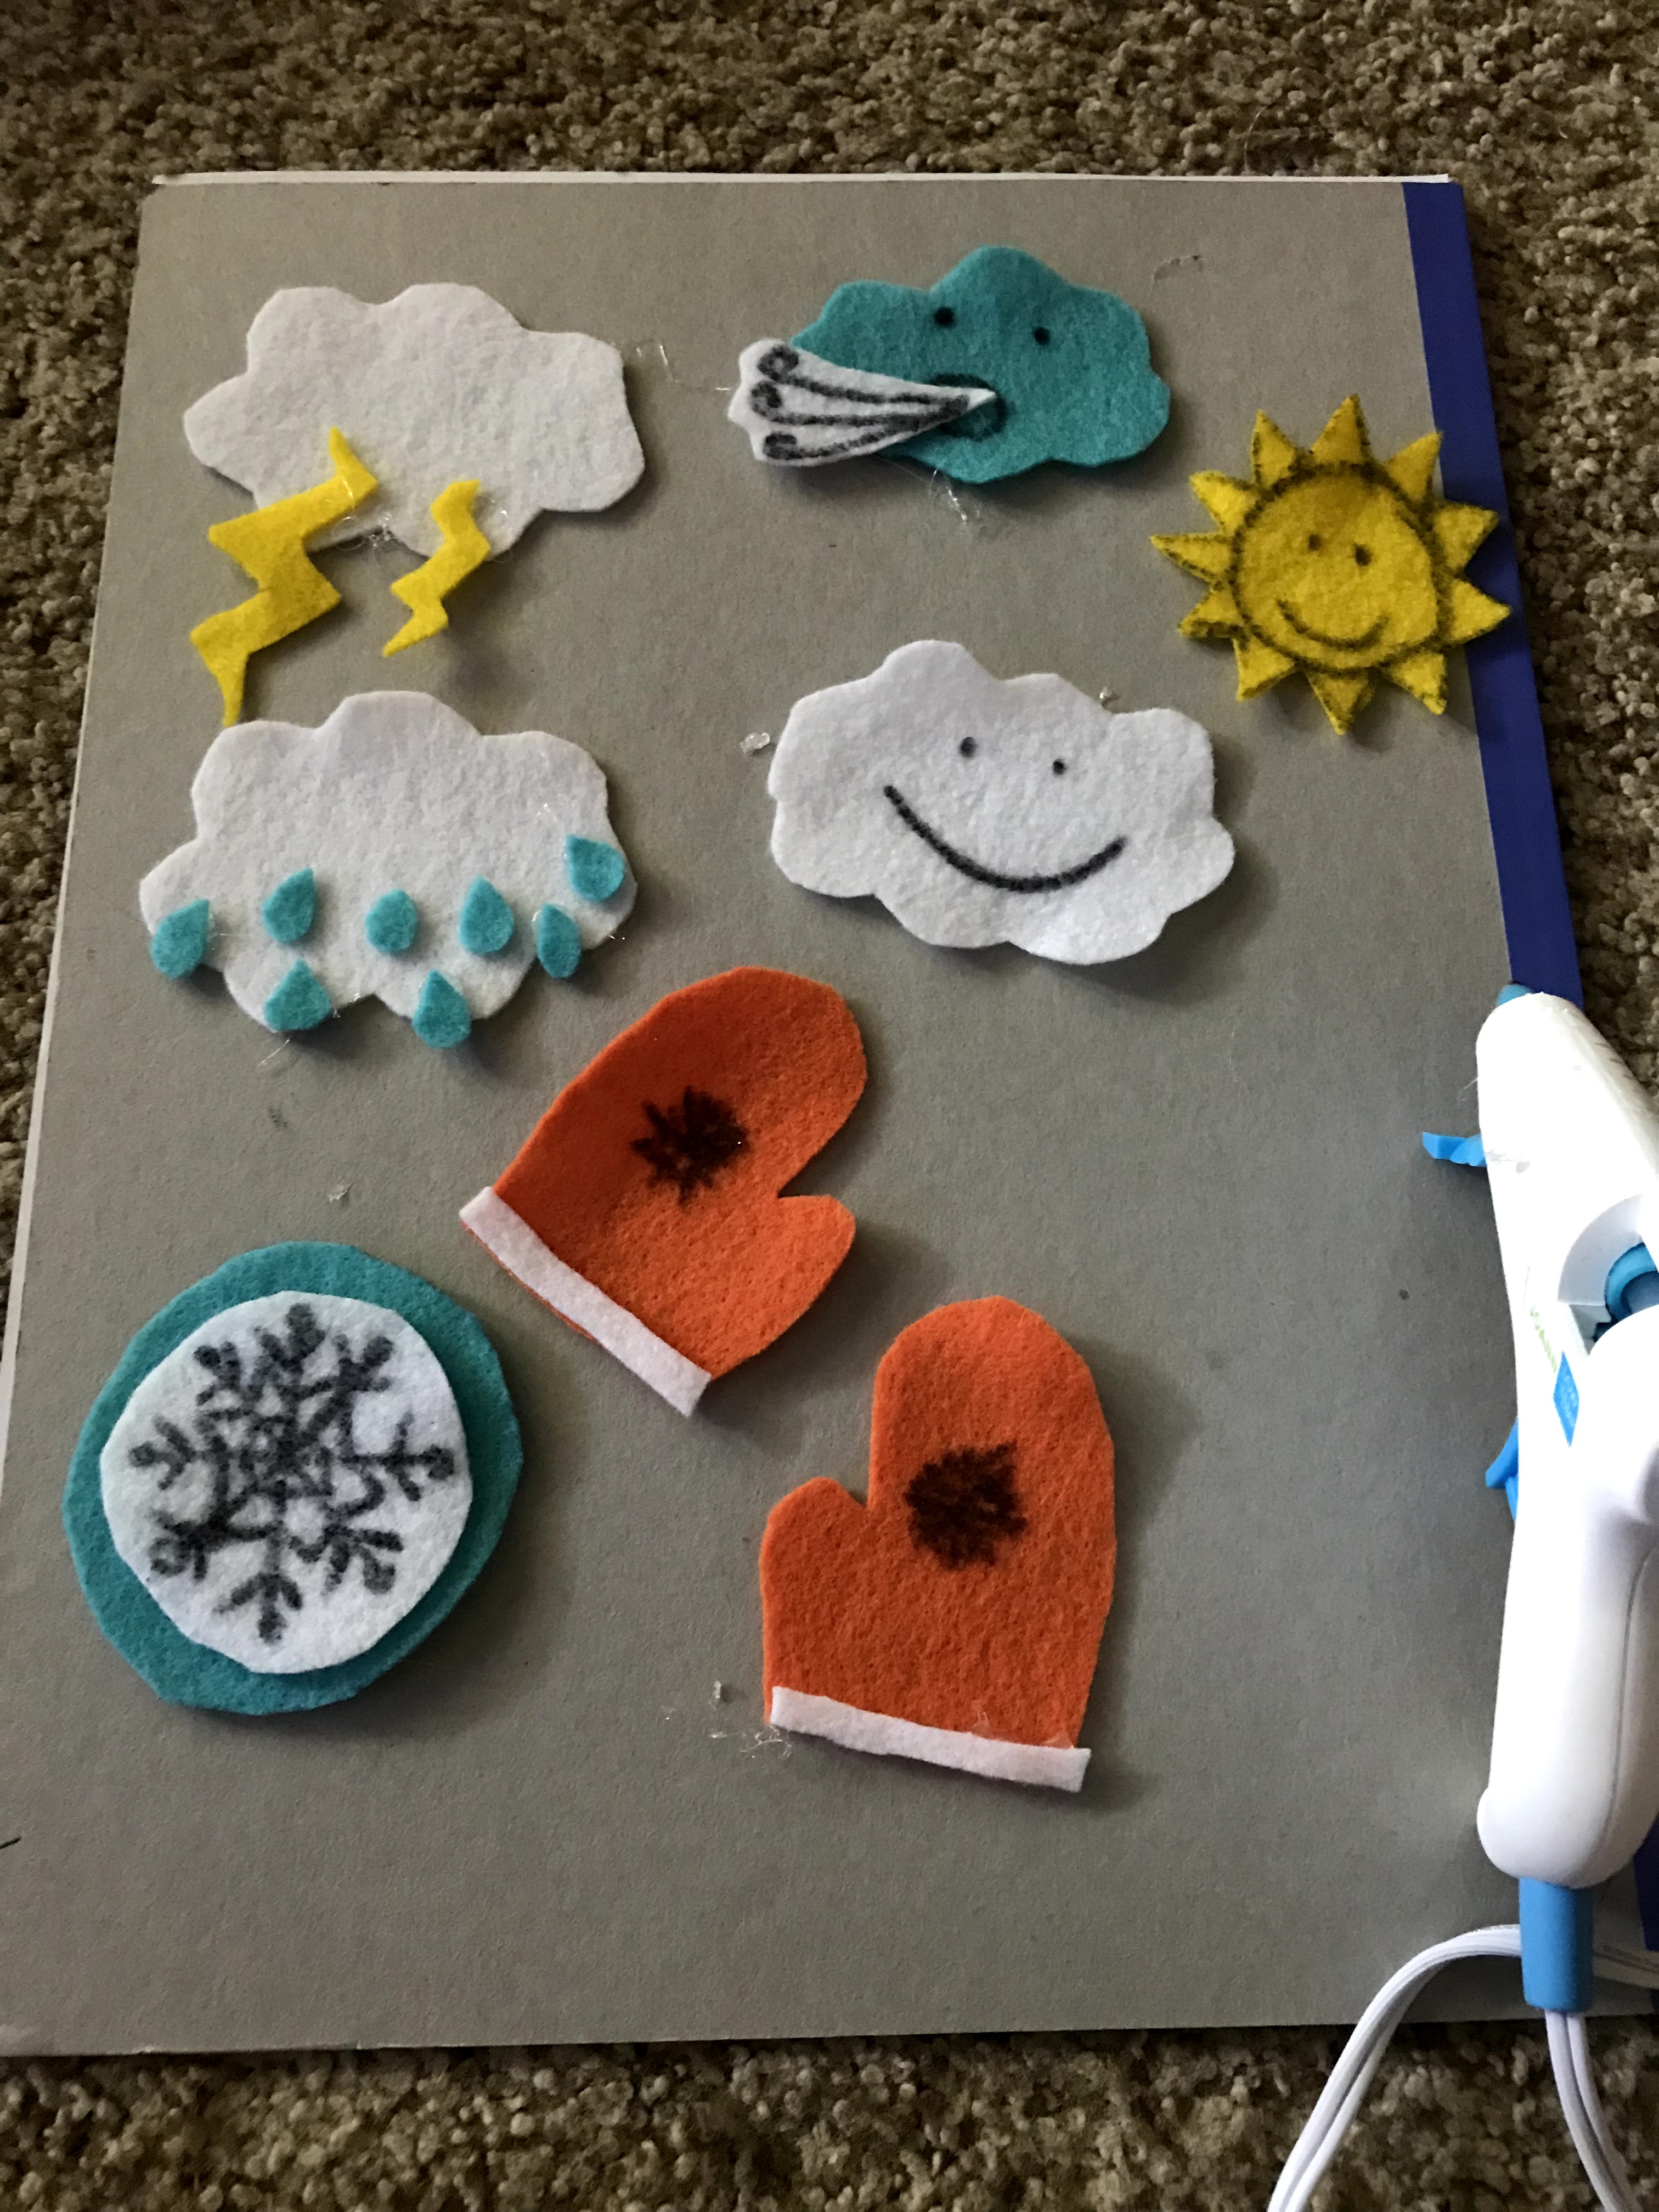
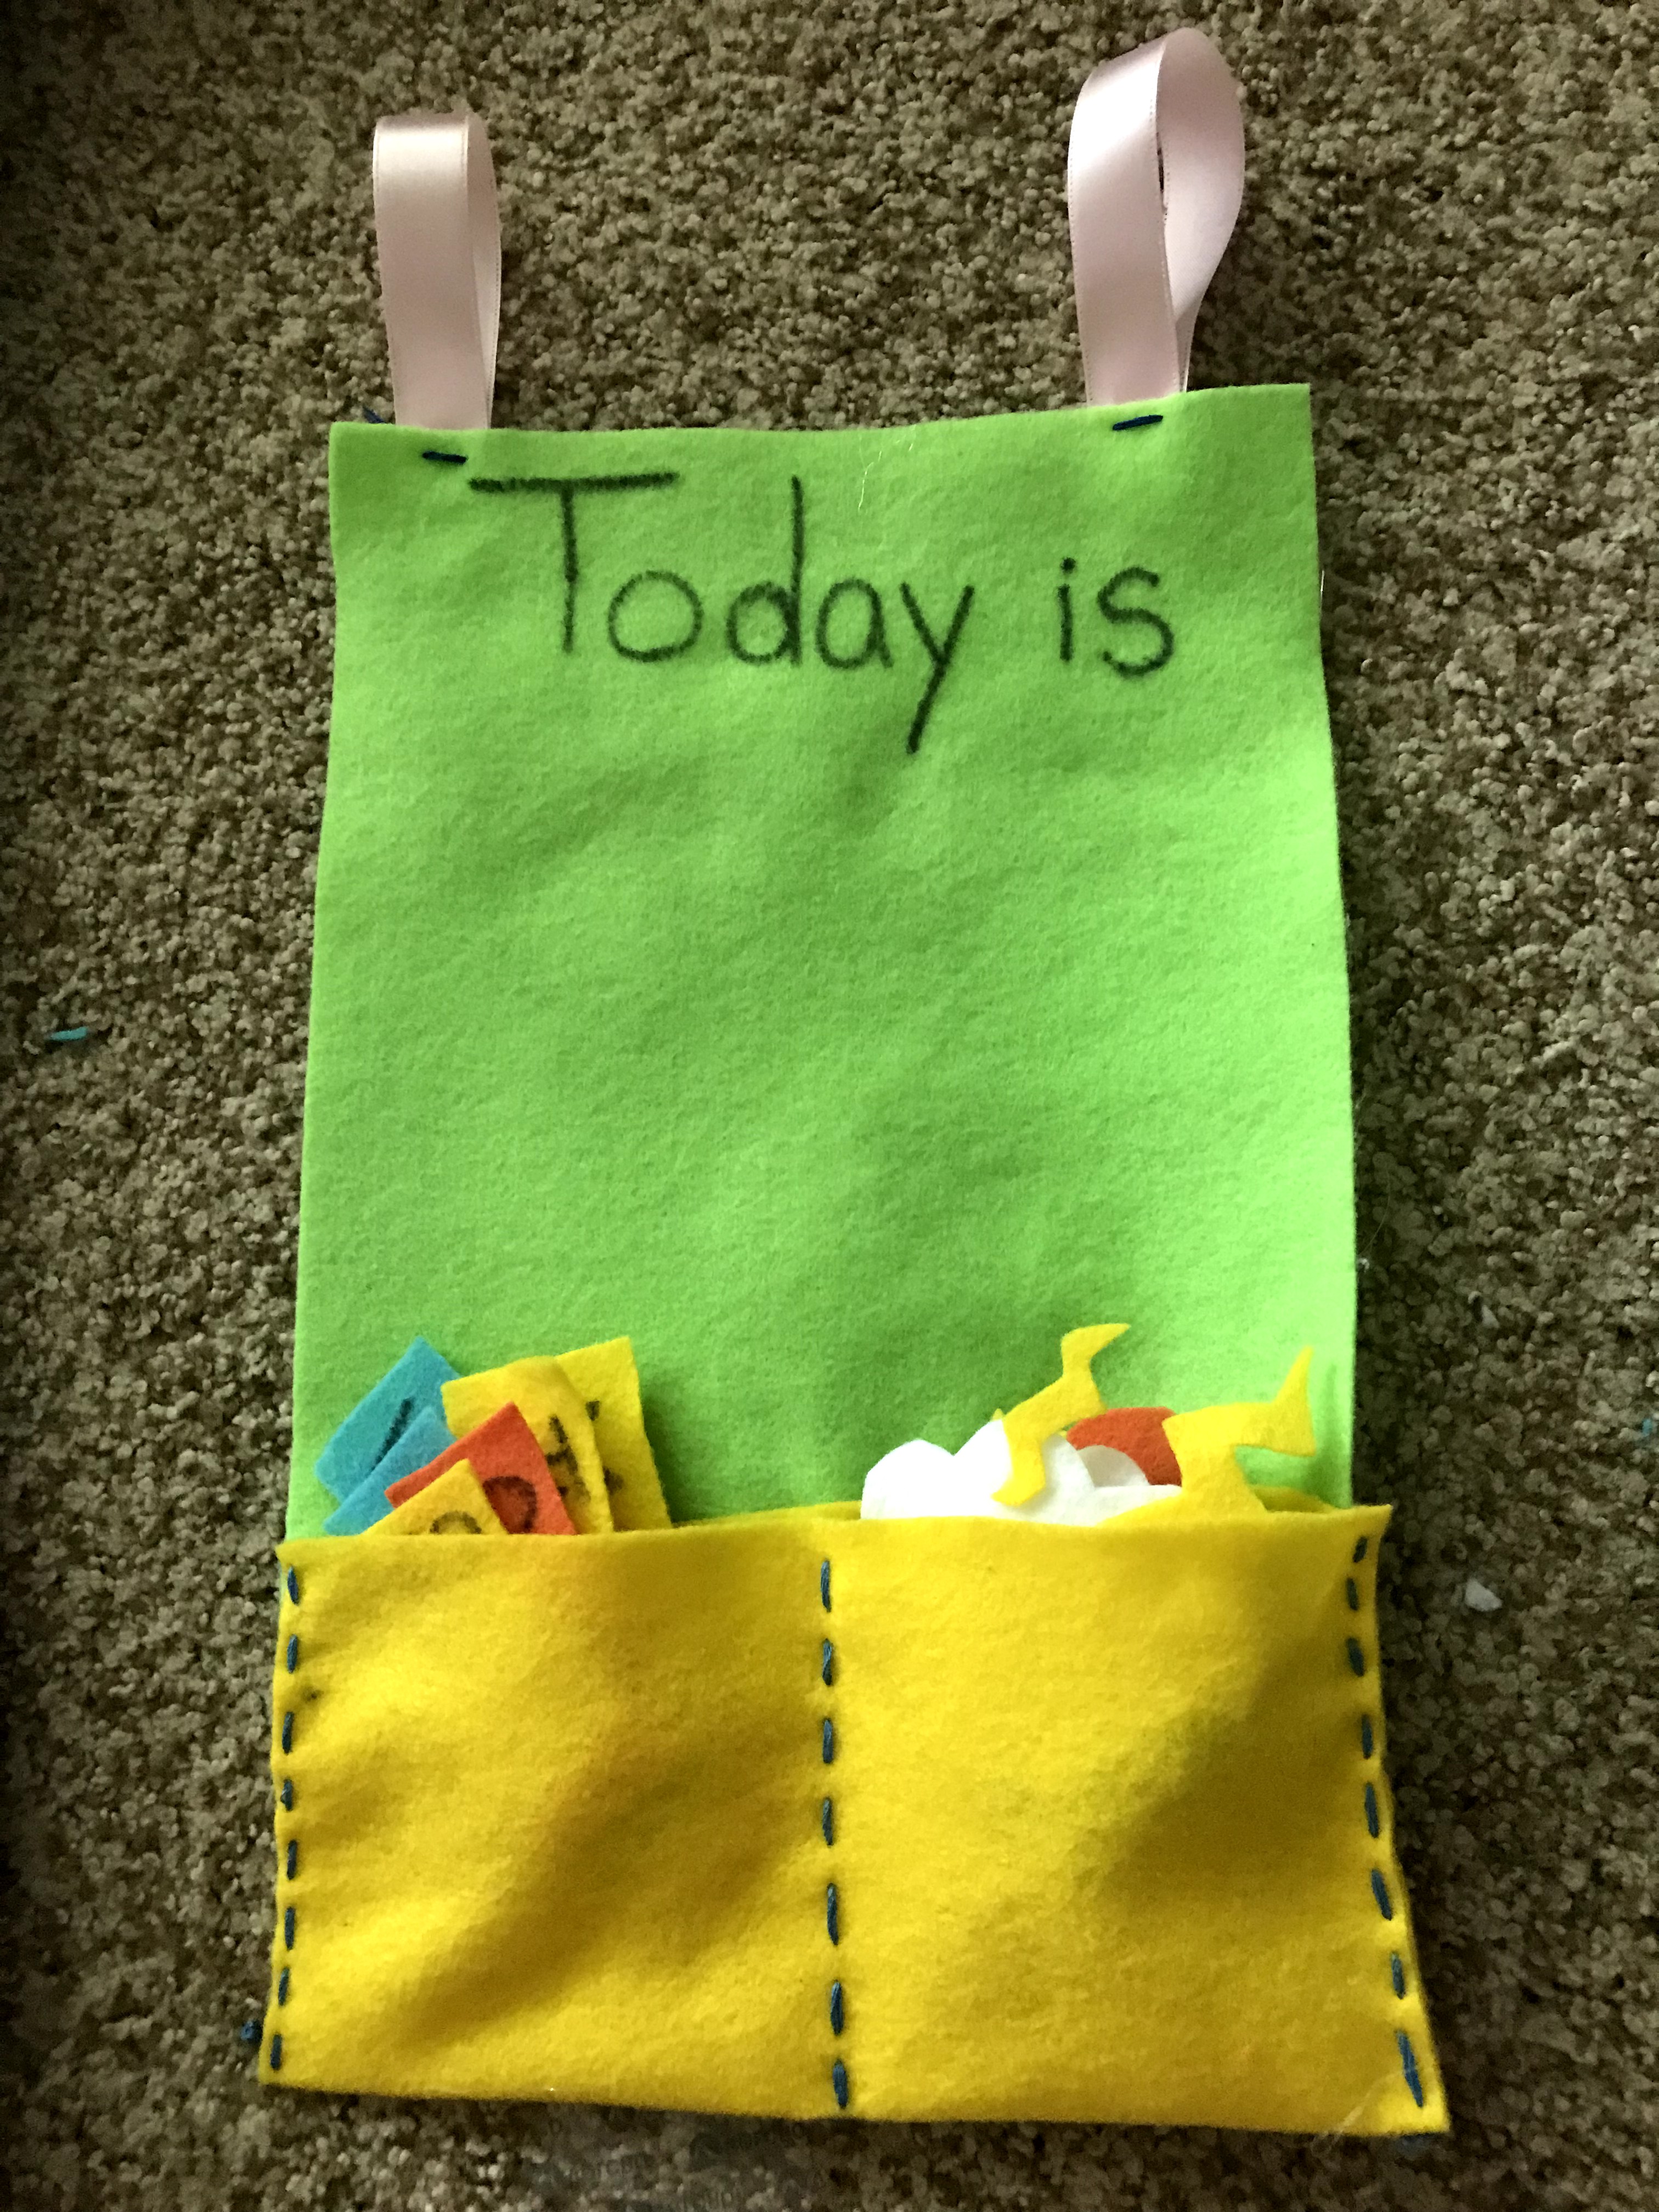
Next, I used a sharpie and wrote “Today is” at the top. I didn’t intend to do the days of the week as my girl is only 2, so she won’t really grasp that, but I had more felt and space! This weather chart can grow with her. Not only will I add more weather icons such as hail, sleet, moon phases, but I will also add the days of the week as she gets older. For now I will store them to the side to focus on weather!
Time for the fun part, making the weather symbols! There are countless ways to create them, I decided on these.
I also added a partly sunny symbol which you will see in later pictures. I did all of these by hand, sometimes outlining the pattern I wanted on the felt first, then cutting them out. I used the glue gun to add some different colors such as the white on the snowflake, the mittens, wind, lightning and rain.
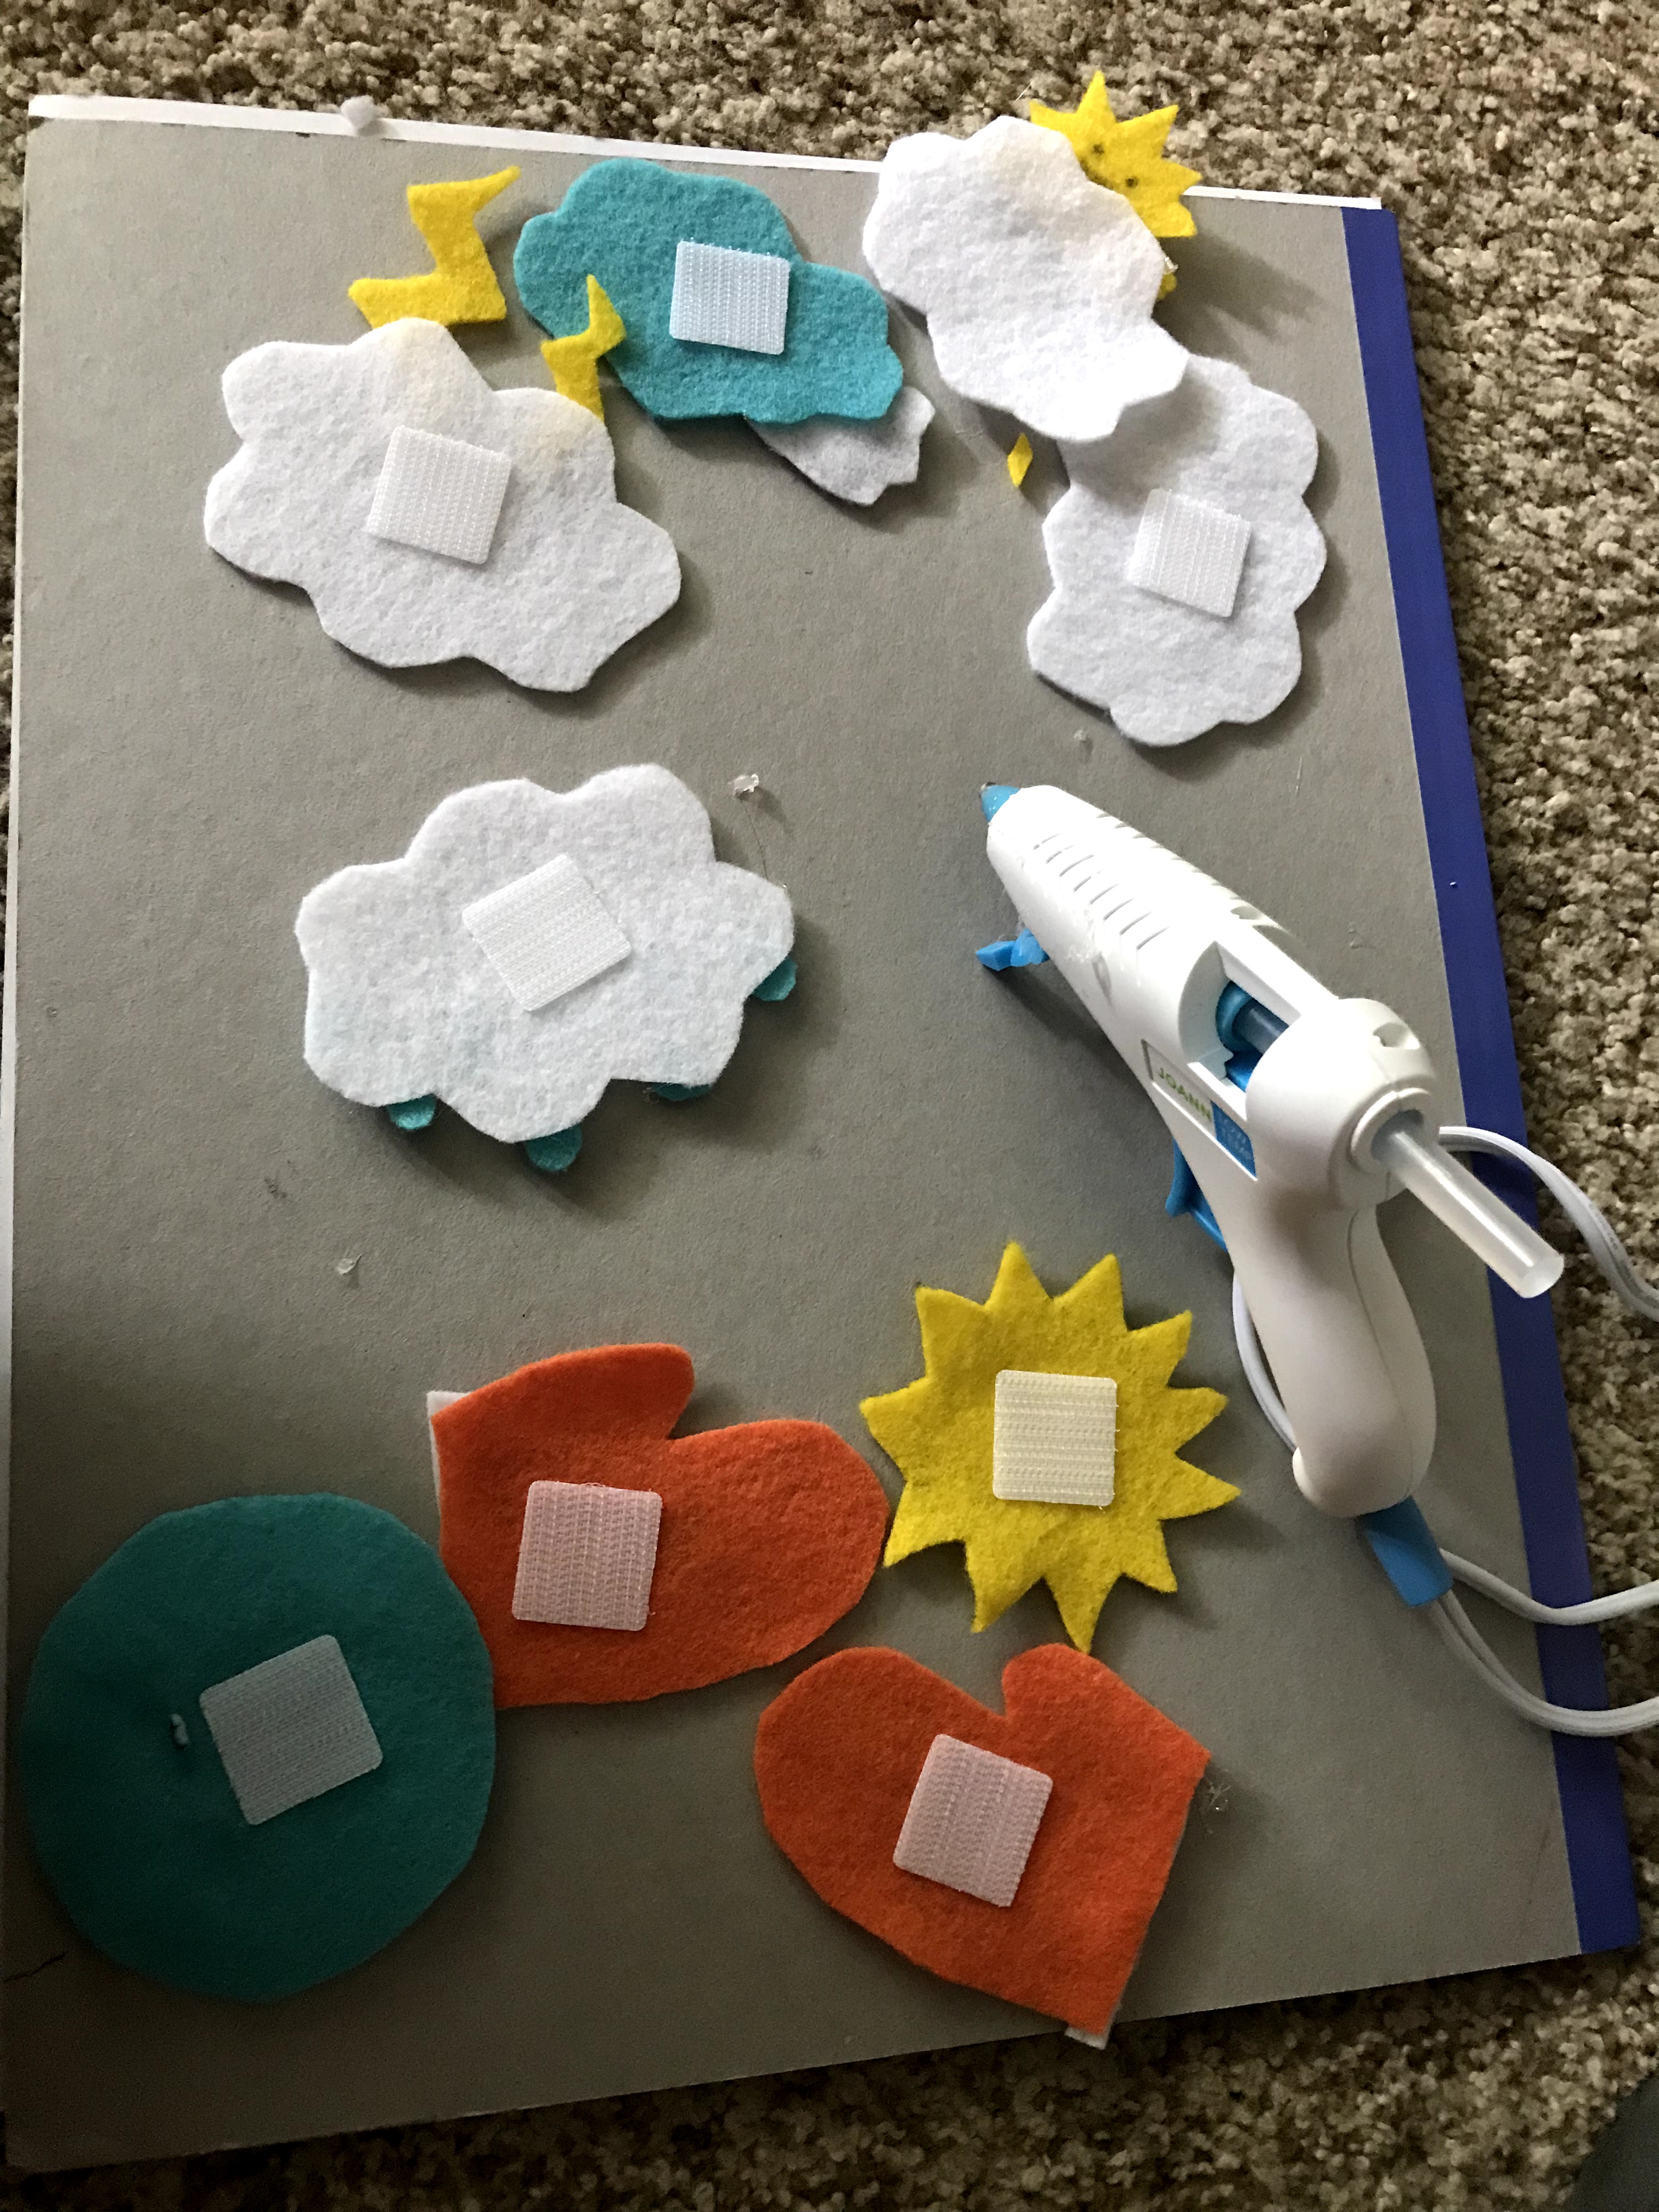
I bought some velcro from Michaels. You can use the scratchy side on the back of the weather symbols. This scratchy side will stick to the felt that is the background, you don’t need the soft side of the velcro at all.
I also added a partly sunny symbol you can see at the top of the picture. I did not use the hot glue for the velcro, it just happens to be in the picture. The velcro has a sticky side that will adhere to the felt.
I had extra felt so I made days of the week!
My daughter won’t really grasp the days of the week but we can practice anyway. I can also store them until she’s ready. I might have to do that! She loves the felt weather board so much she puts them all up and takes them all down. Her favorite symbols are the sun and partly sunny. She had to take them to my sister’s house. Luckily I convinced her to leave them in the car so we didn’t lose them and I returned them to her board!
I ended up adding ribbon by making a stitch at the top. To make it extra sturdy I decided to hot glue the bottom of the ribbon to the felt too! You can use string, small ribbon, or anything you choose for this! I hung it above her work table using the clear command hooks that will easily come off of the wall if I want to remove them.
You can make the weather board a daily routine! Do it in the morning, or change it throughout the day based on the weather. Enjoy!!!
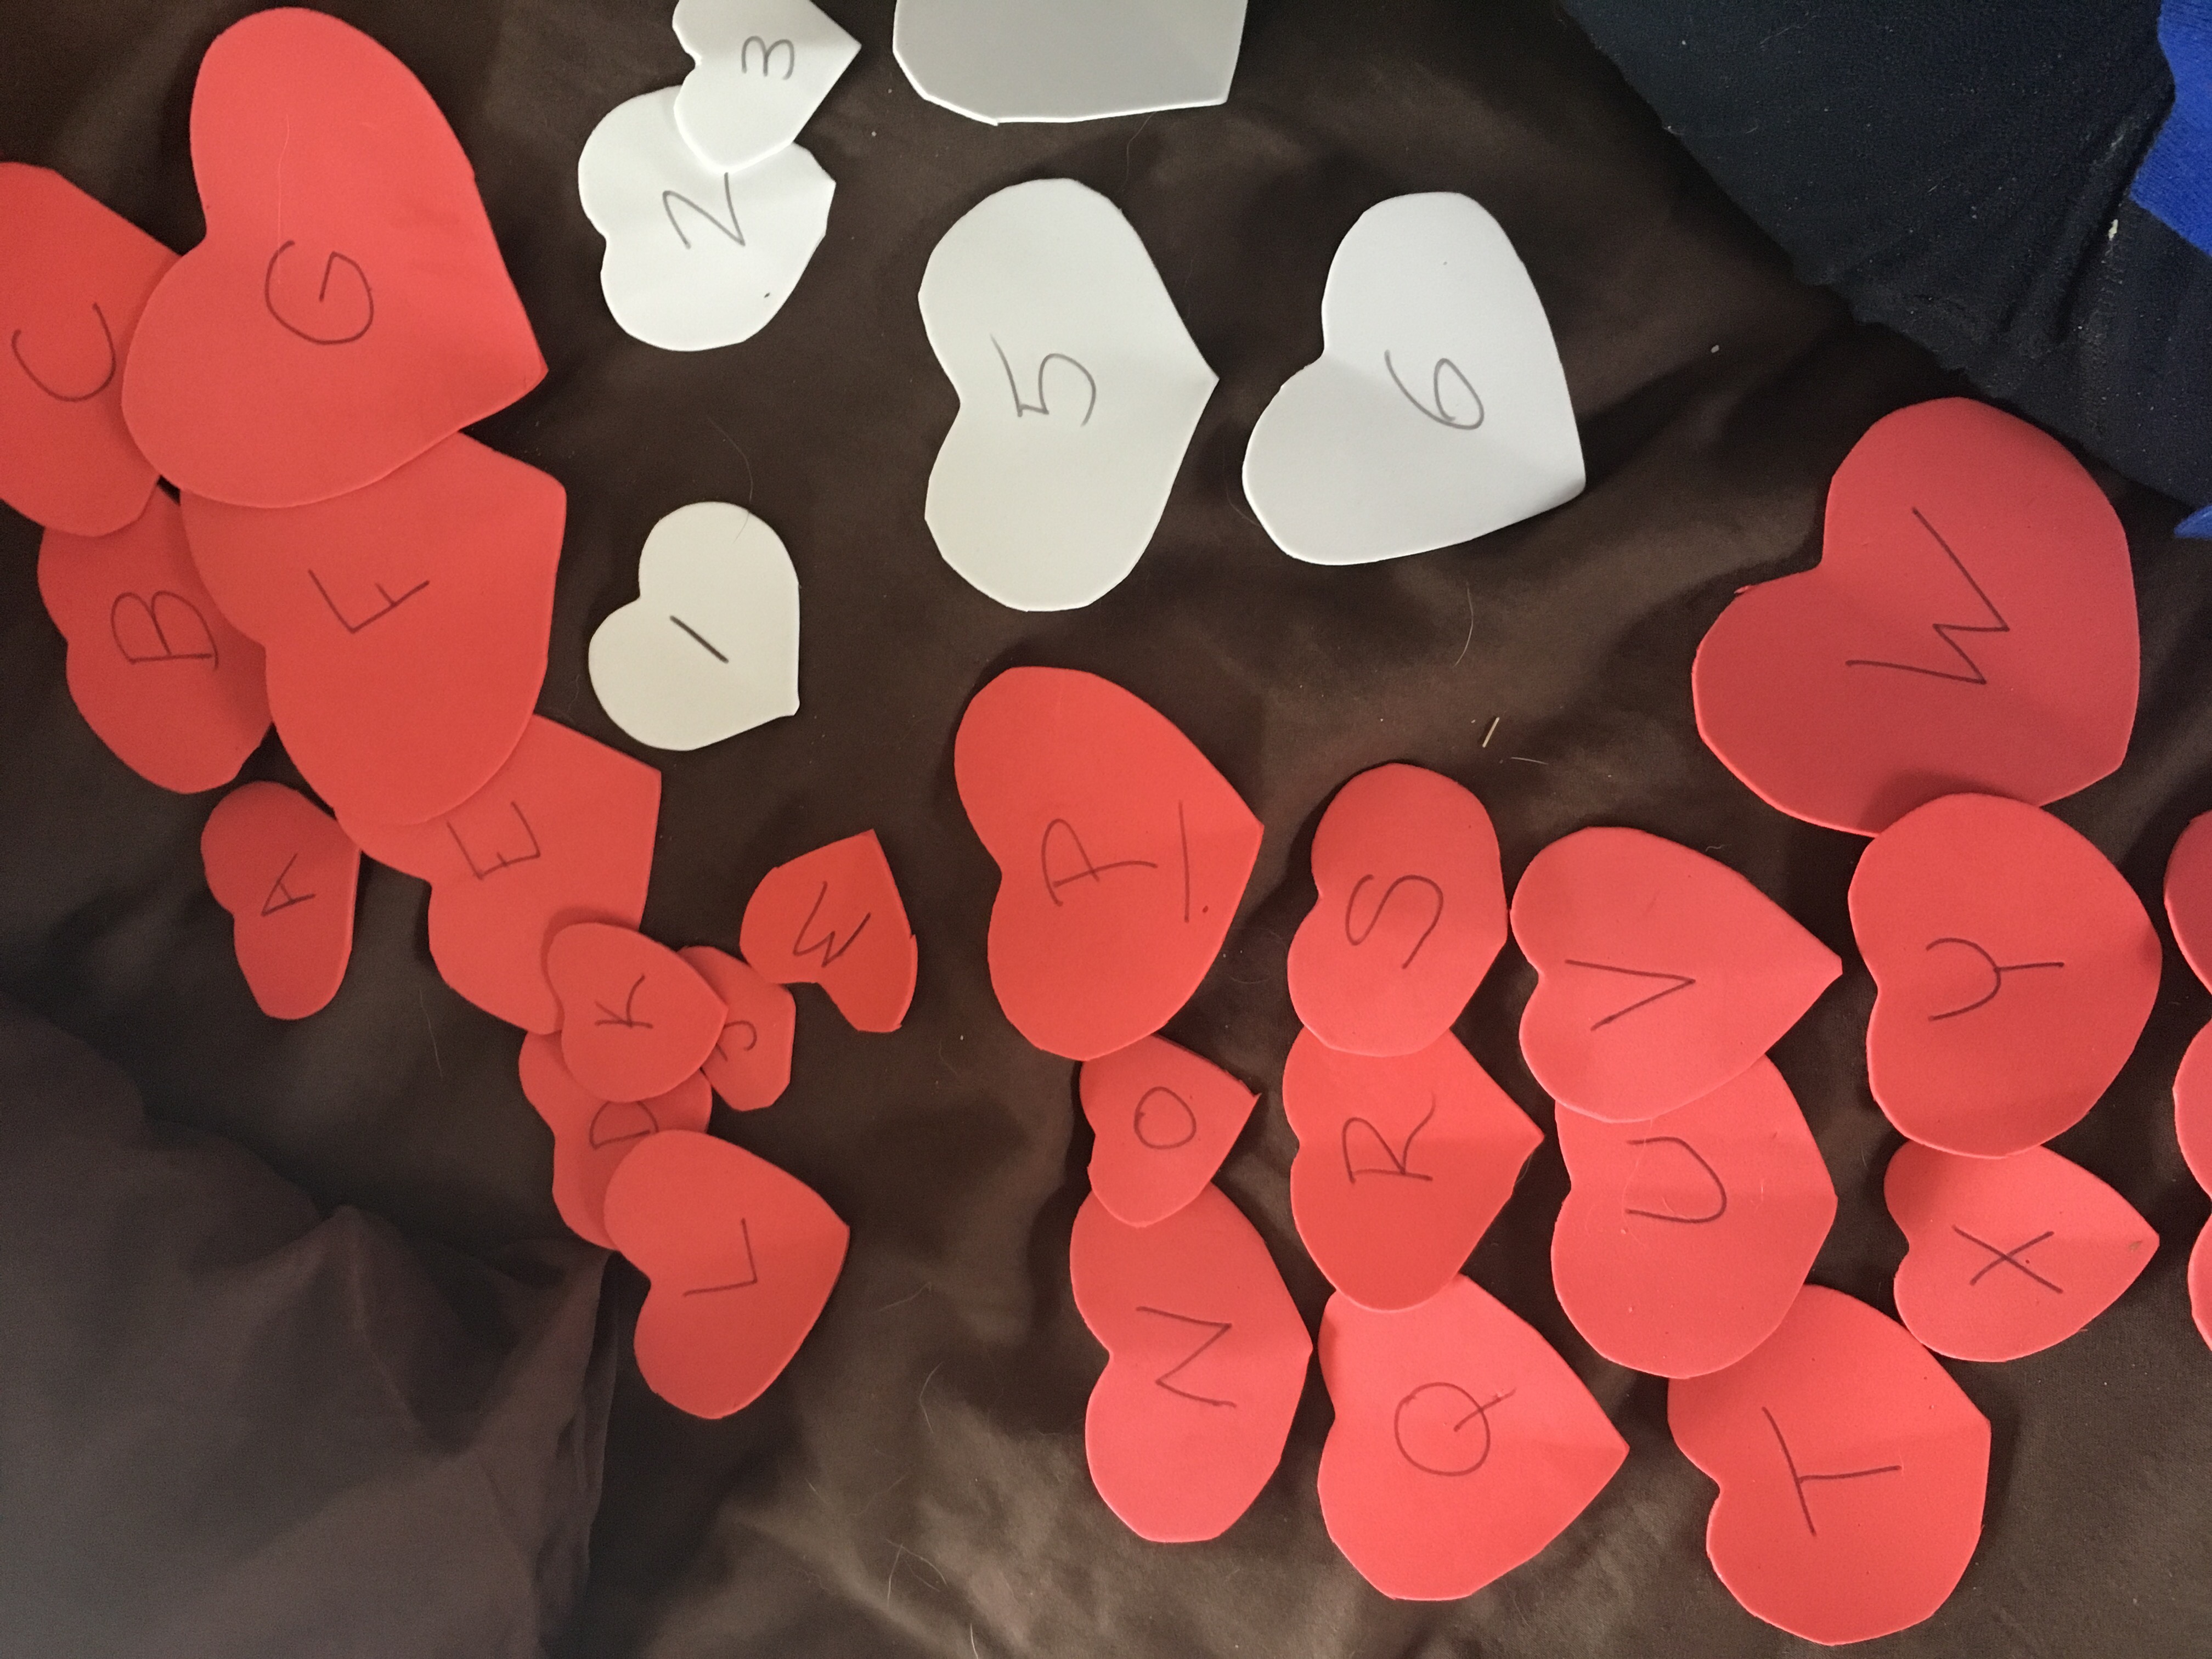
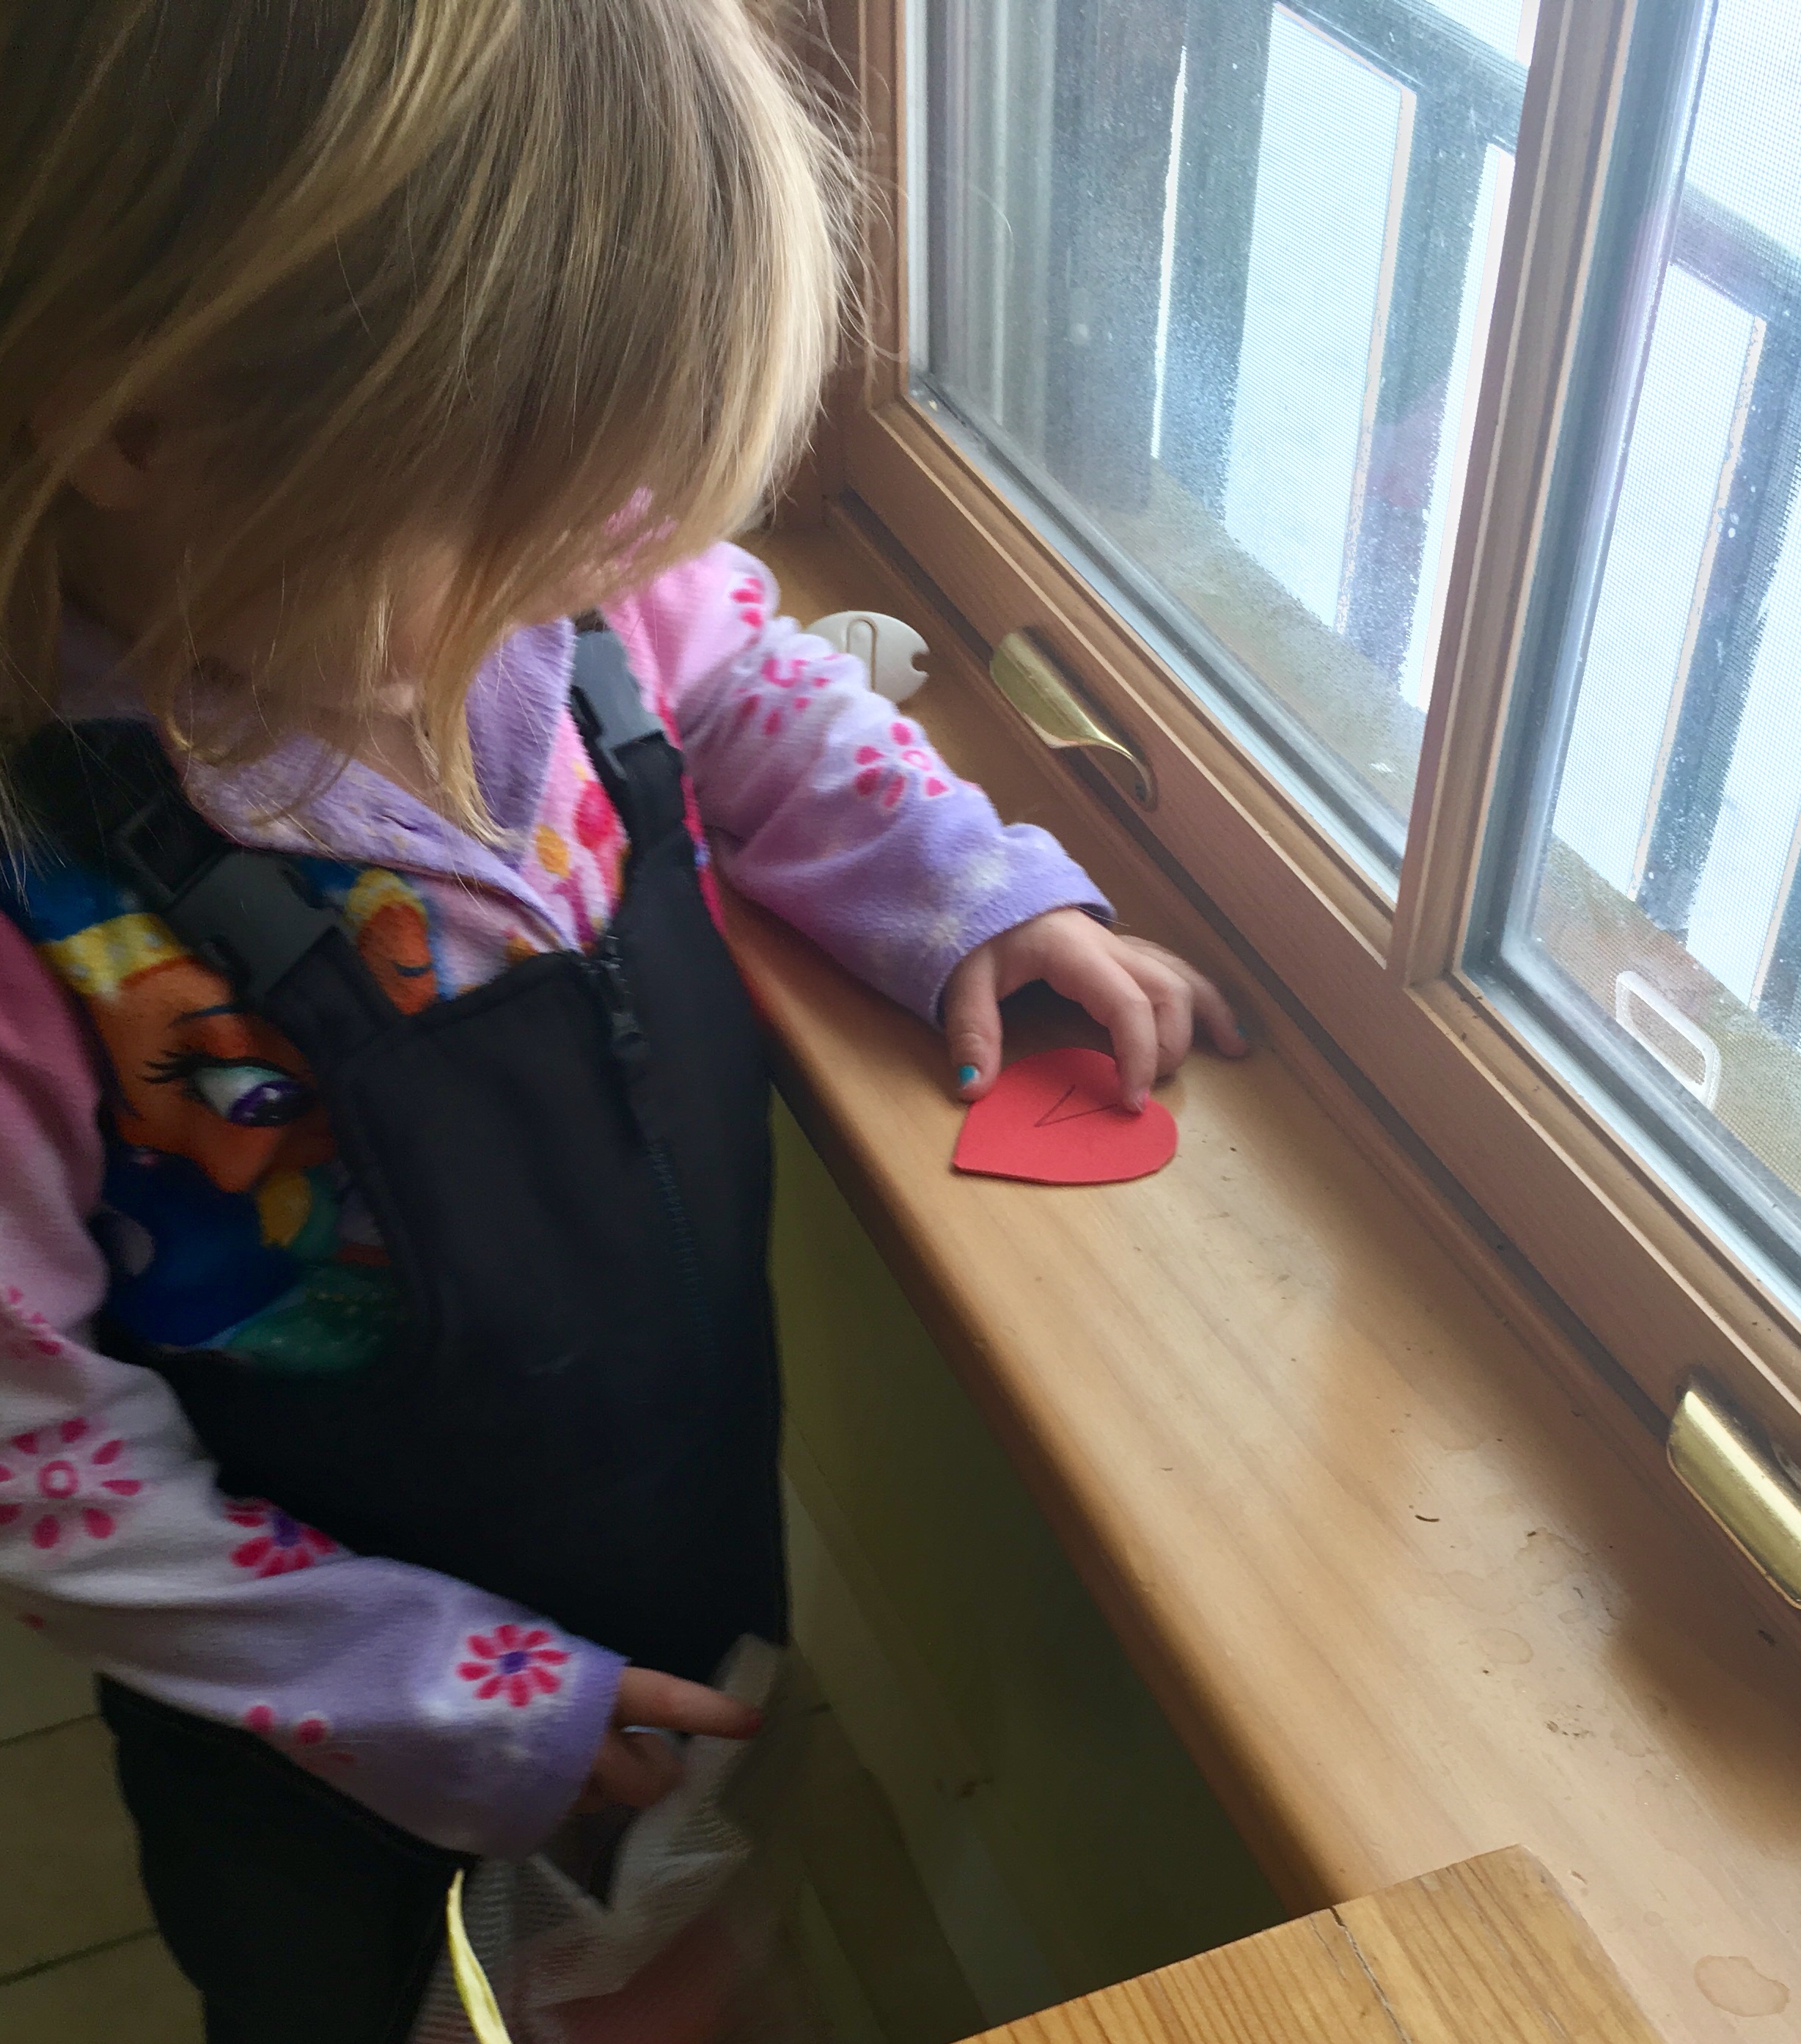
There are many different types of scavenger hunts for holidays. This one is a simple Valentine’s Day heart hunt that has many variations!
So cut out hearts (I used the foam material so it won’t rip), and hide them around the house! You can use paper but it may get torn and won’t last as long!
There are a couple ways to make it more complicated for older toddlers:
Number them and have them line the hearts up
Tell them to find certain colors and sort them
Line the hearts up by size
Alphabetize the hearts
You can have one child hide the hearts for another
Have the child decorate a bucket or paper bag to hold the hearts! Or the child can even decorate the hearts once they are found and give them out as valentines!
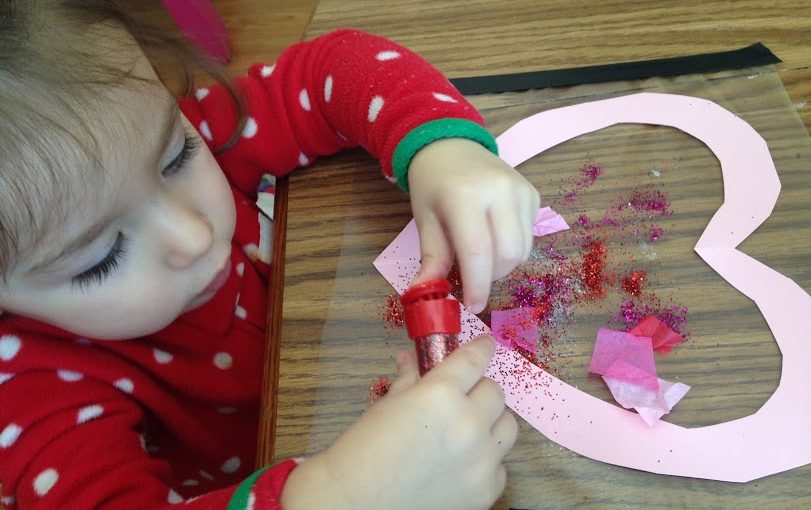
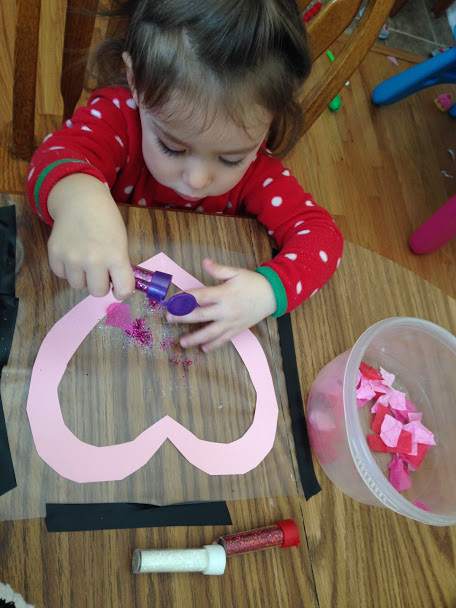
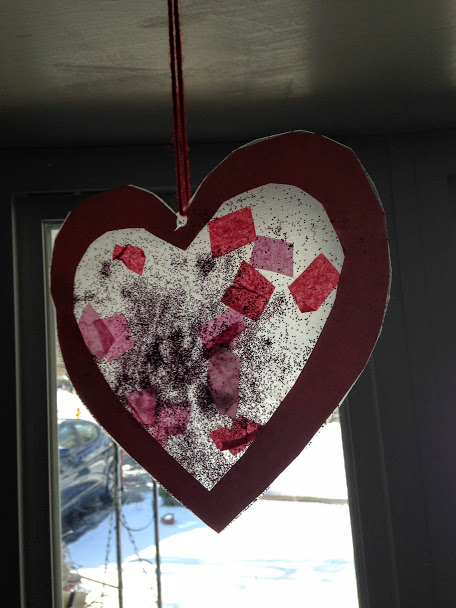
I’ve had contact paper sitting around for quite a while and decided it was time to use it! I had a snow (ice) day today and wanted a fun valentine’s craft for my toddler.
You will need:
-tissue paper in different colors
-contact paper
-tape
-glitter
-construction paper
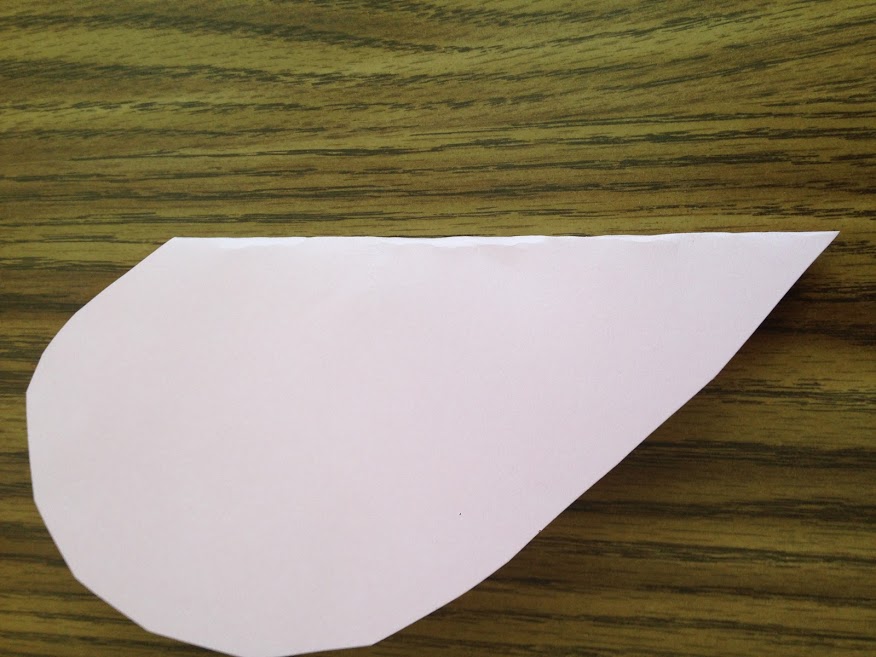
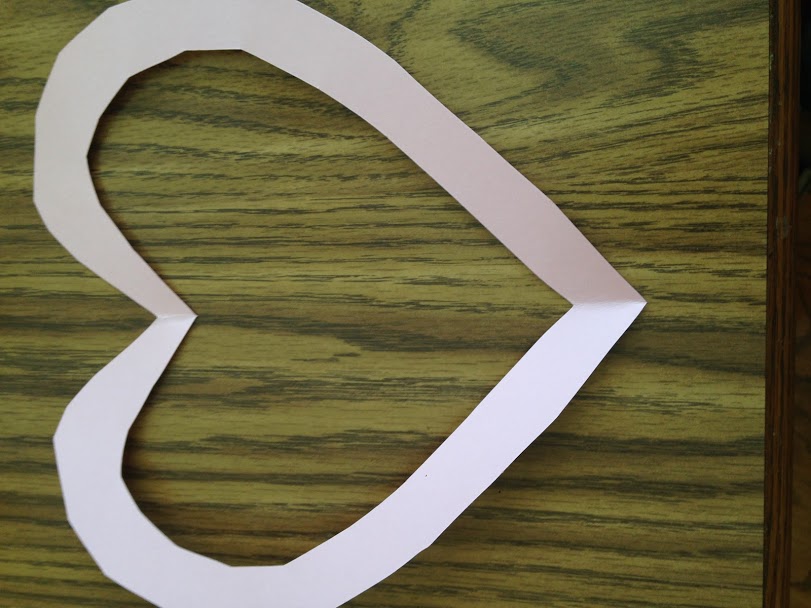
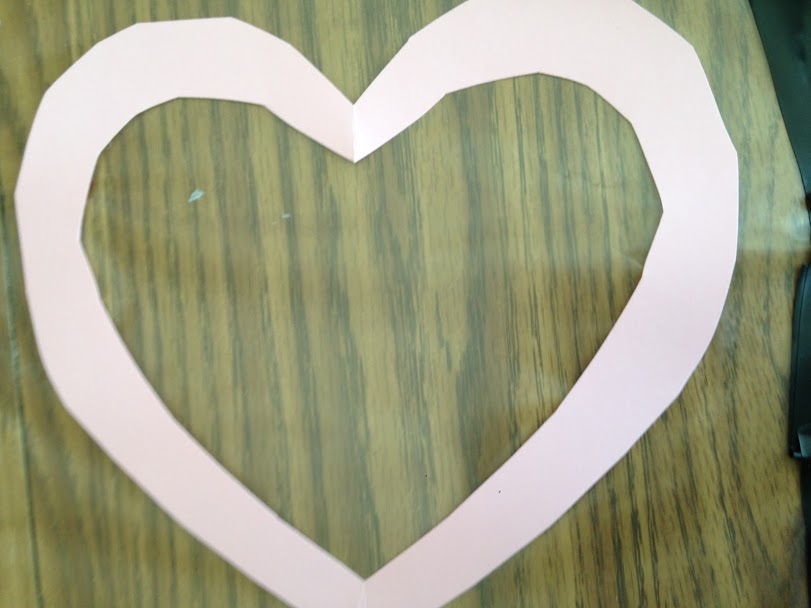
I used pink construction paper to cut out the heart. I simply folded the paper in half and cut out the heart shape.
Next, I cut out a smaller heart from the middle of the heart. This made a nice border.
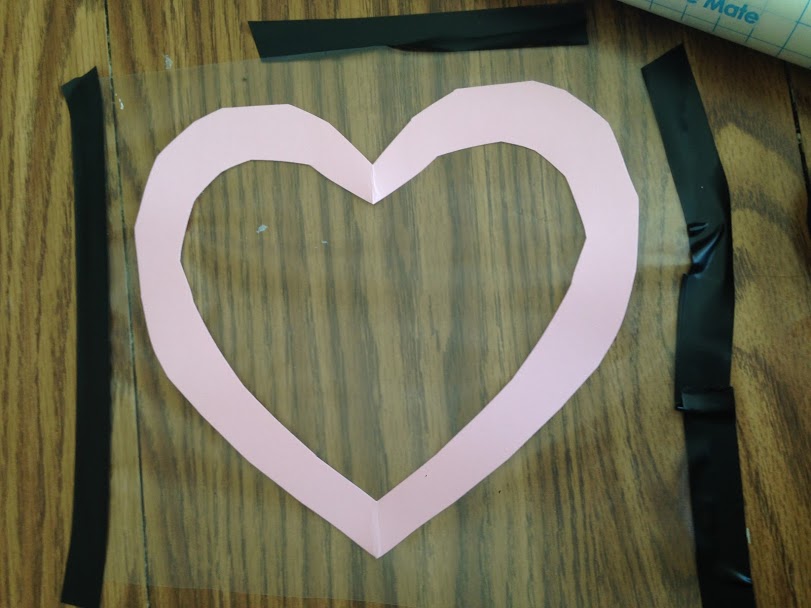
I cut out contact paper and put the heart on top of it. To get the contact paper to stay still and smooth, I put tape on the edges to keep it down.
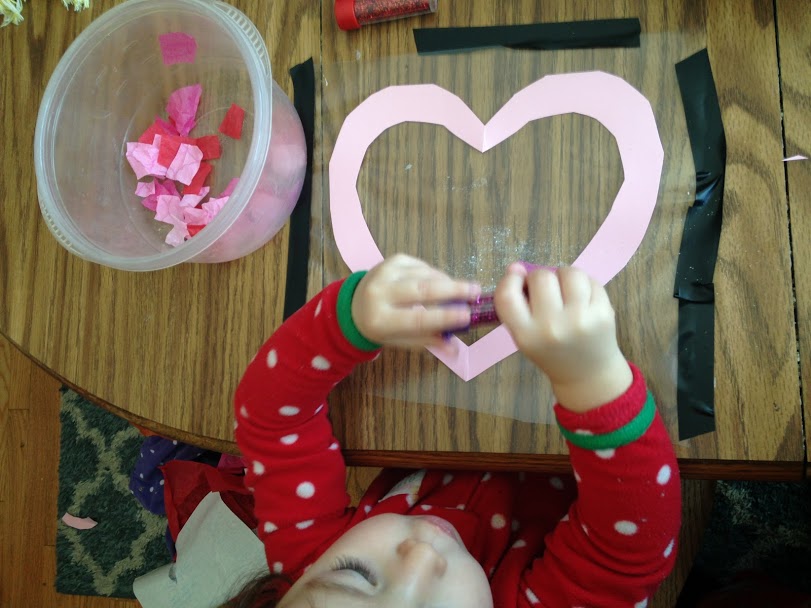
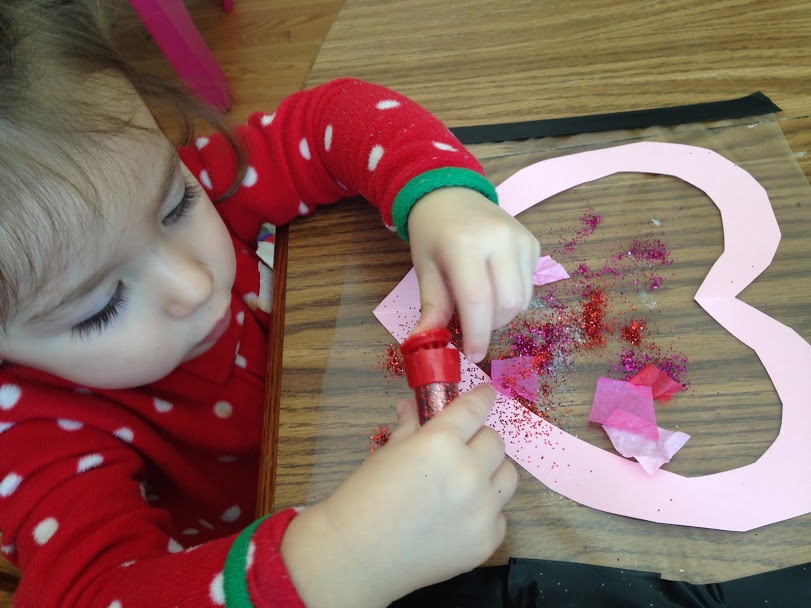
Here comes the fun part! Decorate! The heart is on the sticky contact paper, so anything will stick to it. My little girl used glitter and cut up pieces of tissue paper.
I underestimated how much she would love using glitter!
If she had a choice she would’ve just used glitter…all of it!
She LOVED this activity, so much that we made a few suncatchers! They make great presents for family 🙂
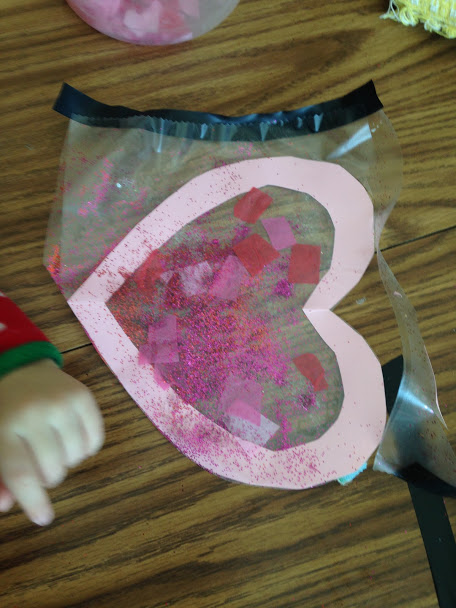
When your child is done decorating (or they’ve used all of the glitter), put another sheet of contact paper (sticky side down) on top of the heart. Cut out the extra contact paper around your heart.
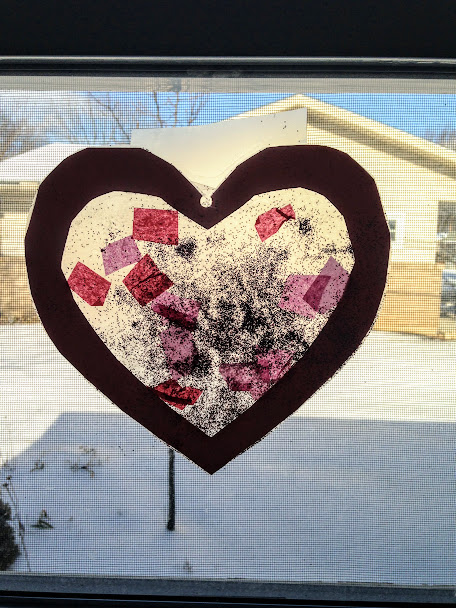
Then you are done! Hang it in a window that gets sunlight! You can hole punch and put a string on it or use contact paper to put it on the window. We will definitely make this again as she loved it soooo much! It’s a great craft idea for any age!
Since tomorrow is Valentine’s day and it’s currently snowing outside, the sky is cloudy. I couldn’t get a great picture of the finished product, but will post the pictures anyways. Keep in mind that the glitter is colored and will shine brightly when the sun is out but today it is cloudy!
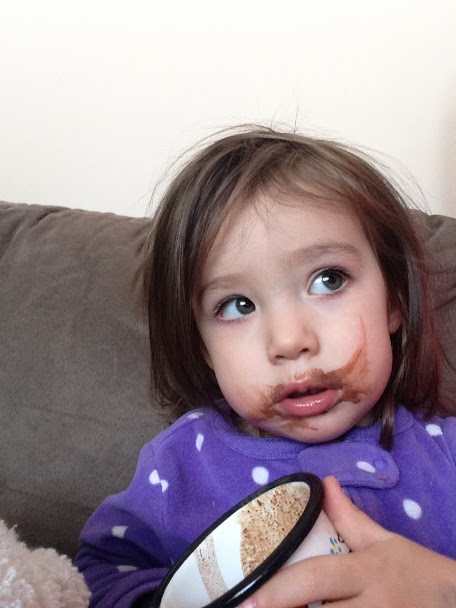
Mmmmm…this is the best hot chocolate I’ve ever had! It definitely doesn’t taste like that stuff from a packet!
Mommy used these ingredients:
2 cups of whole milk
4 oz ( almost 1 cup of bittersweet chocolate chips)
optional: 2 tbsp. of sugar
Mommy made it from scratch and here is what she did:
First, she put 2 cups of whole milk in a saucepan and heated it up on medium on the stove.
She didn’t let it boil, she waited until the little bubbles showed up around the outer circle of the milk in the pan.
While this was going on she poured the bittersweet chocolate chips, 1 cup into a bowl and microwaved it in 30 second intervals (oh I know a fancy word). She mixed it in between each time until it was all melted.
Next she turned off the stove when the little bubbles formed around the outside of the milk and mixed in the chocolate with a whisk.
Yumm….
This is so good and chocolatey. Very rich and thick! More! More I say! How about some whipped cream or marshmallows? Pleasssse?
When we were done I wanted more but mommy put the rest in a large mug in the refrigerator for tomorrow.
Does your child like to play make believe? Ours is just getting into it at almost 2 years old. How do I know? We went to story time at the library last week and one of the songs, “The Ants Go Marching” includes pretending to pick up sticks. She was great at pretending to pick them up and continues to do it at home! She loves playing with tea and pretending to have picnics and play in the “sand” inside.
We’ve been stuck inside for a few days and the dreaded day I am to return to work from my child rearing leave keeps getting delayed due to snow days (hey, I’m okay with that). So what do we do? We pretend we are a family of superheroes!
My husband and I used blankets, but knew they were too long and wouldn’t stay on our little girl. I did a quick google search and found out how to make a t-shirt no sew cape for Madison. All you need to do is take an old adult t-shirt (that you don’t want anymore) and cut it a few inches under the collar in the front. Continue cutting around to the back a few inches from the collar and down the back (the sleeves get cut off). Do the same on both sides and you will have a cape that simply slips over your child’s head.
If you want to be fancy you can add a design on the back with fabric markers, iron on images and so on. We happened to have an image on the shirt already.
We pretended that the snow was piling up in her room and we had to save all of her stuffed animals by putting them on the couch in the living room. She loved racing down the hall while we shouted, “Fly to the room, save the stuffies! Super Maddy saves the day!” Singing also helps and humming superhero ballads. She loved this so much we did it multiple times today and putting that cape together took about one minute (as you an tell by my hasty cutting).
It’s definitely priceless to see your toddler stretch her arms out in front of her in the flying pose while yelling, “Save the stuffies!” Start a family of superheroes today!
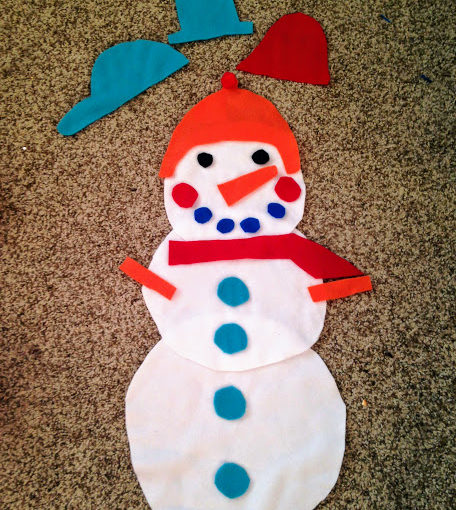
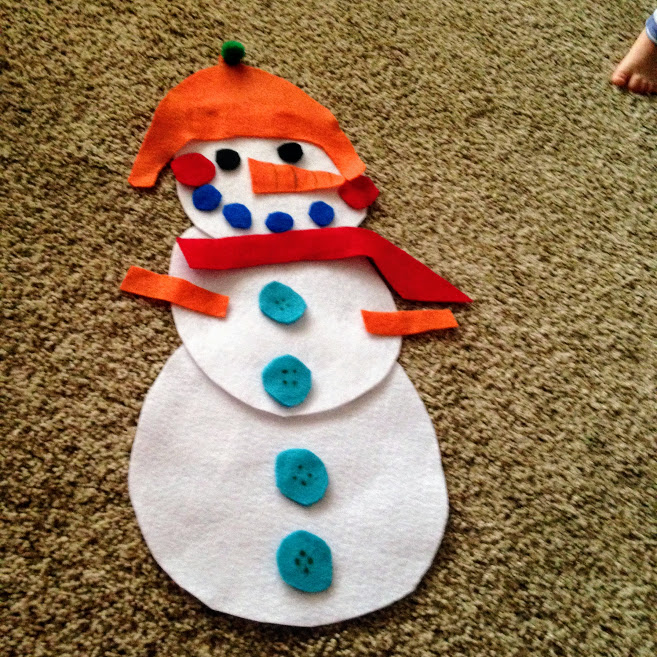
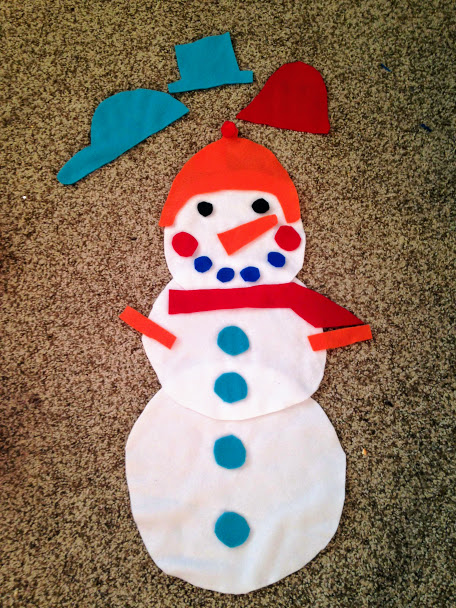
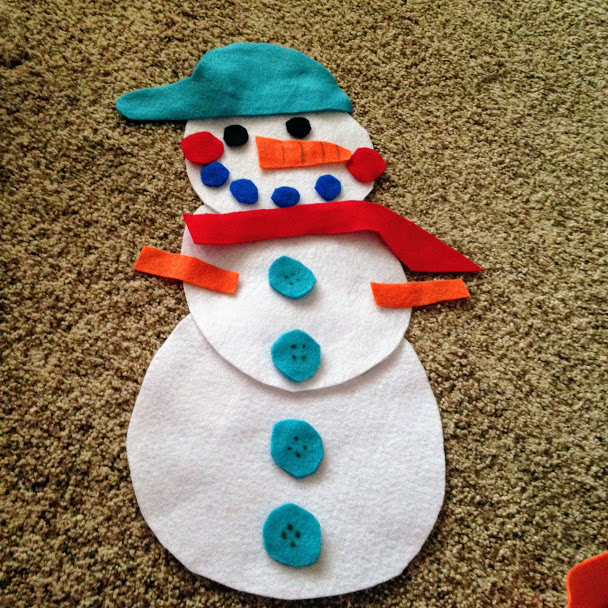
What’s that? A foot in the corner of the picture? Yes! Madison couldn’t wait to get her hands on the felt snowman and decorate him!
My pile of felt was stacking up after doing a few projects and Christmas was over…what to do with it? I took down the amazing felt tree my sister made after the holidays and felt a bit depressed. Noooo Christmas can’t be over! Winter isn’t over, so why not make a felt snowman similar to the felt tree Madison loved so much?
The project is very simple & super cheap!
You need:
Felt in various colors: white, orange, black and a few other colors for the hat, buttons, and mouth.
Velcro
scissors
First, I cut out the 3 circles for the snowman out of white felt purchased at a local craft store (you can also get cheap felt at Walmart). I didn’t use any patterns, but just cut everything free hand. You could also use a marker to draw the shapes first, then cut them out.
I went with simple features, a carrot nose, 2 arms, and a scarf. You can choose whatever colors suit you. I made 4 buttons, a mouth, rosy cheeks, eyes, and 4 hats.
Why 4 hats you ask? Madison likes to dress up different dolls and I thought she would like to make the snowman not only something she puts together, but gets to switch the different features. Plus, I had lots of extra fabric and time. After cutting everything out I hot glued the 3 white circles that make up the snowman together.
Another option would be to put velcro on the bottom of the top 2 white circles and your child could put the snowman together that way. I know my toddler, and she likes to pull on things, so gluing it together was the best option for us.
I bought velcro with sticky back so I wouldn’t have to glue it. I simply used the hook side of the velcro. Yes, I had to look that up, the hook side aka the rough side. I cut each piece depending on what I was using the velcro on. For example, the scarf is long so I used at least 5 inches of the hook side of the velcro.
For the buttons I used about an inch each. You don’t need the soft side, the loop. If you use felt then the rough side of the velcro will stick to the velcro. After you cut the hook velcro just peel off the sticky side and put it on your snowman accessory. Do this for each accessory. When you are all done putting velcro on, you can have your child decorate!
If you wish you can put dots on the buttons and lines on the carrot nose with a sharpie marker! You can lay this on the floor or hang it up for your little one to decorate. It also makes a great present!
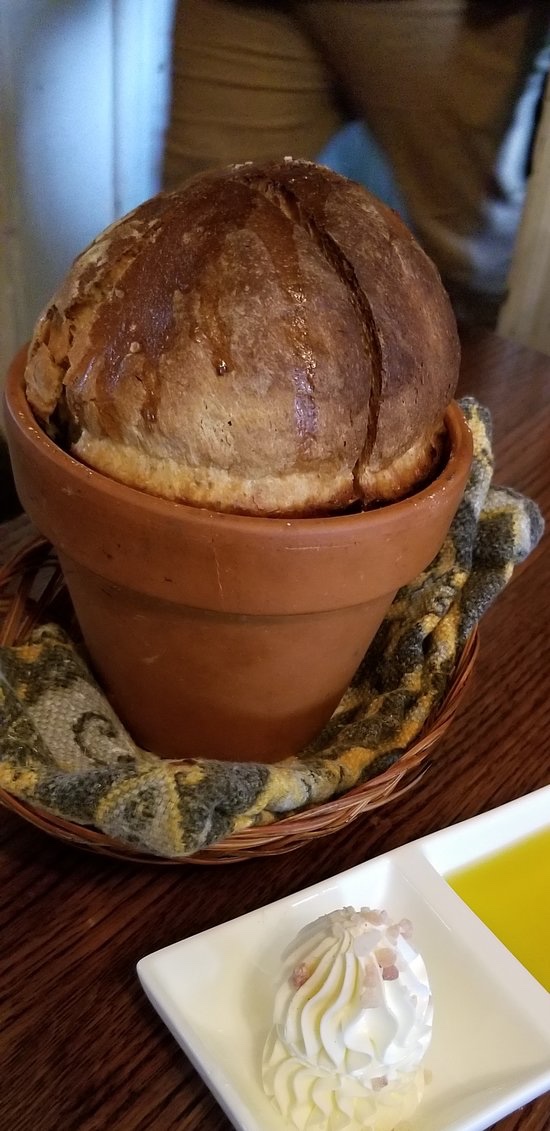
This evening my husband, my two and four year old children, and myself went to a nice restaurant together. Actually, my favorite restaurant, and the one we had our Wedding rehearsal at 7 years ago. I was nervous that our children would become bored and loud so I brought a coloring book, crayons and a couple stickers. Unlike many restaurants, this one is quiet, in an old farmhouse, and has classical music on and no televisions. You are meant to enjoy one another’s company with local fantastic fresh food. There is no overstimulation with many TVs, too loud music, or too many distractions. The food may take longer to be made, but that’s because it’s fresh. The bread comes out in the clay pot it was cooked in, it’s amazing!
But back to my story, a couple comes in with their 3-4 year old son who they sit in a chair. Immediately, a large iPad is placed in front of him and we can hear blippi playing. If you don’t know the show Blippi, you should check it out, as it is a real person doing real things in the real world (it’s my sons favorite show when I do let him watch anything). Luckily, my kids weren’t too distracted, I thought my son might start yelling blippi, but he went back to eating his bread. Next, the sons father went on his phone for the entire dinner. I had missed this as I was paying attention to my family, however my husband pointed out that he was on his phone the entire time.
Through the entire dinner, the family next to us had the iPad or whatever device it was placed in front of him and could hardly see his parents. No wonder this kid was crawling under the table screaming periodically and trying to run around the restaurant! His parents weren’t paying any attention to him except to reference the show he was watching. The mother even said look at those children behaving over there that is how you should behave. I felt badly for this child because his parents were blocking him out by trying to turn him into the zoning zombie to “enjoy” their dinner. Which in this case, was the father on his phone the whole time anyways.
I see children everywhere I go on their parents phones or iPads zoning out instead of interacting, developing relationships, communicating and learning. Even at the food stores, kids are plopped into a cart and given a phone to play with instead of interacting and watching interactions taking place. The children are learning how to behave from the show instead of reality. I’m guilty of letting my children watch tv, I think I might lose my sanity sometimes if I tried to make a decent dinner with two toddlers trying to help and almost burning themselves or cutting themselves every couple seconds. Granted sometimes they play with their puzzles and legos and such and it’s great. Even better, they play together a lot more these days. I do have them bake with me frequently since they love helping (toddlers love helping, even if it makes more of a mess!).
Sometimes I’m guilty of trying to catch a couple more z’s by letting my daughter come into my bed in the morning to watch a pbs show or two. This may let me sleep a couple minutes longer; however I pay the price when it’s time to turn it off. No matter how many times I’ve told her only one show and then breakfast, she throws a mini tantrum or full tantrum and just wants to watch more. This sets a bad tone for the whole day and I immediately regret letting her watch a show.
Another thing that bothers me is when parents post online what type of device they should get their 4 or 5 year old to watch shows before bed or in bed or for restaurants car rides and so on. Children should be interacting with real people, especially their family to build the bonds for their lifetime instead of glued to a screen. If you need to catch your breath once and a whole, I totally get it! Just remember, when you let your daughter watch a show in your bed or take that iPhone out at the store, your child makes that connection that you let him or her do this so they will expect it again and will be persistent. One thing I’ve definitely learned with a toddler is that if you think I’ll pick my battles and let them do something once, they will expect it again and again. More on positive discipline in the future, but that’s all for now!
Of course this is all just my opinion, and everyone has their own opinions, this is America after all, but next time think about actually having a discussion with your kids over dinner instead of bringing out the constant “entertainment.”
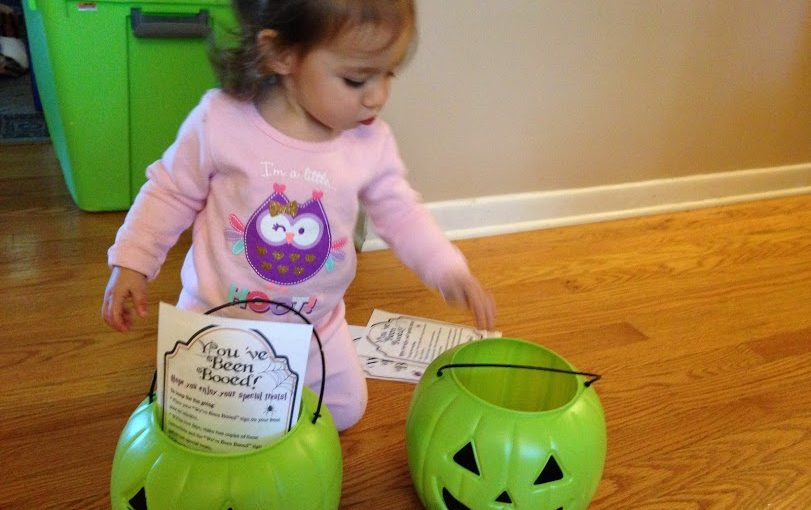
Have you ever been booed? If not, now’s the time to start the booing in your neighborhood!
Am I talking about hanging outside your neighbor’s house and jumping out in a ghost costume the minute they get out the door? No! I’m talking about the contagious spread of joy! Whether you are a little kid or an older adult, this is so much fun! I love sneaking up to neighbors’ houses and dropping off the treats. The key is to make sure no one sees you!
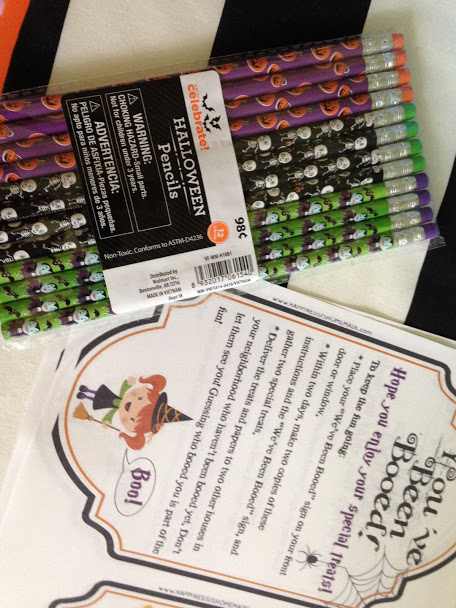
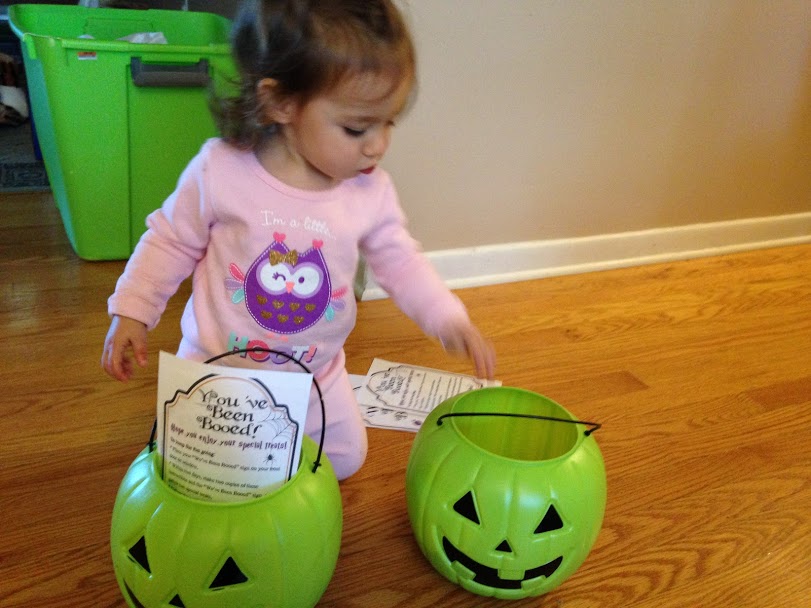
Here’s how it works. Find a free printable online, you can search “you’ve been booed” and countless links come up. Here is the one we used: https://www.happinessishomemade.net/free-youve-been-booed-printables/
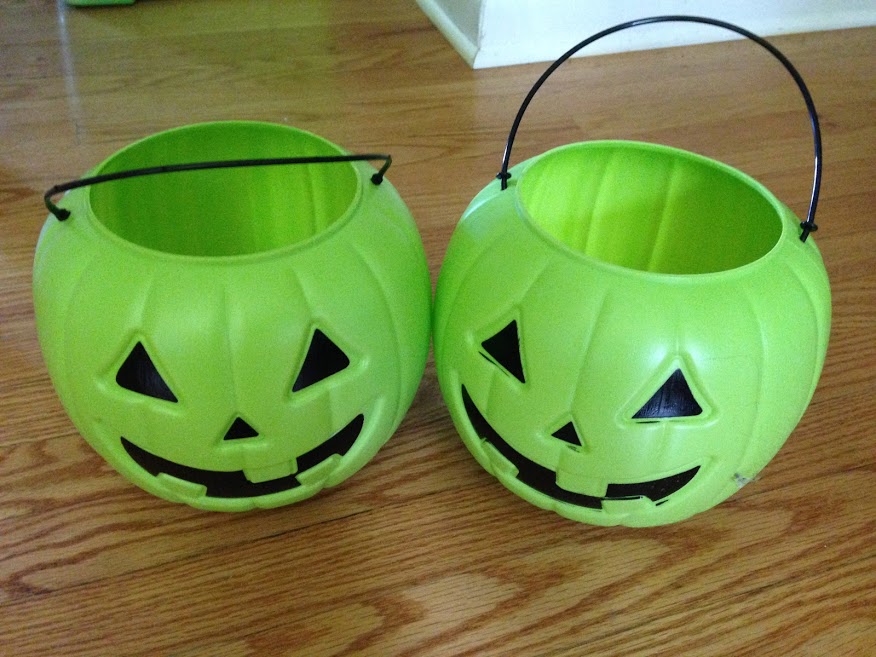
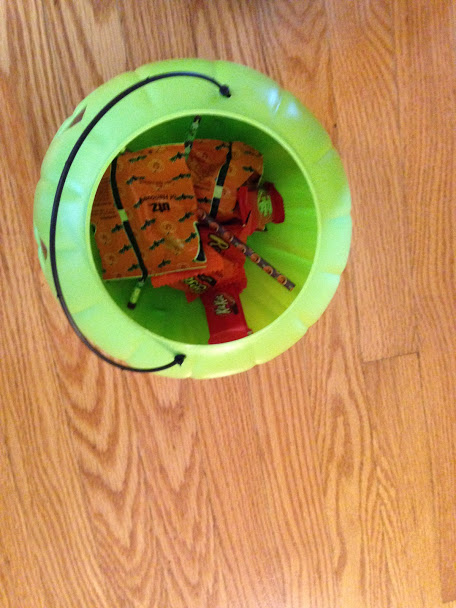
You can use paper lunch bags, or any containers you like to hold treats for 2 houses. Madison and I had fun going to target and getting green pumpkins for $1!
Include the printables so people know they have been booed. Make sure you check the doors of your neighbors to confirm they haven’t been booed yet! You can include any kind of treats you want. We decided to include Halloween goodies we already had for trick or treaters: pretzel bags, reese’s, kit kats, and pencils.
Your little one, or you will enjoy filling a treat bag or pumpkin knowing it’s going to surprise a neighbor!
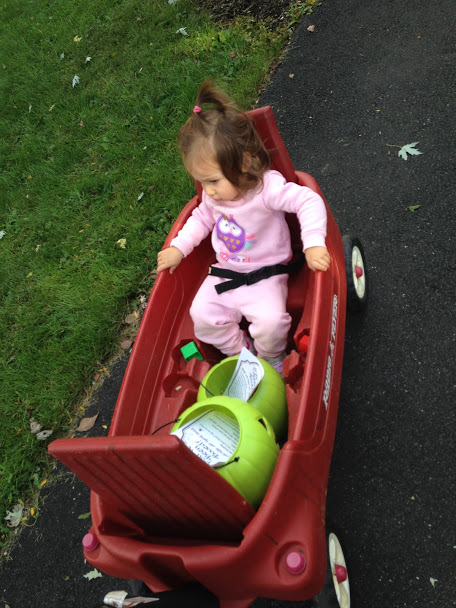
If they have already been booed, you will see the “We’ve Been Booed” signs on their door. Now here is the fun part, make sure they don’t see you! You can do this when it’s dark, or when you notice they aren’t home. I’m home during work hours, so it wasn’t hard to see who wasn’t home. We got to deliver in the daylight!
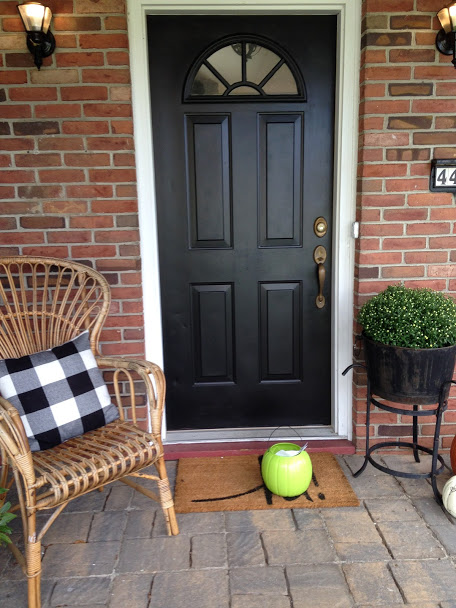
Sneak up to their door and place the treats outside their door. Then run away! Kids and adults will be wondering who placed the unexpected treats at their door! Then it’s their turn. They will read the paper in the treat bag and boo 2 more people! It’s so much fun to watch the we’ve been booed signs go up in the neighborhood, knowing you started a fun game of giving!
If you don’t live in a neighborhood, but still have houses in sight, you can still do this! Give it a try, it’s even more fun to give than to receive!
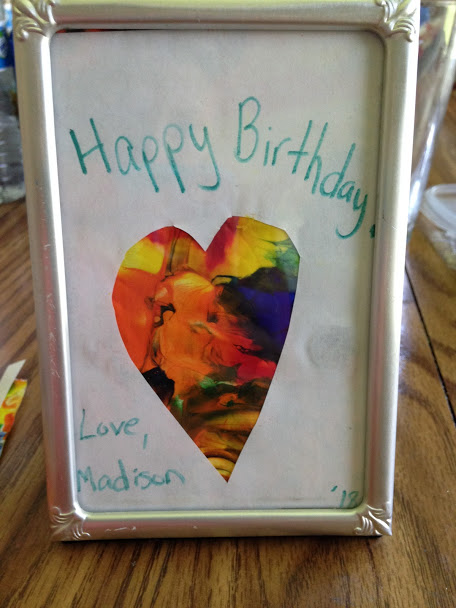
If you have a special occasion coming up and are looking for a gift from your baby, toddler, or child, I have an easy peasy present idea!
Paint…UGH PAINT! The word can invoke fear in any parent, except this is mess free! Okay, almost mess free.
My mom’s birthday was coming up and I wanted to give her something from her granddaughter. I searched online and found this simple craft. I will admit I improvised because I was missing some of the items and I will mention what worked & what didn’t as I go through the steps.
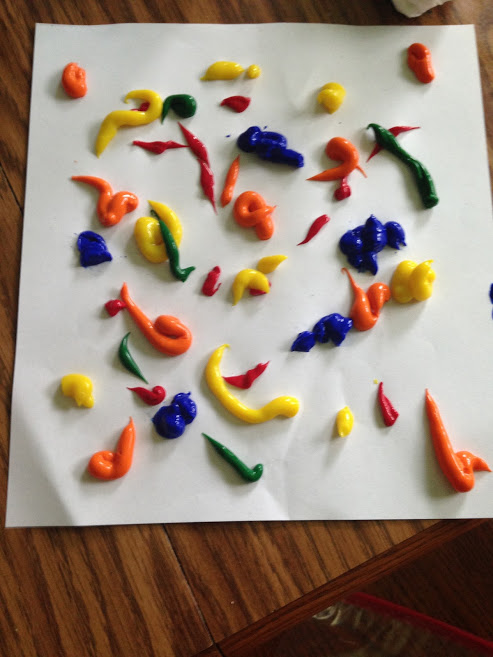
First, gather your materials. You will need:
-Paint in various colors (I used finger paint)
-cardstock (I used regular paper but it didn’t work so well)
-gallon ziplock bag
-picture frame (if you choose to use it as a gift)
-Heart stencil (or you could just draw it yourself)
-scissor
Next, put your choice of colors on your cardstock paper. Note: I didn’t use cardstock and it ripped easily and you could see through some of it. SO USE CARDSTOCK paper or thicker paper. If you are in a pinch you can use regular paper but you will have to be very gentle with it.
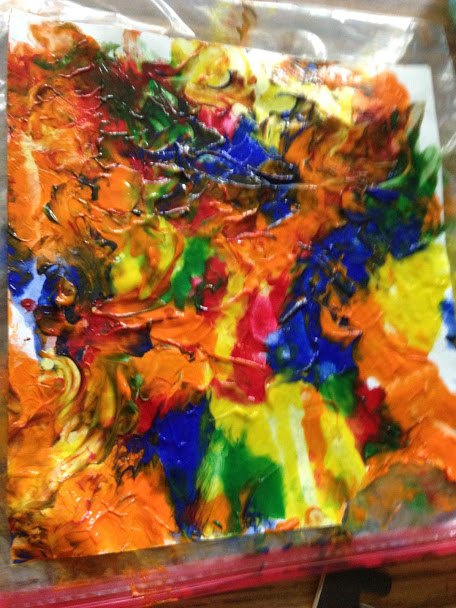
YES, I USED WAYYYYY TOO MUCH PAINT!!! My paint came jumping out of the bottle super fast, I’m really not sure how that happened (haha). It takes longer to dry with all that paint. It took days for it to dry when it should’ve taken overnight.
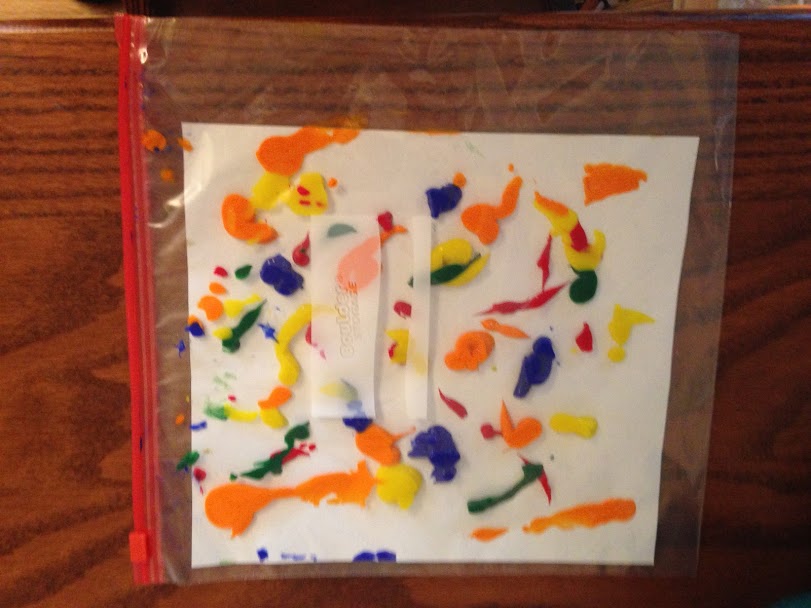
Take your cardstock paper and put it in a gallon sized ziplock. This insures your project will be mostly mess free! If you need to cut down the paper a little, go for it.
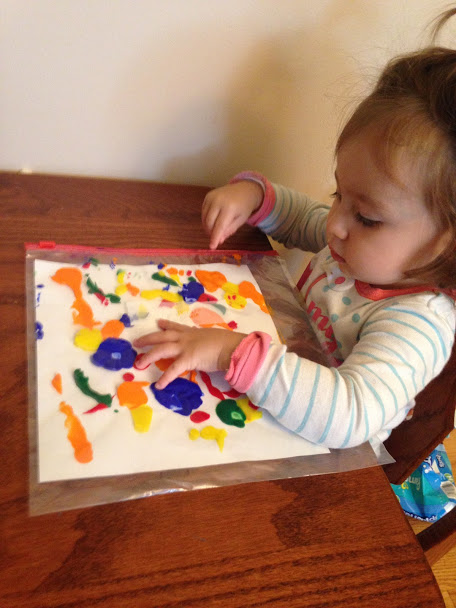
Now it’s time for fun!!! Let your child smear the paint!
Your child will love smearing the paint and you will love that it’s mess free!
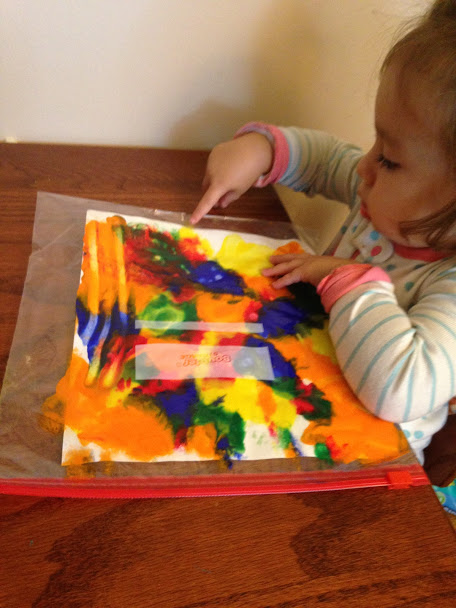
When you like the smeared look your child has made, carefully take it out of the bag and leave it in a safe place to dry.
Look at all of that paint!!! TOOO MUCH! If you put way too much on like me, you can either dab it off with a paper towel or give it days to dry.
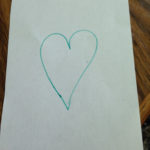
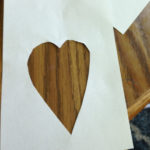
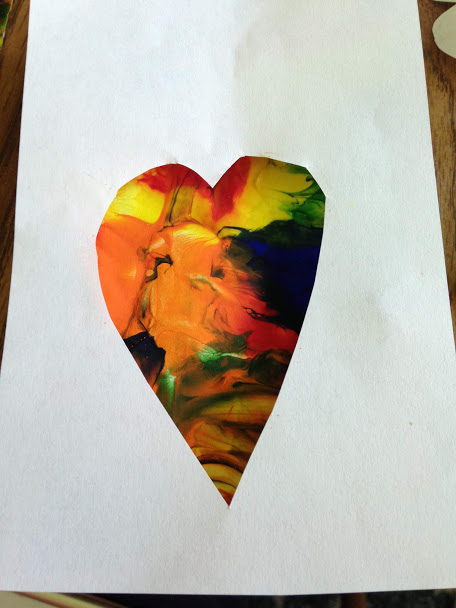
Here’s where you can vary the project. I drew a heart on a new piece of paper (use cardstock) and cut it out. You can pick any shape you like! If you are super crafty you could even cut out a name or shape of an animal. Cut down the paper to whatever size you would like it to fit. I cut it down to fit a frame. However, you could also make this into wall art, a card, or anything you can imagine!
Place the cut out on top of your painted paper. I moved mine around to find which colors I wanted to show. Cut the back painted piece to fit the frame. If you would like to write a message on the paper, go for it! Put in it a frame or glue and fold for a card!
Easy Peasy Paint Present! Note: I used regular paper and you can see that there are places you can see through the top paper. I highly recommend cardstock or thicker paper.
This project is perfect for any occasion!!! This could be done for birthdays, anniversaries, and holidays.
I’m thinking green colors with a Christmas tree or wreath cutout for Christmas! You could also use the paint bag trick for ornaments. Instead of using a top layer, just let the painted paper dry, cut out a tree shape, hole punch and use a ribbon and wallah!


 I went with simple features, a carrot nose, 2 arms, and a scarf. You can choose whatever colors suit you. I made 4 buttons, a mouth, rosy cheeks, eyes, and 4 hats.
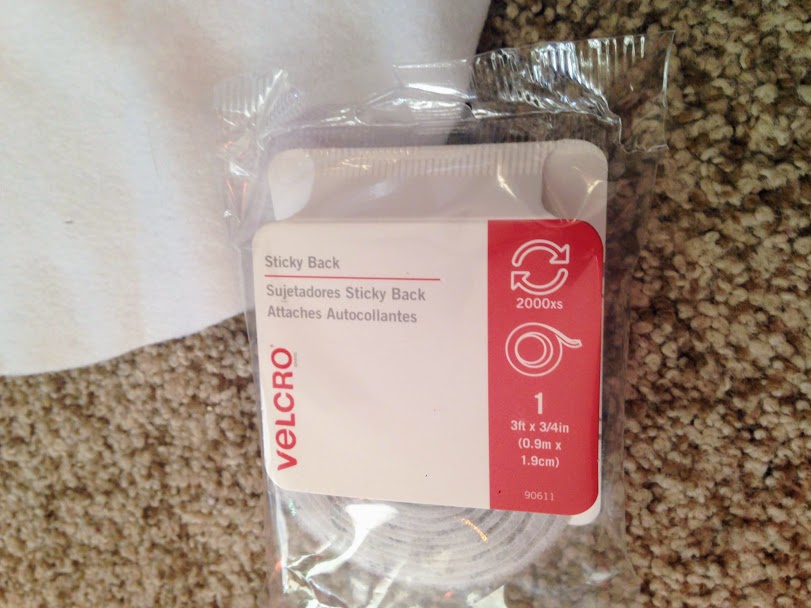 I bought velcro with sticky back so I wouldn’t have to glue it. I simply used the hook side of the velcro. Yes, I had to look that up, the hook side aka the rough side. I cut each piece depending on what I was using the velcro on. For example, the scarf is long so I used at least 5 inches of the hook side of the velcro.
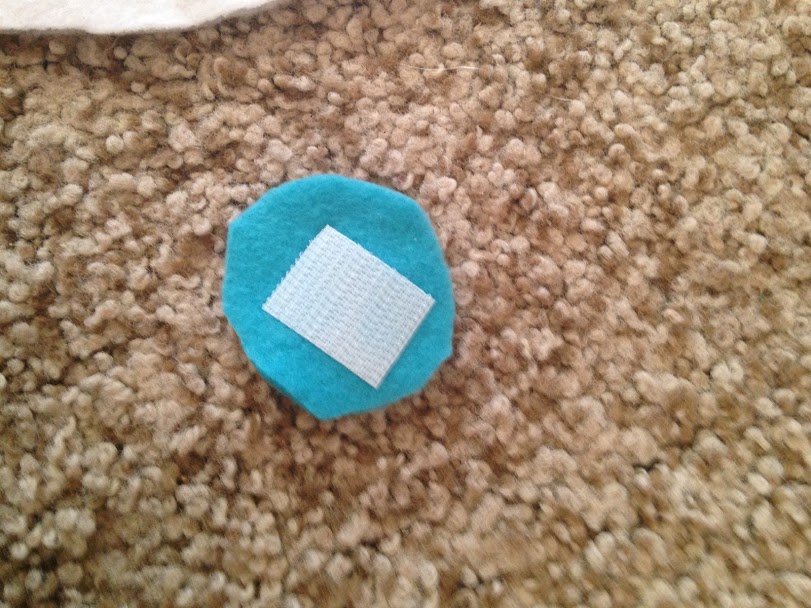

 It’s so much fun to watch the we’ve been booed signs go up in the neighborhood, knowing you started a fun game of giving!