DIY Felt Height Chart

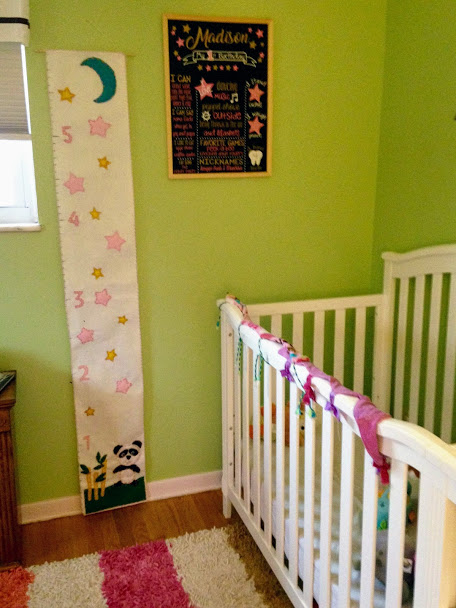
Years ago I made my sister a felt hot balloon height chart for her baby shower and I’ve meant to make my own baby (more of a toddler now) a height chart. So, I headed out to the local craft store.

83.JPG

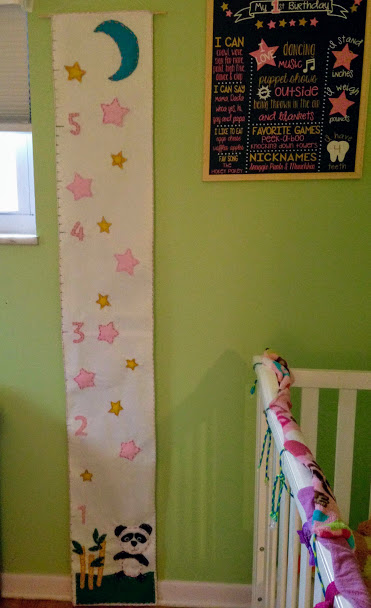
I knew I wanted to make a height chart with her favorite things, a panda and a moon. Her first birthday was twinkle twinkle theme, so stars would be perfect.

For this project I used:

  • 1 yard white felt
  • Pink Embroidery Floss
  • Sewing needle
  • Black Fabric marker
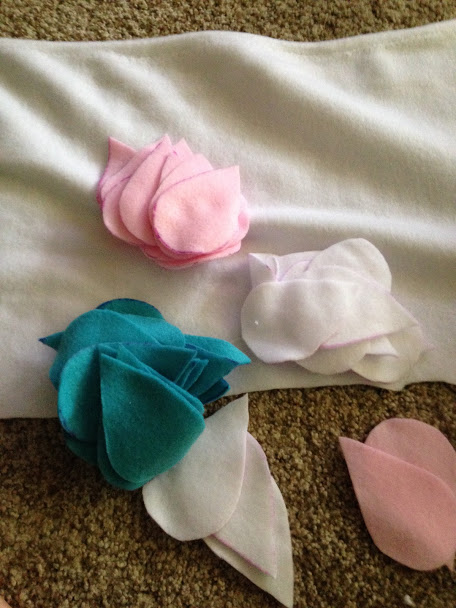
  • assorted sheets of felt in different colors
  • Hot glue gun
  • Measuring tape
  • ruler

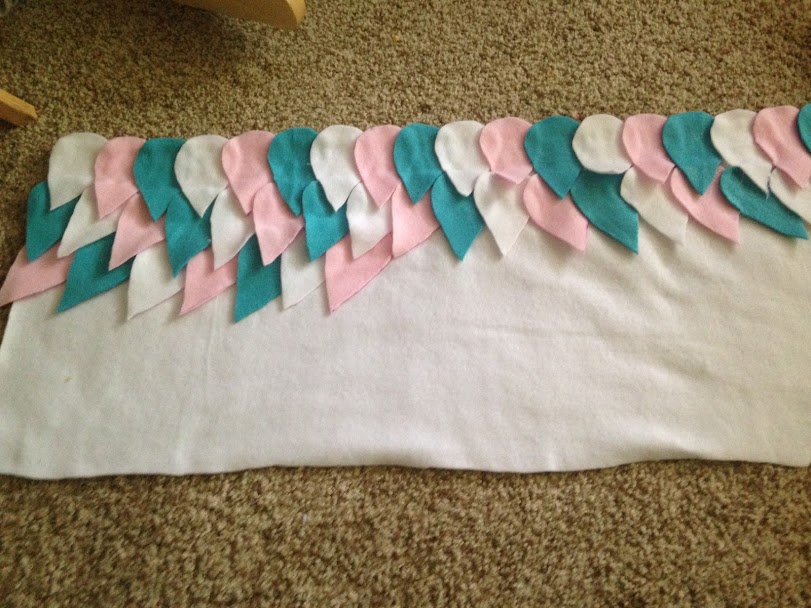
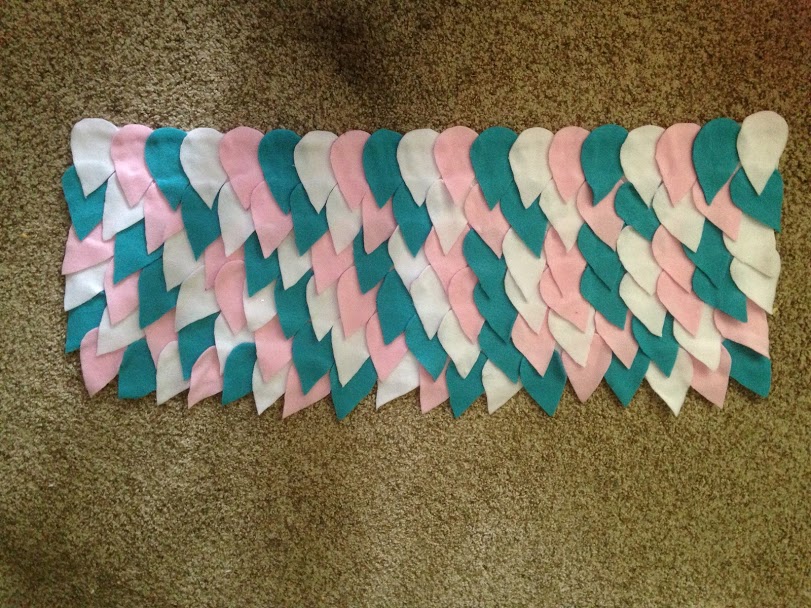
First, I cut the yard of white felt into 2 pieces. Next, I lined them up so they were about 6 feet high back to back and hot glued them together.

82.JPG

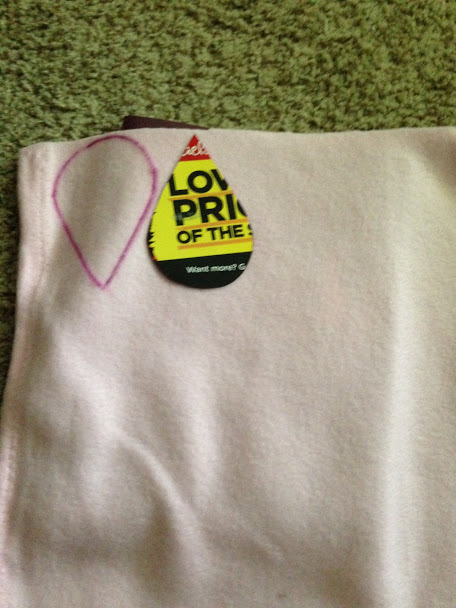
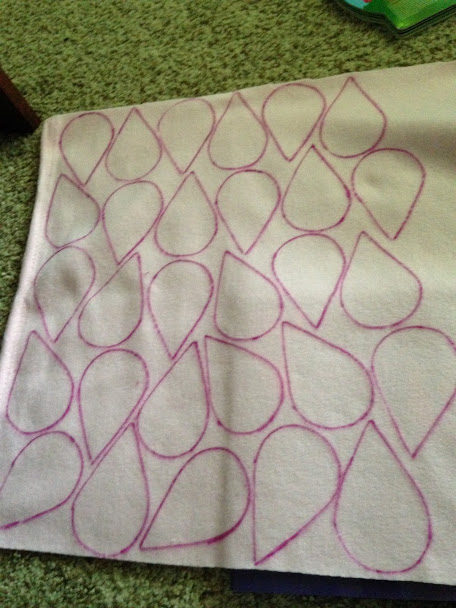
I cut out the star shapes using a cookie cutter. I traced the stars onto the white and yellow felt and then cut them out. You could also print a star out to trace, or free hand it. I drew the moon, panda, and bamboo freehand and cut out the felt pieces. If you are making different shapes and animals, just do the same. Trace or freehand and cut them out!

84.JPG
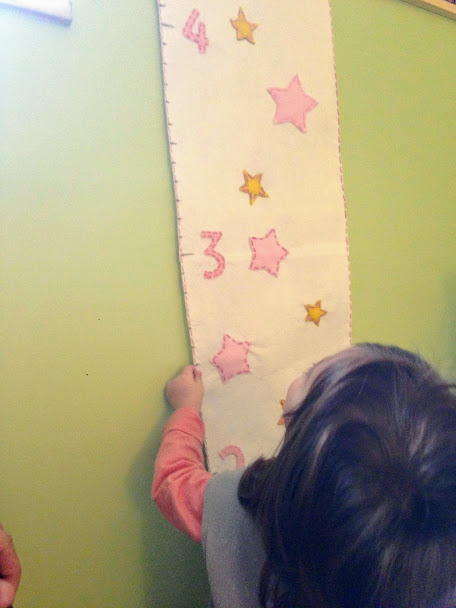
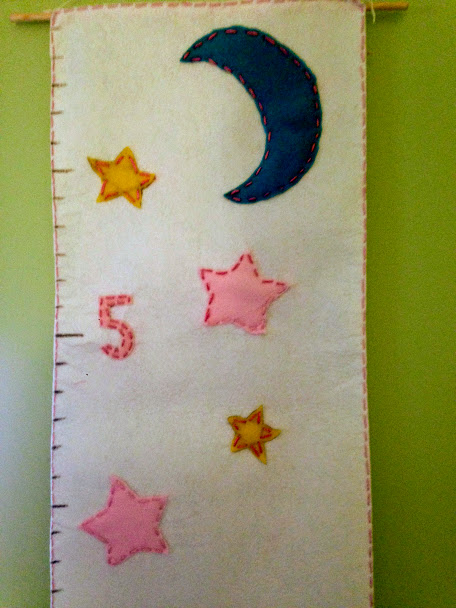
Next, I used a measuring tape and ruler to draw the lines for each inch. I made each foot line a bit longer, and the 1/2 foot a little longer too. For the numbers, I decided to use stencils. Again, you could free hand or trace. I used the stencils on the pink felt fabric 85
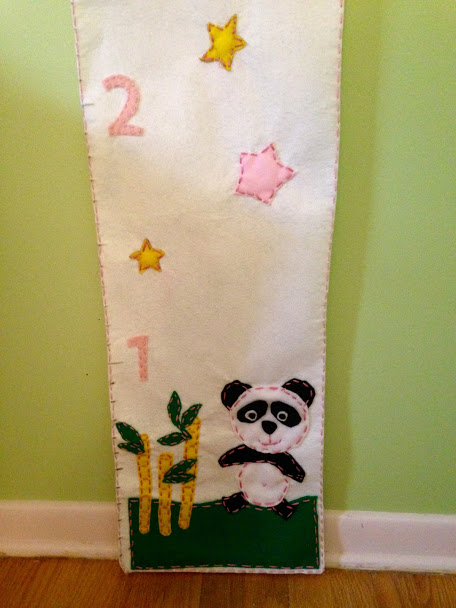
squares and cut them out.

I used embroidery floss since I was doing this all by hand. If you have a sewing machine you would approach this differently, and it certainly wouldn’t take as long. I decided to work on it while I was watching television in the evening or when my girl was napping.

I simply put the embroidery floss through the needle and did a double knot. I brought the floss through the back first, and looped it in and out of the the numbers, along the outside. I did this for each number. I placed the moon next, and did the same thing, when finished I cut the floss and knotted it off (make sure you do this on the back of the felt so you don’t see the knots). I did this for all of the shapes and animals on the height chart.

The scene with the panda on the bottom of the height chart took more time due to the detailed sewing. I had to hot glue the eyes because the layers made it too thick to get through. I sewed an x on his belly button.  I had a lot of extra thread and wanted to do a border, so I sewed the border all the way around. This is definitely a keepsake.

86.JPGThis can be used for many different designs. You could sew on your child’s name, different animals, shapes, and so on.

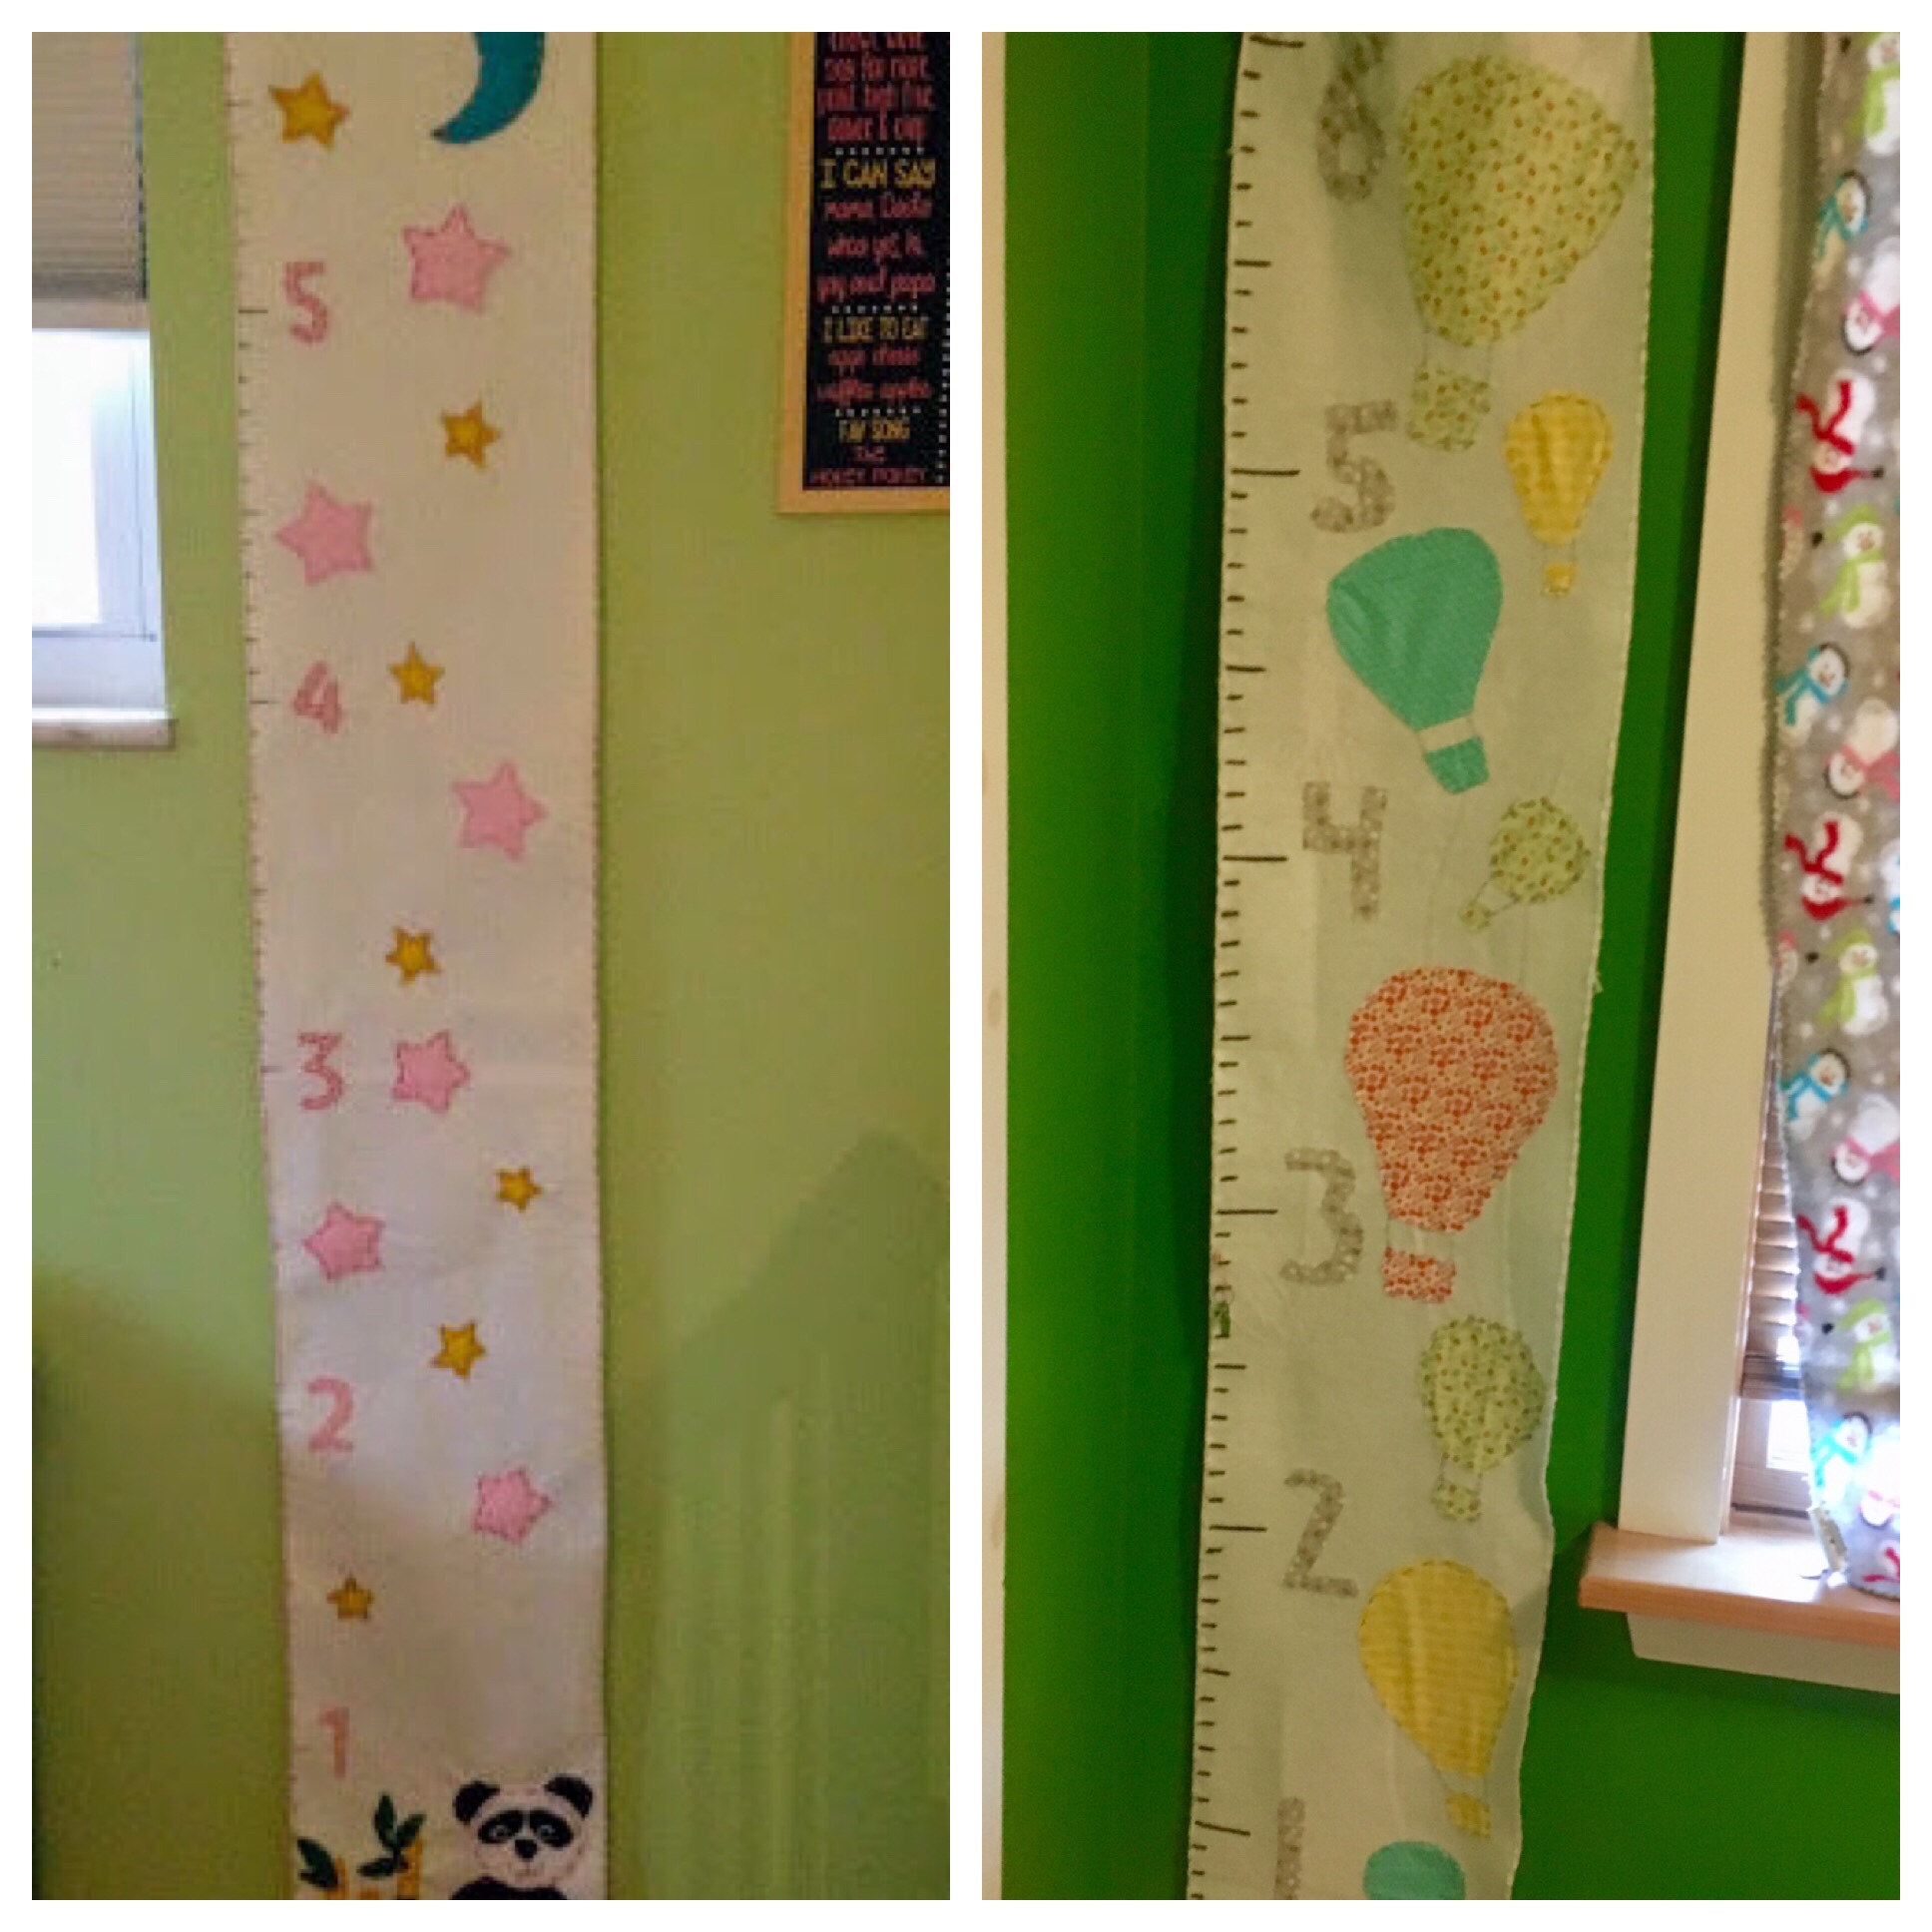
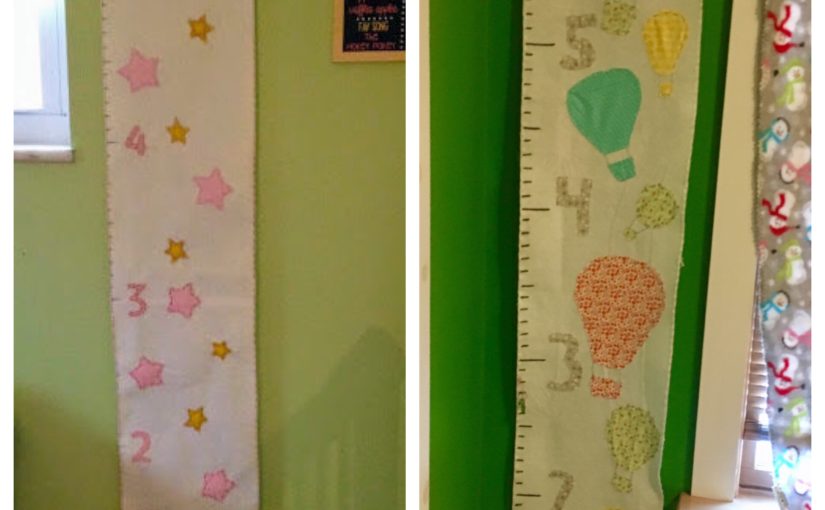
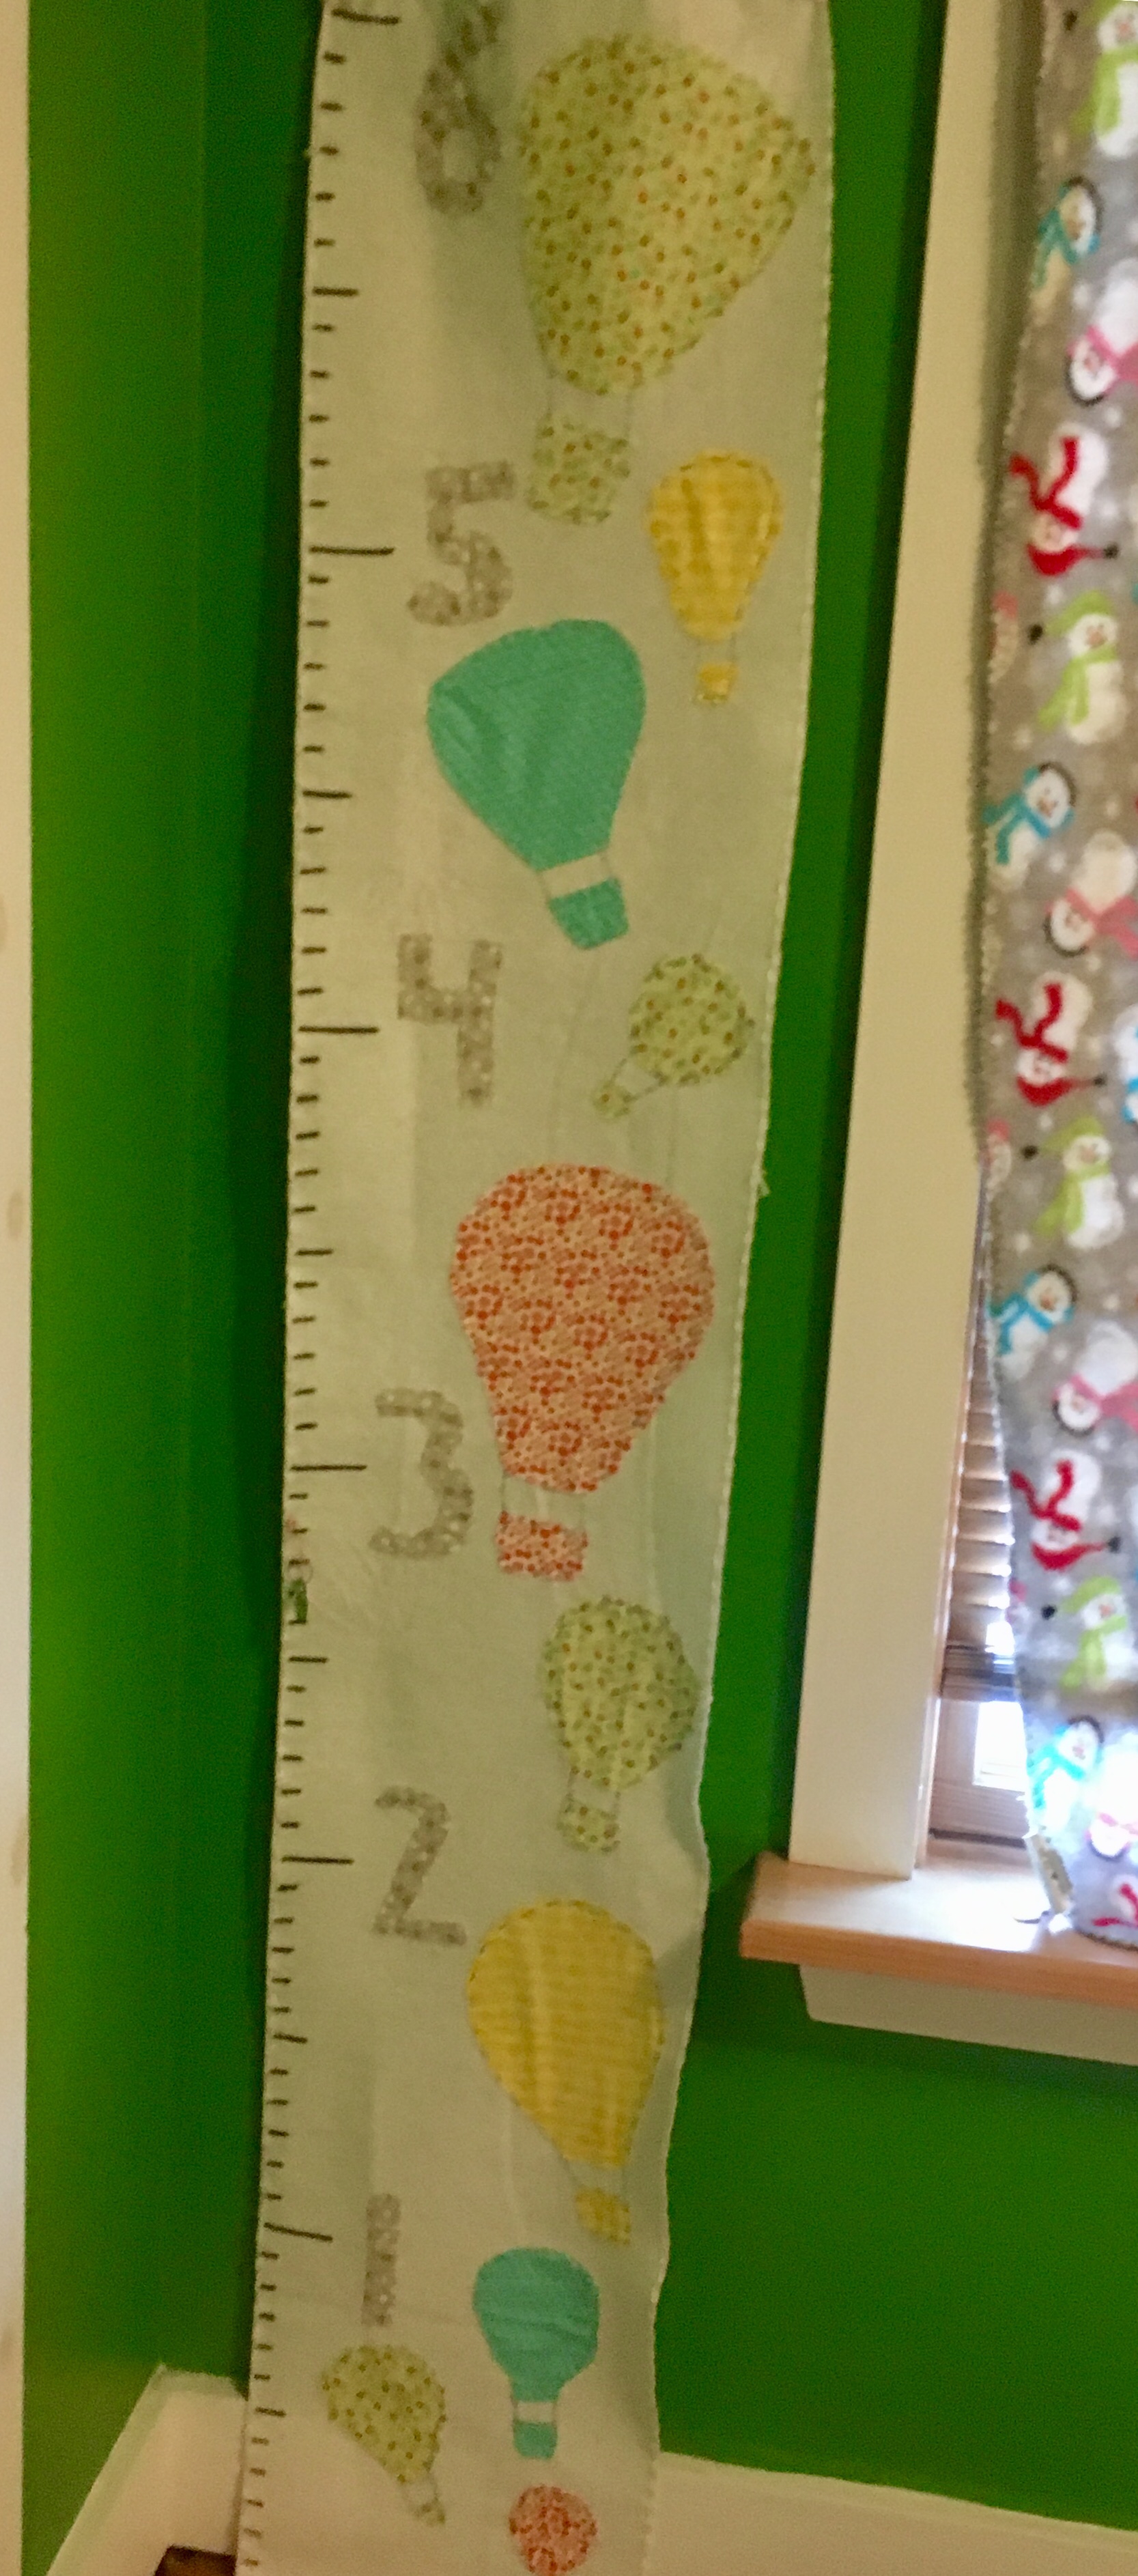
Here is a pic of the hot air balloon height chart I made for my sister:


As for recording their height, you can write the date and age for each child right on the chart, or you could use tags like these 86.JPGwith safety pins. This will allow you to use this again, or use for more than one child.

This is a great gift for a baby shower, birthday, or to make your own child.

FollowFacebookpinterestrssyoutube
ShareFacebookpinterest

Valentine’s Heart Suncatcher (SO EASY)!

I’ve had contact paper sitting around for quite a while and decided it was time to use it! I had a snow (ice) day today and wanted a fun valentine’s craft for my toddler.

You will need:

-tissue paper in different colors

-contact paper

-tape

-glitter

-construction paper

I used pink construction paper to cut out the heart. I simply folded the paper in half and cut out the heart shape.

1       2

Next, I cut out a smaller heart from the middle of the heart. This made a nice border.

1

I cut out contact paper and put the heart on top of it. To get the contact paper to stay still and smooth, I put tape on the edges to keep it down.

1   2

Here comes the fun part! Decorate! The heart is on the sticky contact paper, so anything will stick to it. My little girl used glitter and cut up pieces of tissue paper.

1.jpg

I underestimated how much she would love using glitter!

2.jpg

If she had a choice she would’ve just used glitter…all of it!

3.jpg

She LOVED this activity, so much that we made a few suncatchers! They make great presents for family 🙂

1.jpg


When your child is done decorating (or they’ve used all of the glitter), put another sheet of contact paper (sticky side down) on top of the heart. Cut out the extra contact paper around your heart.

Then you are done! Hang it in a window that gets sunlight! You can hole punch and put a string on it or use contact paper to put it on the window. We will definitely make this again as she loved it soooo much! It’s a great craft idea for any age!

Since tomorrow is Valentine’s day and it’s currently snowing outside, the sky is cloudy. I couldn’t get a great picture of the finished product, but will post the pictures anyways. Keep in mind that the glitter is colored and will shine brightly when the sun is out but today it is cloudy!

1   2

FollowFacebookpinterestrssyoutube
ShareFacebookpinterest

Homemade Hot Chocolate, Told by a Toddler

86

Mmmmm…this is the best hot chocolate I’ve ever had! It definitely doesn’t taste like that stuff from a packet!

Mommy used these ingredients:

  • 2 cups of whole milk
  • 4 oz ( almost 1 cup of bittersweet chocolate chips)
  • optional: 2 tbsp. of sugar

Mommy made it from scratch and here is what she did:

First, she put 2 cups of whole milk in a saucepan and heated it up on medium on the stove.

She didn’t let it boil, she waited until the little bubbles showed up around the outer circle of the milk in the pan.

While this was going on she poured the bittersweet chocolate chips, 1 cup into a  bowl and microwaved it in 30 second intervals (oh I know a fancy word). She mixed it in between each time until it was all melted.

Next she turned off the stove when the little bubbles formed around the outside of the milk and mixed in the chocolate with a whisk.

Yumm….

85

This is so good and chocolatey. Very rich and thick! More! More I say! How about some whipped cream or marshmallows? Pleasssse?

84

When we were done I wanted more but mommy put the rest in a large mug in the refrigerator for tomorrow.

83

I can’t wait!


FollowFacebookpinterestrssyoutube
ShareFacebookpinterest

A Family of Superheroes

Does your child like to play make believe? Ours is just getting into it at almost 2 years old. How do I know? We went to story time at the library last week and one of the songs, “The Ants Go Marching” includes pretending to pick up sticks. She was great at pretending to pick them up and continues to do it at home! She loves playing with tea and pretending to have picnics and play in the “sand” inside.

We’ve been stuck inside for a few days and the dreaded day I am to return to work from my child rearing leave keeps getting delayed due to snow days (hey, I’m okay with that). So what do we do? We pretend we are a family of superheroes!

85

My husband and I used blankets, but knew they were too long and wouldn’t stay on our little girl. I did a quick google search and found out how to make a t-shirt no sew cape for Madison. All you need to do is take an old adult t-shirt (that you don’t want anymore) and cut it a few inches under the collar in the front. Continue cutting around to the back a few inches from the collar and down the back (the sleeves get cut off). Do the same on both sides and you will have a cape that simply slips over your child’s head.

84.JPG


If you want to be fancy you can add a design on the back with fabric markers, iron on images and so on. We happened to have an image on the shirt already.

We pretended that the snow was piling up in her room and we had to save all of her stuffed animals by putting them on the couch in the living room. She loved racing down the hall while we shouted, “Fly to the room, save the stuffies! Super Maddy saves the day!” Singing also helps and humming superhero ballads. She loved this so much we did it multiple times today and putting that cape together took about one minute (as you an tell by my hasty cutting).

86

It’s definitely priceless to see your toddler stretch her arms out in front of her in the flying pose while yelling, “Save the stuffies!” Start a family of superheroes today!

FollowFacebookpinterestrssyoutube
ShareFacebookpinterest

Tv tv everywhere…

This evening my husband, my two and four year old children, and myself went to a nice restaurant together. Actually, my favorite restaurant, and the one we had our Wedding rehearsal at 7 years ago. I was nervous that our children would become bored and loud so I brought a coloring book, crayons and a couple stickers. Unlike many restaurants, this one is quiet, in an old farmhouse, and has classical music on and no televisions. You are meant to enjoy one another’s company with local fantastic fresh food. There is no overstimulation with many TVs, too loud music, or too many distractions. The food may take longer to be made, but that’s because it’s fresh. The bread comes out in the clay pot it was cooked in, it’s amazing!

But back to my story, a couple comes in with their 3-4 year old son who they sit in a chair. Immediately, a large iPad is placed in front of him and we can hear blippi playing. If you don’t know the show Blippi, you should check it out, as it is a real person doing real things in the real world (it’s my sons favorite show when I do let him watch anything). Luckily, my kids weren’t too distracted, I thought my son might start yelling blippi, but he went back to eating his bread. Next, the sons father went on his phone for the entire dinner. I had missed this as I was paying attention to my family, however my husband pointed out that he was on his phone the entire time.

Through the entire dinner, the family next to us had the iPad or whatever device it was placed in front of him and could hardly see his parents. No wonder this kid was crawling under the table screaming periodically and trying to run around the restaurant! His parents weren’t paying any attention to him except to reference the show he was watching. The mother even said look at those children behaving over there that is how you should behave. I felt badly for this child because his parents were blocking him out by trying to turn him into the zoning zombie to “enjoy” their dinner. Which in this case, was the father on his phone the whole time anyways.

I see children everywhere I go on their parents phones or iPads zoning out instead of interacting, developing relationships, communicating and learning. Even at the food stores, kids are plopped into a cart and given a phone to play with instead of interacting and watching interactions taking place. The children are learning how to behave from the show instead of reality. I’m guilty of letting my children watch tv, I think I might lose my sanity sometimes if I tried to make a decent dinner with two toddlers trying to help and almost burning themselves or cutting themselves every couple seconds. Granted sometimes they play with their puzzles and legos and such and it’s great. Even better, they play together a lot more these days. I do have them bake with me frequently since they love helping (toddlers love helping, even if it makes more of a mess!).

Sometimes I’m guilty of trying to catch a couple more z’s by letting my daughter come into my bed in the morning to watch a pbs show or two. This may let me sleep a couple minutes longer; however I pay the price when it’s time to turn it off. No matter how many times I’ve told her only one show and then breakfast, she throws a mini tantrum or full tantrum and just wants to watch more. This sets a bad tone for the whole day and I immediately regret letting her watch a show.

Another thing that bothers me is when parents post online what type of device they should get their 4 or 5 year old to watch shows before bed or in bed or for restaurants car rides and so on. Children should be interacting with real people, especially their family to build the bonds for their lifetime instead of glued to a screen. If you need to catch your breath once and a whole, I totally get it! Just remember, when you let your daughter watch a show in your bed or take that iPhone out at the store, your child makes that connection that you let him or her do this so they will expect it again and will be persistent. One thing I’ve definitely learned with a toddler is that if you think I’ll pick my battles and let them do something once, they will expect it again and again. More on positive discipline in the future, but that’s all for now!

Of course this is all just my opinion, and everyone has their own opinions, this is America after all, but next time think about actually having a discussion with your kids over dinner instead of bringing out the constant “entertainment.”

FollowFacebookpinterestrssyoutube
ShareFacebookpinterest

How to Make an Owl Costume, It’s a Hoot!

1.jpg

What a hoot! I made this owl costume for my toddler girl for Halloween. This costume can be adapted for any age! Not only is it soooo cute, but it’s also soft, comfortable, and easy to make!

Let’s start with the materials. If you are making this for a larger toddler, child, or adult, you will need more material. You will need:

  • Felt, 3 or 4 colors or more, I ordered half a yard of each and it was more than enough
  • Hot glue and hot glue gun (I got a cheaper version at Michaels and it worked great!)
  • Scissors
  • A piece of cardstock or thicker paper

Let’s start with the cape (aka wings).

14.JPG

I didn’t have cardstock so I used a flier in the mail for my pattern. I simply drew a teardrop design and cut it out. To make all of the feathers for the owl, you must trace the teardrop design over and over.

13

I ended up tracing over 80 feathers in each color. I did this because I wanted to do wings (the cape) and put feathers on the front of the sweatshirt (optional). Trace the feathers in each color and cut them out.

12.JPG

I used 3 colors, but I recommend 4. If you have 4 feathers it will be easier to vary the pattern the feathers are glued in, so that there is no repetitions. 3 colors definitely works though.

Next, measure the wingspan of your toddler (or adult). You can use a measuring tape or eyeball it with the fabric like I did. I held up the white felt with my daughter’s arms outstretched and make a mark from fingertip to fingertip. You can also adjust and cut the cape when you are finished, so if you are unsure make it a little larger.

Next, warm up your glue gun and choose a pattern for your feathers and glue them on. I put glue on the top half of the feather, so that when I did the next row I could snuggle a feather underneath the bottom of the feather. Check out the picture to see what I’m talking about.

9.JPG

The feathers overlap so don’t put glue on the bottom half of your feathers. You’ll notice the first row I did very straight, as I was working I realized I wanted to tilt feathers a bit to the side so they looked more natural. Continue gluing until you have filled up the wings!

8.JPG

Beautiful! Now it’s time to add a tie to the top sides. You want the wings to be able to tie around your toddler’s neck. I wanted something that wasn’t tight, would hang down, and very comfy, so I used felt. I cut some extra pieces of felt. I simply used my scissors and in the upper right and left hand corner of the large piece of white felt (that the feathers are glued to), I made a hole with the scissor. I tied the shoelace type felt piece on each and wallah! Then I could tie the cape together.

The cape is done. I happened to have an owl hat. If you don’t have a hat, you can make one. If you like to crochet, then simply google and find a video and pattern. If you want to make the hat from felt (which is easier), then simply google “diy toddler owl felt hat.”

Here is where options come into place. You can do the wings and hat and leave it at that. I bought a pink sweatshirt and pants at walmart for $10 for the costume, but you can use any clothes you like.

4.jpg

This is a picture without doing the feathers on the front of the sweatshirt. This is very cute and if it’s cold weather in your area, will work great with a winter coat.

I went ahead and did the front of the sweatshirt, but as you can see in the picture below, ended up covering it anyway because of the cold weather. The cape (wings) can easily go over a large winter coat.

3

If you want to cover the front of a shirt, then simply cut out more feathers. I wanted to reuse my sweatshirt, so I didn’t glue the feathers to the sweatshirt. I measured the front of the shirt, used a large piece of white felt and glued feathers to the felt (just like the cape). Next, I put it on top of the shirt and sewed it on in the corners. This way I can simply cut the thread and take the felt off and use the sweatshirt again. If you don’t want to use the shirt again, gluing is easier.

2

Happy Halloween! I hope you have a hoot of a time!!! 

FollowFacebookpinterestrssyoutube
ShareFacebookpinterest

Easy Peasy Paint Present

If you have a special occasion coming up and are looking for a gift from your baby, toddler, or child, I have an easy peasy present idea!

Paint…UGH PAINT! The word can invoke fear in any parent, except this is mess free! Okay, almost mess free.

My mom’s birthday was coming up and I wanted to give her something from her granddaughter. I searched online and found this simple craft. I will admit I improvised because I was missing some of the items and I will mention what worked & what didn’t as I go through the steps.

First, gather your materials. You will need:

-Paint in various colors (I used finger paint)

-cardstock (I used regular paper but it didn’t work so well)

-gallon ziplock bag

-picture frame (if you choose to use it as a gift)

-Heart stencil (or you could just draw it yourself)

-scissor

Next, put your choice of colors on your cardstock paper. Note: I didn’t use cardstock and it ripped easily and you could see through some of it. SO USE CARDSTOCK paper or thicker paper. If you are in a pinch you can use regular paper but you will have to be very gentle with it.

a

YES, I USED WAYYYYY TOO MUCH PAINT!!! My paint came jumping out of the bottle super fast, I’m really not sure how that happened (haha). It takes longer to dry with all that paint. It took days for it to dry when it should’ve taken overnight.

Take your cardstock paper and put it in a gallon sized ziplock. This insures your project will be mostly mess free! If you need to cut down the paper a little, go for it.b

Now it’s time for fun!!! Let your child smear the paint!

c

Your child will love smearing the paint and you will love that it’s mess free!

d

When you like the smeared look your child has made, carefully take it out of the bag and leave it in a safe place to dry.

e

Look at all of that paint!!! TOOO MUCH! If you put way too much on like me, you can either dab it off with a paper towel or give it days to dry.

Here’s where you can vary the project. I drew a heart on a new piece of paper (use cardstock) and cut it out. You can pick any shape you like! If you are super crafty you could even cut out a name or shape of an animal. Cut down the paper to whatever size you would like it to fit. I cut it down to fit a frame. However, you could also make this into wall art, a card, or anything you can imagine!

i.JPG

Place the cut out on top of your painted paper. I moved mine around to find which colors I wanted to show. Cut the back painted piece to fit the frame. If you would like to write a message on the paper, go for it! Put in it a frame or glue and fold for a card!

j

Easy Peasy Paint Present! Note: I used regular paper and you can see that there are places you can see through the top paper. I highly recommend cardstock or thicker paper.

This project is perfect for any occasion!!! This could be done for birthdays, anniversaries, and holidays.

I’m thinking green colors with a Christmas tree or wreath cutout for Christmas! You could also use the paint bag trick for ornaments. Instead of using a top layer, just let the painted paper dry, cut out a tree shape, hole punch and use a ribbon and wallah!

box celebrate celebration christmas
Photo by Pixabay on Pexels.com
FollowFacebookpinterestrssyoutube
ShareFacebookpinterest

Twinkle Twinkle

Hello! Guest writer here! I am the blog founder’s twin sister, Jessie, and I’m here to share my decorations and ideas from my little girl Madison’s first birthday party. You can use these decoration ideas for anything from baby showers, birthday parties, to graduation parties depending on what your theme is. If your theme involves stars, pink, or gold then you are in luck!

party
The dessert table before the desserts!

Let’s first start with the pink and gold theme. All of the tablecloths, plates, napkins, and containers are from Walmart. I wanted a good deal, but also wanted it to look good and found the best deals there. Michaels was another store I frequented for ideas and supplies. All of the numbers, letters, and banner supplies were purchased there.

Okay, before we dive too deep into how each decoration was made, let’s check out some pictures!

party6
The birthday girl’s chair!

All of the banner pennants in this article were purchased from Michaels. The letters on all of the banners are stick on letters from Michaels too. However, they don’t stay on the thick fabric of the pennants so need to be glued on. I used a hole puncher to make 2 holes at the top of each pennant and put string through them. I purchased some glitter foam sheets from Walmart to make the stars and used a cookie cutter to trace them.

party14
The happy birthday banner hanging above the food table.

Again, I used the materials I purchased to make this banner and it was fairly easy because everything was cut out besides the stars. This banner was definitely worth the time to put it together, it was super cute and personalized to her party. I moved the pictures that were originally above the banner and replaced them with picture frames of Madison.

party10

Balloons were purchased at the dollar store. I used the cork board from the kitchen to put pictures of her from the first year-a simple and affordable decoration. The 12 month banner was also made from the pennants. I simply traced the star cookie cutter and cut out stars instead of using the pennant shape. If you don’t have a cookie cutter you could print out a star from a computer and trace it! I found little pink clothespins at Michaels and hot glued them to the stars so the pictures could be added below the banner. This could also be a cute idea for other types of parties. You could write someone’s name and have pictures of them beneath it or for graduation with pictures from each school year. The options are endless!

party18
Again, I cut out stars and added the stick on letters with glue. These stars were cut from glitter foam paper.
party7
Stars, stars, everywhere!

I made the twinkle banner, the stars hanging from the chandelier and the star wands on the table that I used as party favors and a centerpiece. For the stars hanging from the light, I cut out stars from the foam paper and attached it to felt pink cloth I had. I cut the outline of the pink cloth around the gold star so it looks like an outline for the stars.

As for the wands, I purchased gold straws from Michaels and they were very sturdy made from cardboard and didn’t bend. I decided to use the foam paper to cut out two stars and stick them together around the top of the straw. I also included 2 cut pieces of ribbon on the wand. I put one on each side of the star and pushed the stars together (they have sticky backs, but you could easily glue them). They were a hit!

party4
Yum! I made chocolate covered pretzels with pink chocolate melts and gold sprinkles. I also made the sugar cookies with star and number one cookie cutters!
party9
No, I didn’t make this beautiful cake. However, I thought the stars sticking out of the top were so cute and easy to make! They simply used some wire and cut out stars they hot glued to the wire! 
party11
Pictures, pictures, everywhere! 
party13
Super cheap decoration-pictures on string! I used pink string and taped the pictures. For a twinkle twinkle theme you could also use string lights around the house for decorations!
party17
A giant number one made with pictures!

There are great tutorials online about making the number one with pictures for your baby’s first birthday. Most people recommend using cardboard from a large appliance box. I didn’t have any available, so used regular printer paper. I simply cut pictures and fit them on the paper with glue, then laminated the paper. I am a teacher so I happen to have a small scotch laminator at home that worked perfectly. I lined up all the papers to make the number one and adhered it to the wall with tape!

party16

party20
You might be wondering about her outfit and this wonderful sign. I’m sorry to tell you that I didn’t make them. A local woman made them both for me. 
party2
My sister (aka the blog writer) made her beautiful dress and headband. Hopefully there will be a post on that coming up soon! Yes, Madison wanted the cake.

If you are a very busy person with many kids, making all of these decorations might be too time consuming. However, even making a small amount of them is very rewarding. It not only adds a personal touch, but can be used as a keepsake or for future parties!

party19
Thank you for visiting this blog and YOU can make these decorations too with a little time and effort!
FollowFacebookpinterestrssyoutube
ShareFacebookpinterest

Another day with Exhausted toddler Moms

Like most toddlers, my daughter would try every tactic to avoid sleep. “I have to go potty.” “I need a drink.” “I have a question.” “One more book,” or “I’m scared,” “tuck me in” are just a couple examples.

One night after my daughter was yelling several excuses not to go to bed, she started yelling, “I need my socks on!” My husband turned to me in bed and said, “when she’s a teenager I’m going to yell I need my socks on and I have to poop in the middle of the night to wake her up.” I laughed and said, “no you won’t.” But he is someone who definitely will (if he can wake up in the middle of the night to do it). However, sometimes I wonder if this isn’t such an absurd idea.

Today my daughter decided to make snow out of hidden styrofoam in a new Melissa and Doug word game. I was changing my sons diaper and came out to the dinning room to hear, “it’s snowing yay!” One of us was having fun.

I reminded myself that she’s only a toddler and one day I’ll miss her being little and took a deep breath. I told her she will have to clean up this mess. Of course I got the usual, “yes mommy” answer. And as with most times, when it came time to clean she did not want to listen to mommy. (Side note: why do kids always listen to their daddy right away? Is it the deep voice?)

I can imagine going to my grown up daughters home with styrofoam and playing snow but I’m pretty sure she wouldn’t remember and think I’ve gone clinically insane.

It took quite a long time to clean and I’m still finding the little white pieces stuff to everything, not to mention how long it took trying to get them out of her hair!

Just another day with two kiddos under 4! I can’t imagine having 3 or 4 under 4!

As I lay in my bed yearning to take a nap myself, my toddler is yelling I’m hungry! I’m tense waiting for my Son to wake up from the toddler screams of I’m hungry. Just so you know, we went out for breakfast and she ate 4 dippy eggs and 4 pieces of toast and a large glass of milk about an hour ago. She also got out of her converted crib to use the potty and get a stuffed animal already. She also yelled I’m hungry or I want to play! So this tells me she is again avoiding her nap. She doesn’t yet sleep the recommended 12hours at night and is exhausted and cranky when she protests her nap and doesn’t take it. This is how I know she’s not ready to skip the nap yet, I dread the day when I don’t get a free hour to breath (or shower, bathroom, eat, you know the basics).

Toddlers are stubborn negotiators too. Sitting at the table my daughter Frequently states, “if I eat 5 more bites I can have a yogurt,” or a similar statement.

The idea of what it’s worth standing your ground on versus giving in or compromising is literally kicking me in the butt now. At first I would give in and say okay let’s go get a snack or a drink or your stuffed animal and then let my daughter back to bed. Honestly, I’m exhausted emotionally and felt I’d rather not fight about it and if I get it for her she will go to sleep. WRONG! Payback is a bitch. I am now the parent who gives in and she knows it. I’m the weakling who she knows can be manipulated because I’m not consistent at all times. Yes, it is hard because my little bear now tries all tactics to get what she wants and whines and cries and wakes up my son which in turn is another reason I use to give in to the demands. Now I’m trying my best to stand firm and be consistent, but I have a feeling all toddlers love using their newfound skills to get out of nap time and eat less vegetables.

On a side note, she always comes up with something that makes me smile after she’s yelling for a while. She just yelled from her room, “I see a spoon but where’s my food?”

Fast forward 10mins later and she’s finally asleep, my son wakes with poop up his back. After cleaning him up I go to wash my hands and I dive to try and stop him from running into my daughters room. But alas, it’s too late, he has awoken the bear.


Post any of your stories you would like to share below…

FollowFacebookpinterestrssyoutube
ShareFacebookpinterest